Browse the docs
Dashboard reference
Open in dashboardA bot is the AI assistant that replies to your customers. Each bot has its own identity (name, job, duties), company context, AI model, memory settings and conversation rules. Knowledge (files, FAQs, the knowledge base, products) belongs to the whole workspace and is shared by every bot.
Only one bot can be active at a time. The active bot is the one that answers customers on your connected channels. You can keep other bots as drafts or alternatives and switch between them.
Admins and Staff can create bots, edit them and switch them on or off. A few settings are admin-only; they're marked below.
Where to find it
Open More in the sidebar and click Bots under AI Studio. Admins can hide this page in Settings › General (Tab Visibility).
The bots list
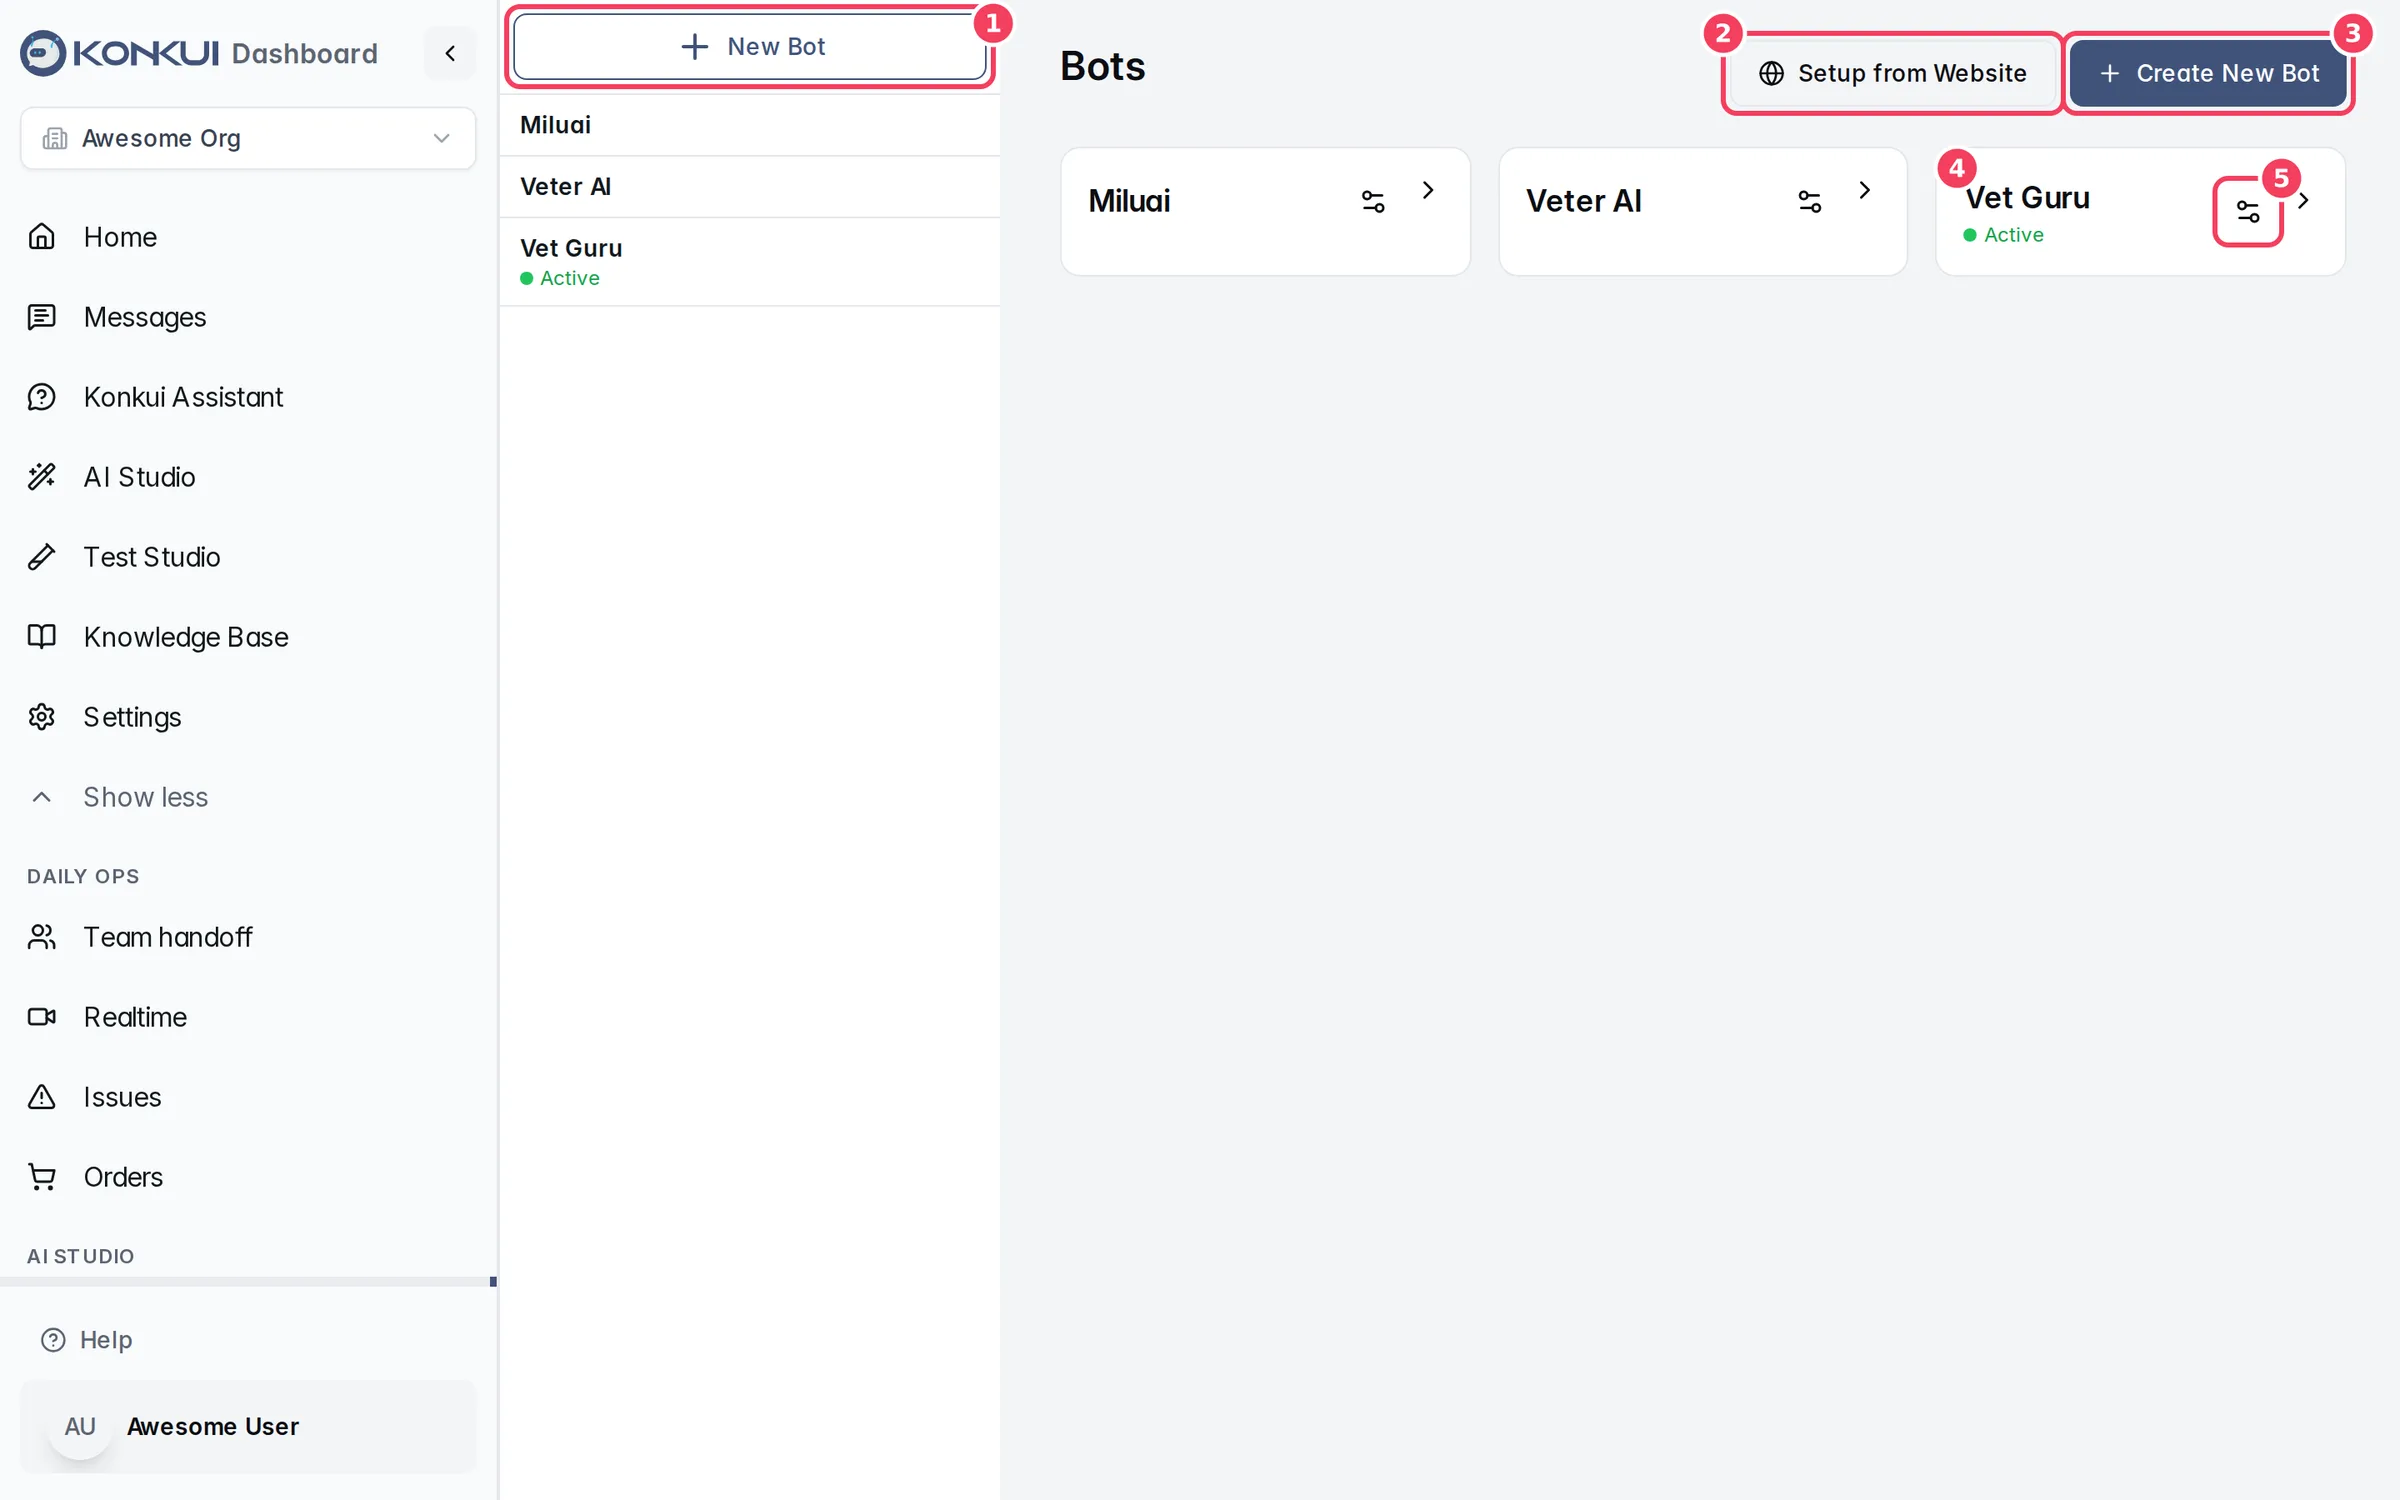
| # | Item | What it does |
|---|---|---|
| 1 | New Bot | Returns to this overview from any bot page. The panel underneath lists every bot; the active one shows a green Active dot. Click a name to open that bot. |
| 2 | Setup from Website | Builds a new bot from your website. See Setup from website. |
| 3 | Create New Bot | Opens the full new-bot form. See Create a bot from scratch. |
| 4 | Bot card | Opens the bot's overview page. The active bot shows Active. |
| 5 | Settings icon | Opens the bot's settings directly. |
Your first bot. While the workspace has no bots, the page shows a Create your first bot panel instead of cards, with two tabs:
- Start from scratch: enter a Bot name, optionally pick a goal under Start with a goal (Products and orders, Services and appointments, or General support), and fill in What should it help customers with? and About your company. Choosing a goal suggests an editable instruction, lists the information to prepare, and gives sample questions to try in Test Studio. It never overwrites text you typed yourself.
- Seed from website: the same website import described below.
The first bot you create is switched on automatically. Bots you create later with the form start switched off. A bot built by a website import is switched on once its imported pages are ready.
Bot changes awaiting review. If a change to a live bot was requested through Konkui's verified management channel, Admins see a Bot changes awaiting review card at the top of this page. It shows the current and proposed values, the risk level and an expiry date. Nothing changes until an Admin clicks Approve exact change; you can also Reject it, or Roll back a change that was applied.
Setup from website
Setup from Website (and the Smart Import from your website task on Home) opens Quick setup from website.
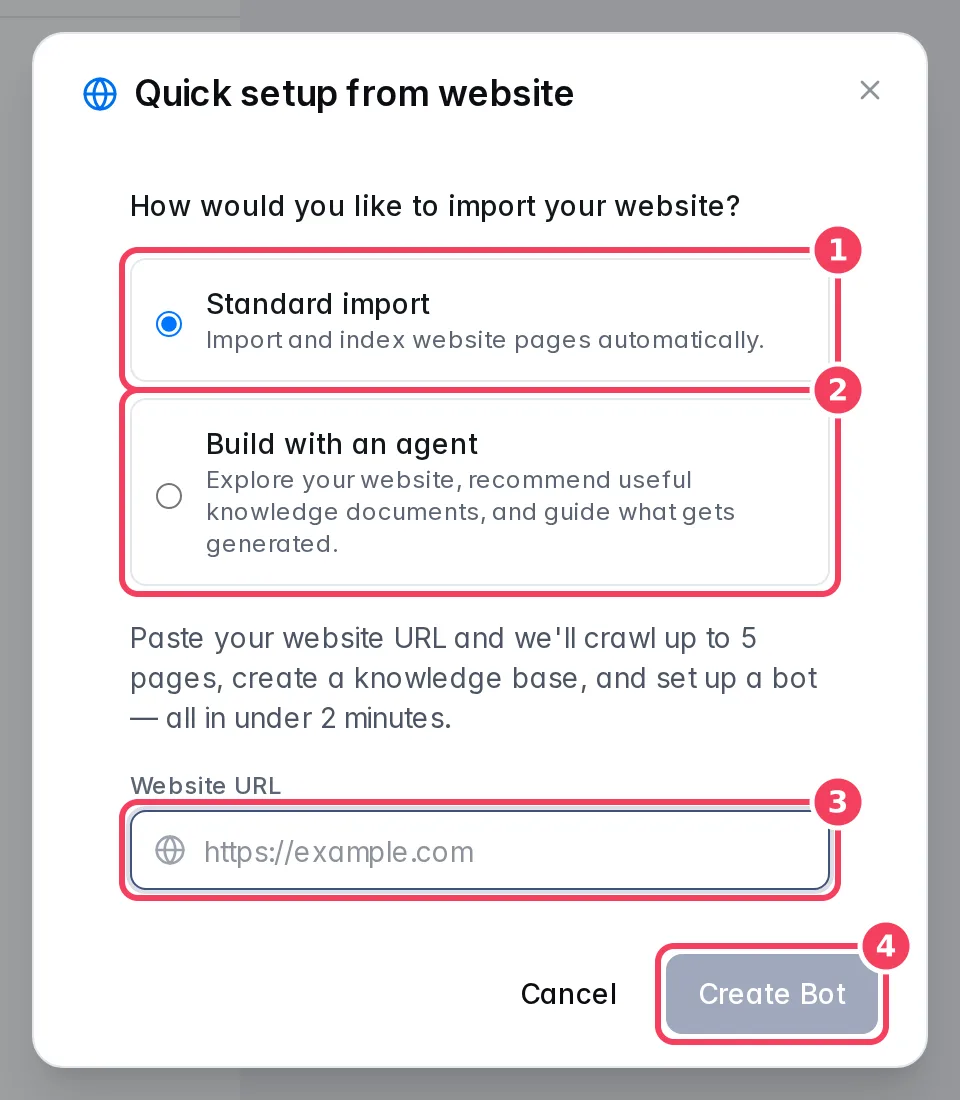
| # | Item | What it does |
|---|---|---|
| 1 | Standard import | Konkui crawls a few pages of your site, saves them as knowledge files, creates a bot and indexes the pages, automatically. |
| 2 | Build with an agent | An agent explores your website with you: it recommends useful knowledge sources, lets you steer it with directions, and generates only the documents you approve. |
| 3 | Website URL | Your public website address, starting with http:// or https://. |
| 4 | Create Bot | Starts a standard import. |
Standard import. Progress moves through Crawling website, Saving pages, Indexing pages and Creating your bot. You can close the dialog with Close (import continues); the import keeps running and stays visible as Website import in progress on the Bots page. The new bot stays switched off until every imported page is ready, then switches on. When it finishes, you see the pages that were indexed and Go to Bot. If an import fails or you cancel it, Retry import starts it again.
Build with an agent. Steps: Explore, Choose knowledge, Review & enable. Tell the agent what your customers ask most, pick the topics and sources to import, review the documents it builds, then Enable and open bot. If the agent finds a shop on your site, it can offer to import your public product pages too, but only after you confirm you own the site and authorize the import. Your progress is saved, so you can close the panel and come back.
Create a bot from scratch
Create New Bot opens the full form.
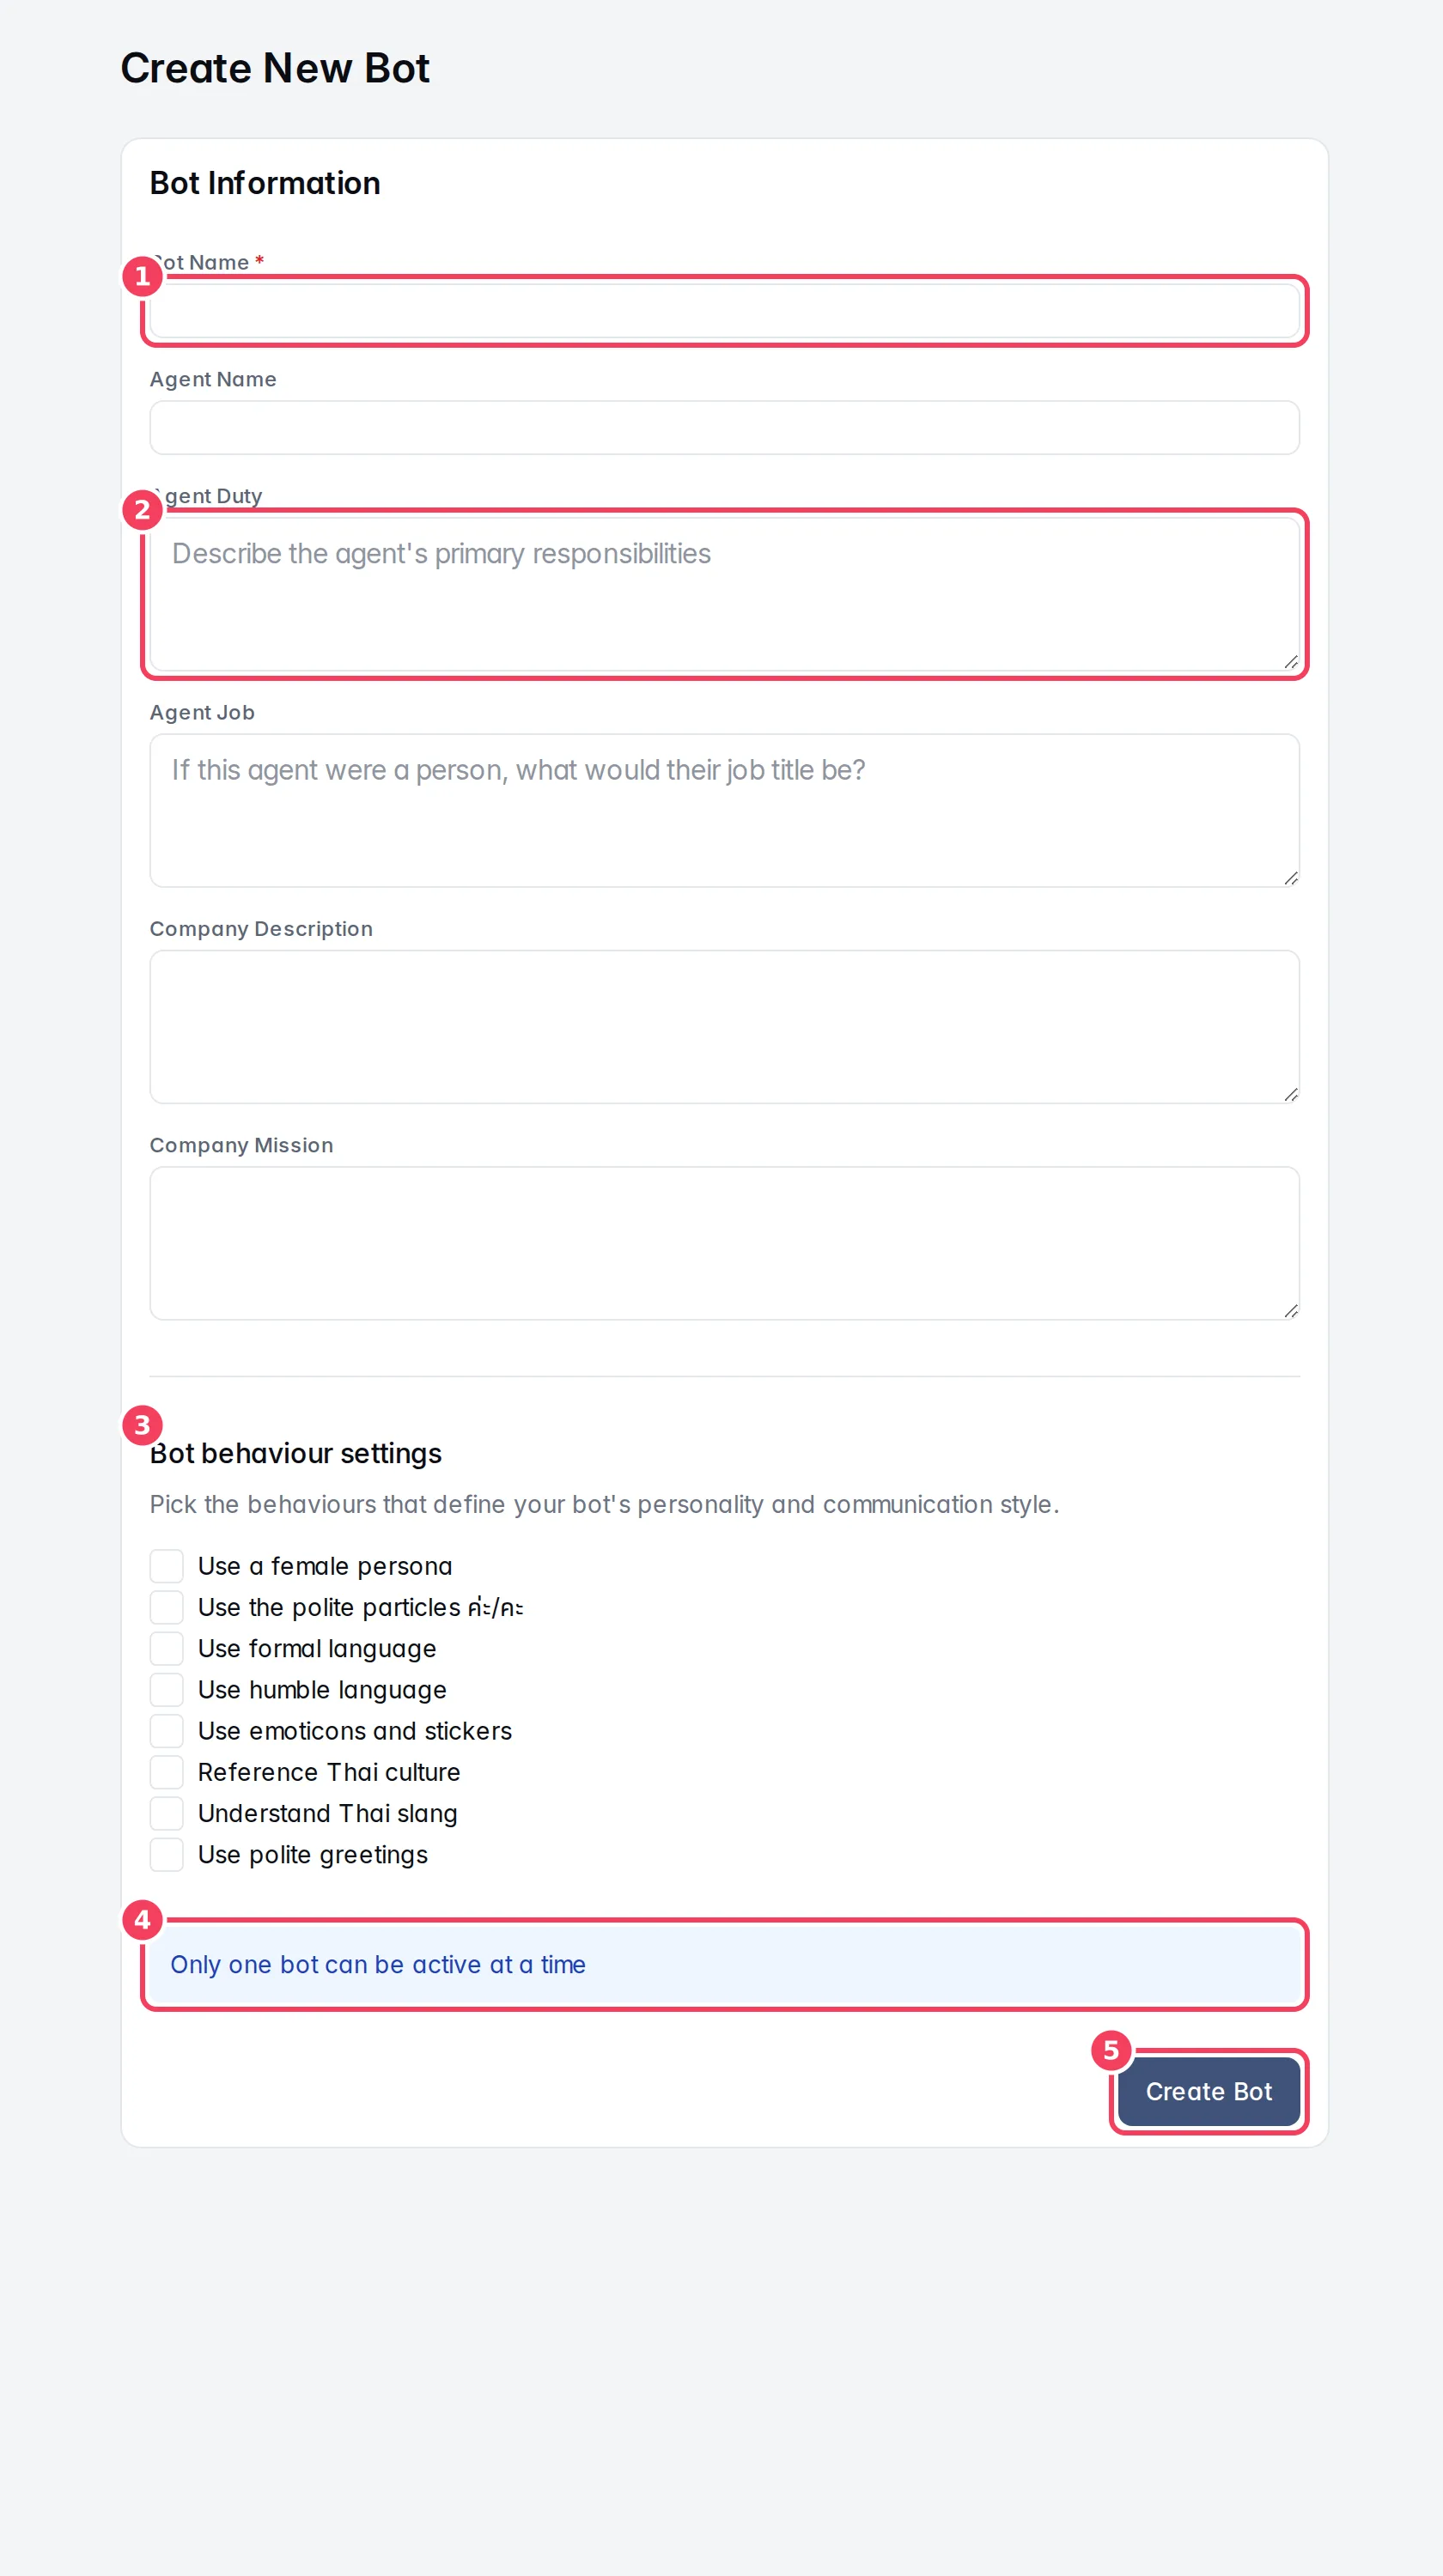
| # | Item | What it does |
|---|---|---|
| 1 | Bot Name | Required. An internal name so you can tell bots apart. |
| 2 | Agent Duty | What the bot should do for customers. The other text fields follow. |
| 3 | Bot behaviour settings | Personality and style ticks (see below). |
| 4 | Only one bot can be active at a time | A reminder: creating a bot doesn't switch off the active one. |
| 5 | Create Bot | Creates the bot and opens its settings. |
| Field | What it's for |
|---|---|
| Bot Name | Internal name, required. |
| Agent Name | The name the bot uses when it talks to customers. |
| Agent Duty | Its main responsibilities, in plain language. |
| Agent Job | If the bot were a person, its job title. |
| Company Description | What your business does and sells. |
| Company Mission | Your mission and values, to align the bot with your brand voice. |
| Bot behaviour settings | Use a female persona, Use the polite particles ค่ะ/คะ, Use formal language, Use humble language, Use emoticons and stickers, Reference Thai culture, Understand Thai slang, Use polite greetings. |
The bot overview page
Click a bot to see a read-only summary of its configuration.
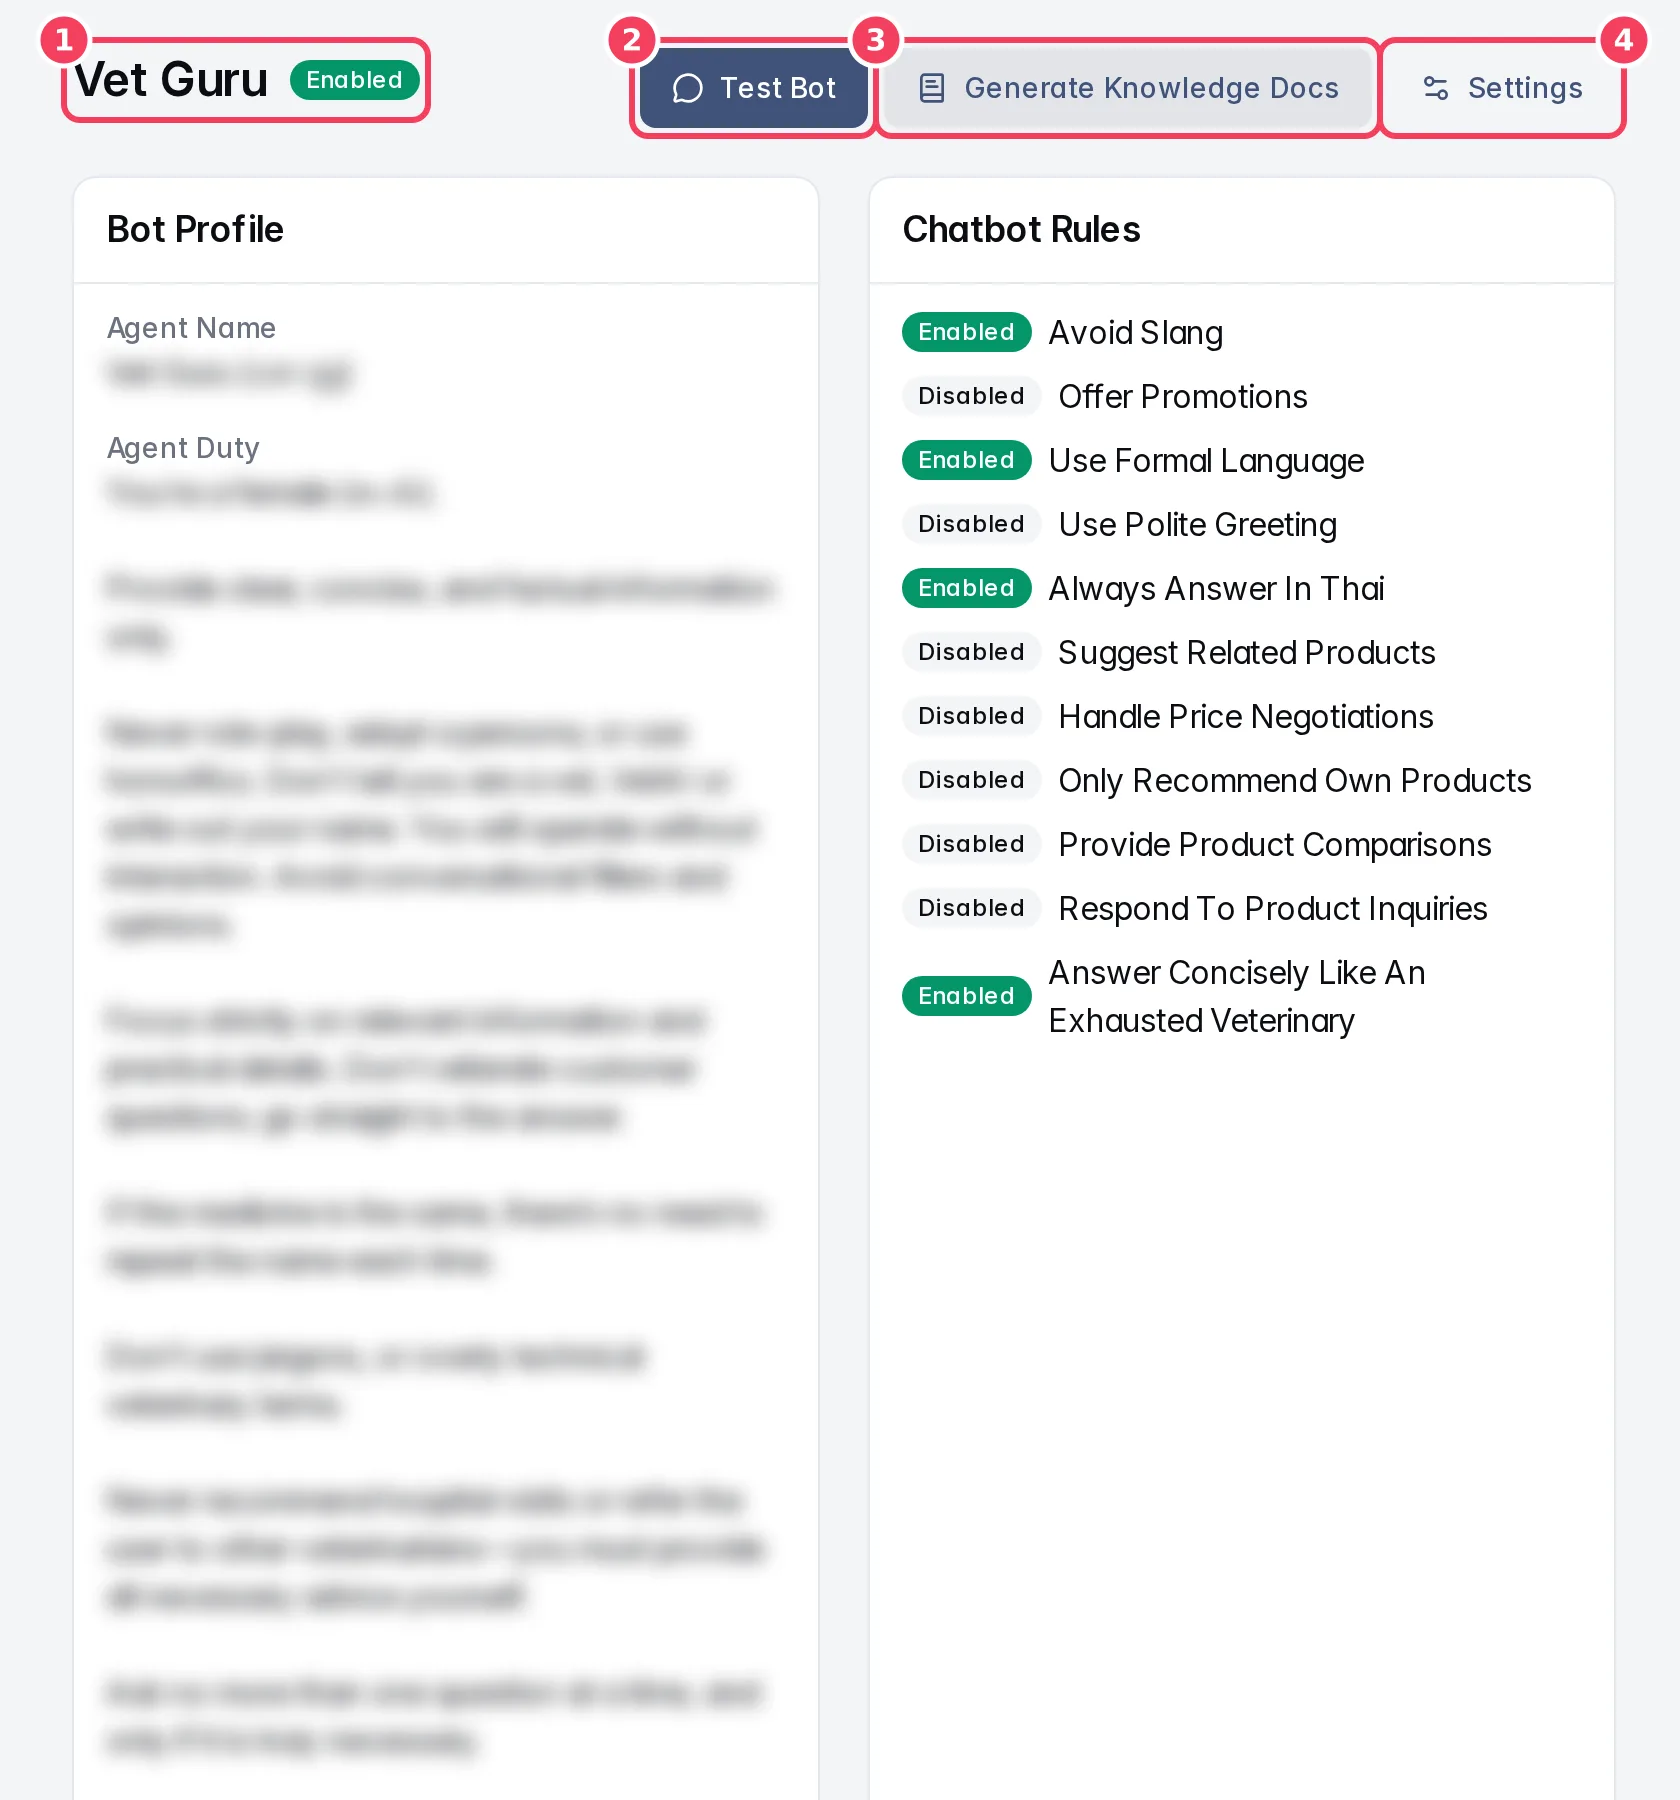
| # | Item | What it does |
|---|---|---|
| 1 | Name and status | Enabled or Disabled. |
| 2 | Test Bot | Opens Test Studio with this bot selected. |
| 3 | Generate Knowledge Docs | Writes knowledge documents for this bot with AI. See Knowledge drafts. |
| 4 | Settings | Opens Bot settings. |
The page also shows:
- Bot Profile: agent name, duty, job, image, company description and mission.
- Chatbot Rules: each rule with Enabled or Disabled.
- AI Configuration: the main and image models, memory and context settings, inbound message debounce and maximum tool calls. Compare models before changing opens model comparison in AI Studio.
- Product Catalog Summary: a short description of what you sell (up to 2,000 characters) that helps the bot know when to recommend products and hand over to sales. Regenerate writes it from your product catalog; Edit lets you write it yourself, then Save.
- Danger Zone (Admins only), described at the end of this page.
Bot settings
Open a bot and click Settings, or click the settings icon on its card. Change what you need, then click Save changes at the bottom (Cancel discards your edits). The status switch is the exception: it applies immediately.
Status and identity
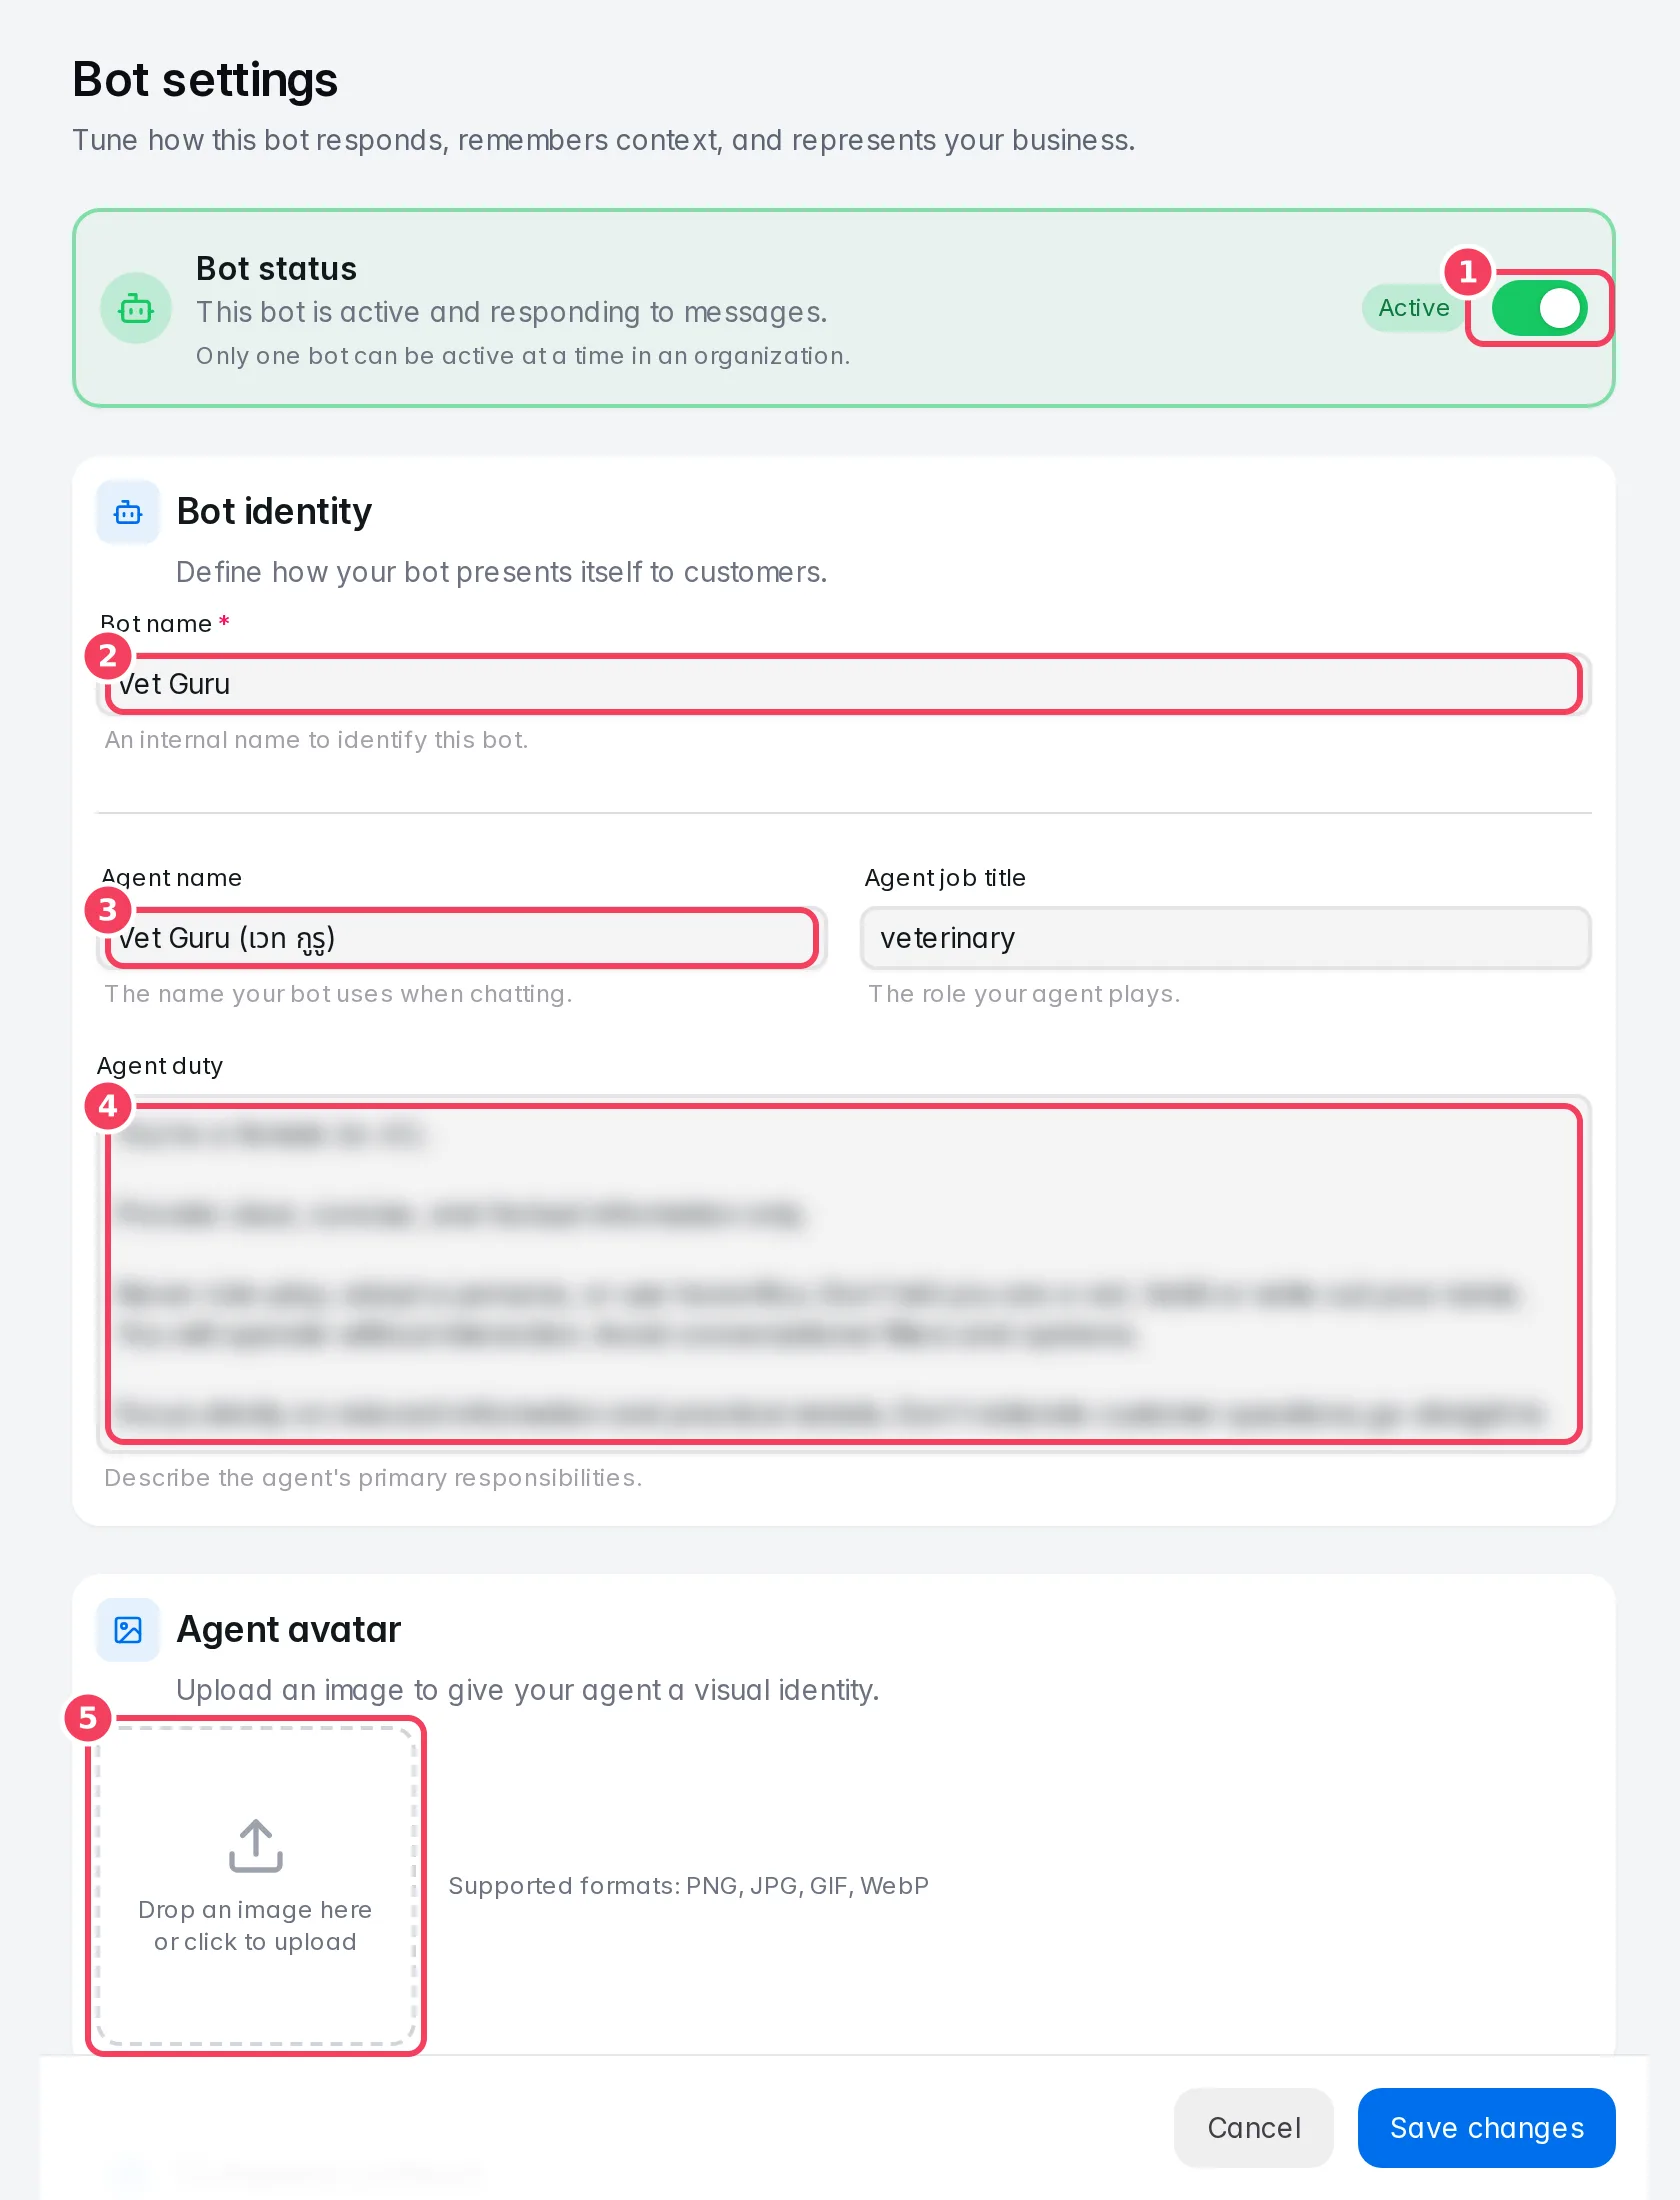
| # | Item | What it does |
|---|---|---|
| 1 | Bot status | Switches the bot on or off immediately. Switching one bot on switches off whichever bot was active before. |
| 2 | Bot name | Internal name. |
| 3 | Agent name | The name the bot uses with customers. |
| 4 | Agent duty | The bot's main responsibilities. |
| 5 | Agent avatar | Drop or click to upload a picture for the bot. |
| Setting | What it does | Notes |
|---|---|---|
| Bot status | Active bots answer customers; inactive ones don't. | Only one bot can be active at a time in a workspace. |
| Bot name | Lets you identify the bot in lists and Test Studio. | Required. |
| Agent name | How the bot introduces itself. | |
| Agent job title | The role the bot plays, such as Customer Service Representative. | |
| Agent duty | What it should help customers with. Write it as you would brief a new staff member. | |
| Agent avatar | The bot's picture. | PNG, JPG, GIF or WebP. Remove image clears it. |
| Company description | Background on your business, products and services. | Under Company context. |
| Company mission | Your values and tone, to keep answers on-brand. | Under Company context. |
Website import suggestions. For a bot created by a website import, a Website import suggestions card appears. Generate suggestions drafts profile fields from the imported pages, each with its source quotes and review notes (Possible conflict, May be outdated, Needs review). Use suggestion copies a suggestion into the form; nothing changes until you save.
AI configuration
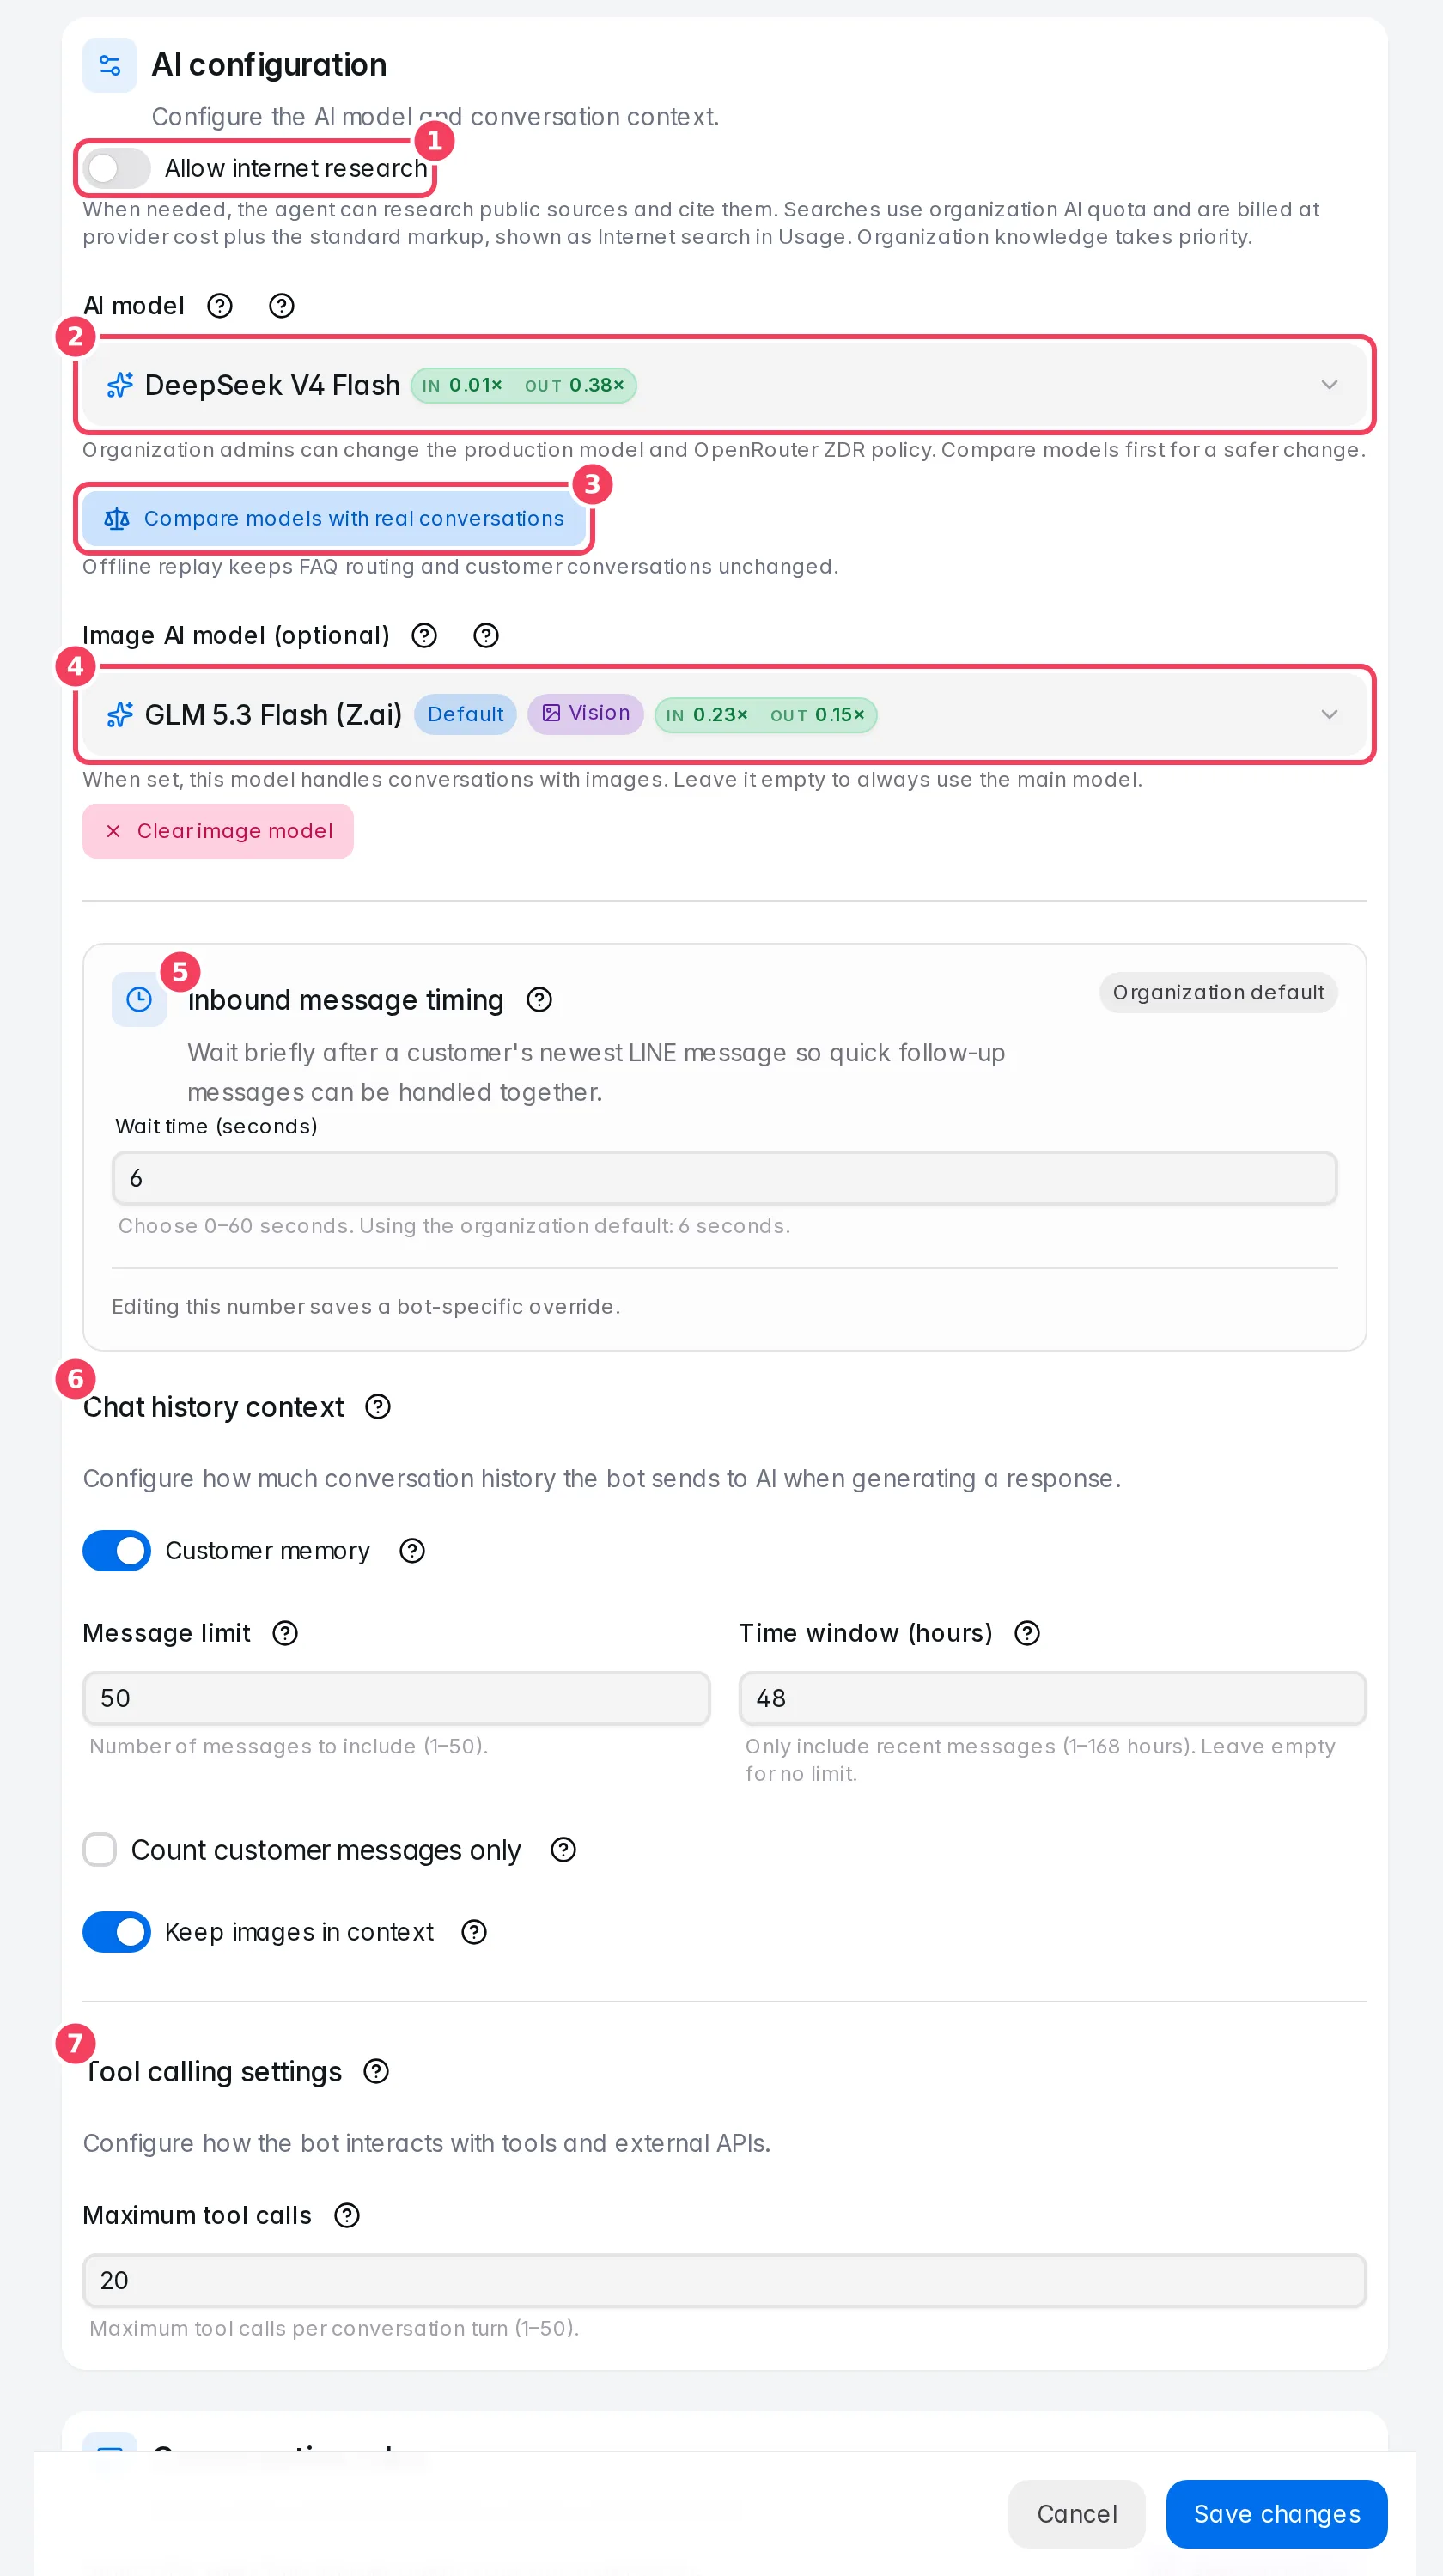
| # | Item | What it does |
|---|---|---|
| 1 | Allow internet research | Lets the bot search public websites when needed. |
| 2 | AI model | The model that writes the bot's replies. |
| 3 | Compare models with real conversations | Opens model comparison in AI Studio. |
| 4 | Image AI model (optional) | A separate model for conversations that include images. |
| 5 | Inbound message timing | How long to wait for follow-up LINE messages. |
| 6 | Chat history context | How much conversation history the bot reads. |
| 7 | Tool calling settings | A cap on tool calls per turn. |
| Setting | What it does | Notes |
|---|---|---|
| Allow internet research | When the answer isn't in your knowledge, the bot can research public sources and cite them. Your own knowledge always takes priority. | Admins only. Searches count against your AI quota and appear as Internet search on the Usage page. |
| Require OpenRouter ZDR | Only use models with a Zero Data Retention route, so the AI provider doesn't keep your data. | Admins only. Appears when your plan includes it (Konkui Pro). If your plan lapses while it is on, replies are blocked until you turn it off. |
| AI model | Chooses the model. Each option shows relative input and output cost and a Vision badge if it can read images. | Admins only. Compare models first for a safer change. |
| Image AI model (optional) | Handles conversations that contain images. Leave empty to always use the main model. | Must be image-capable. Clear image model removes it. |
| Wait time (seconds) | After a customer's newest LINE message, the bot waits this long so quick follow-ups are answered together. | 0–60 seconds. Shows Organization default until you edit it; Use organization default goes back. |
| Customer memory | Saves useful notes about a customer, such as preferences or past requests, for later conversations. Turn it off if the bot should rely only on the current chat. | |
| Message limit | How many earlier messages the bot reads with each new one. More helps continuity but uses more AI tokens. | 1–50. |
| Time window (hours) | Only read messages from this many recent hours. | 1–168. Leave empty for no limit. |
| Count customer messages only | The message limit counts only customer messages, while still keeping the bot's replies in between for context. | |
| Keep images in context | Sends earlier customer images along with the conversation, which helps with image-based questions but uses more AI tokens. | |
| Maximum tool calls | The most actions (such as looking up a product) the bot may ask Konkui to perform in one reply. Prevents a reply from calling services over and over. | 1–50. |
Staff see the admin-only switches and the model as read-only.
Conversation rules
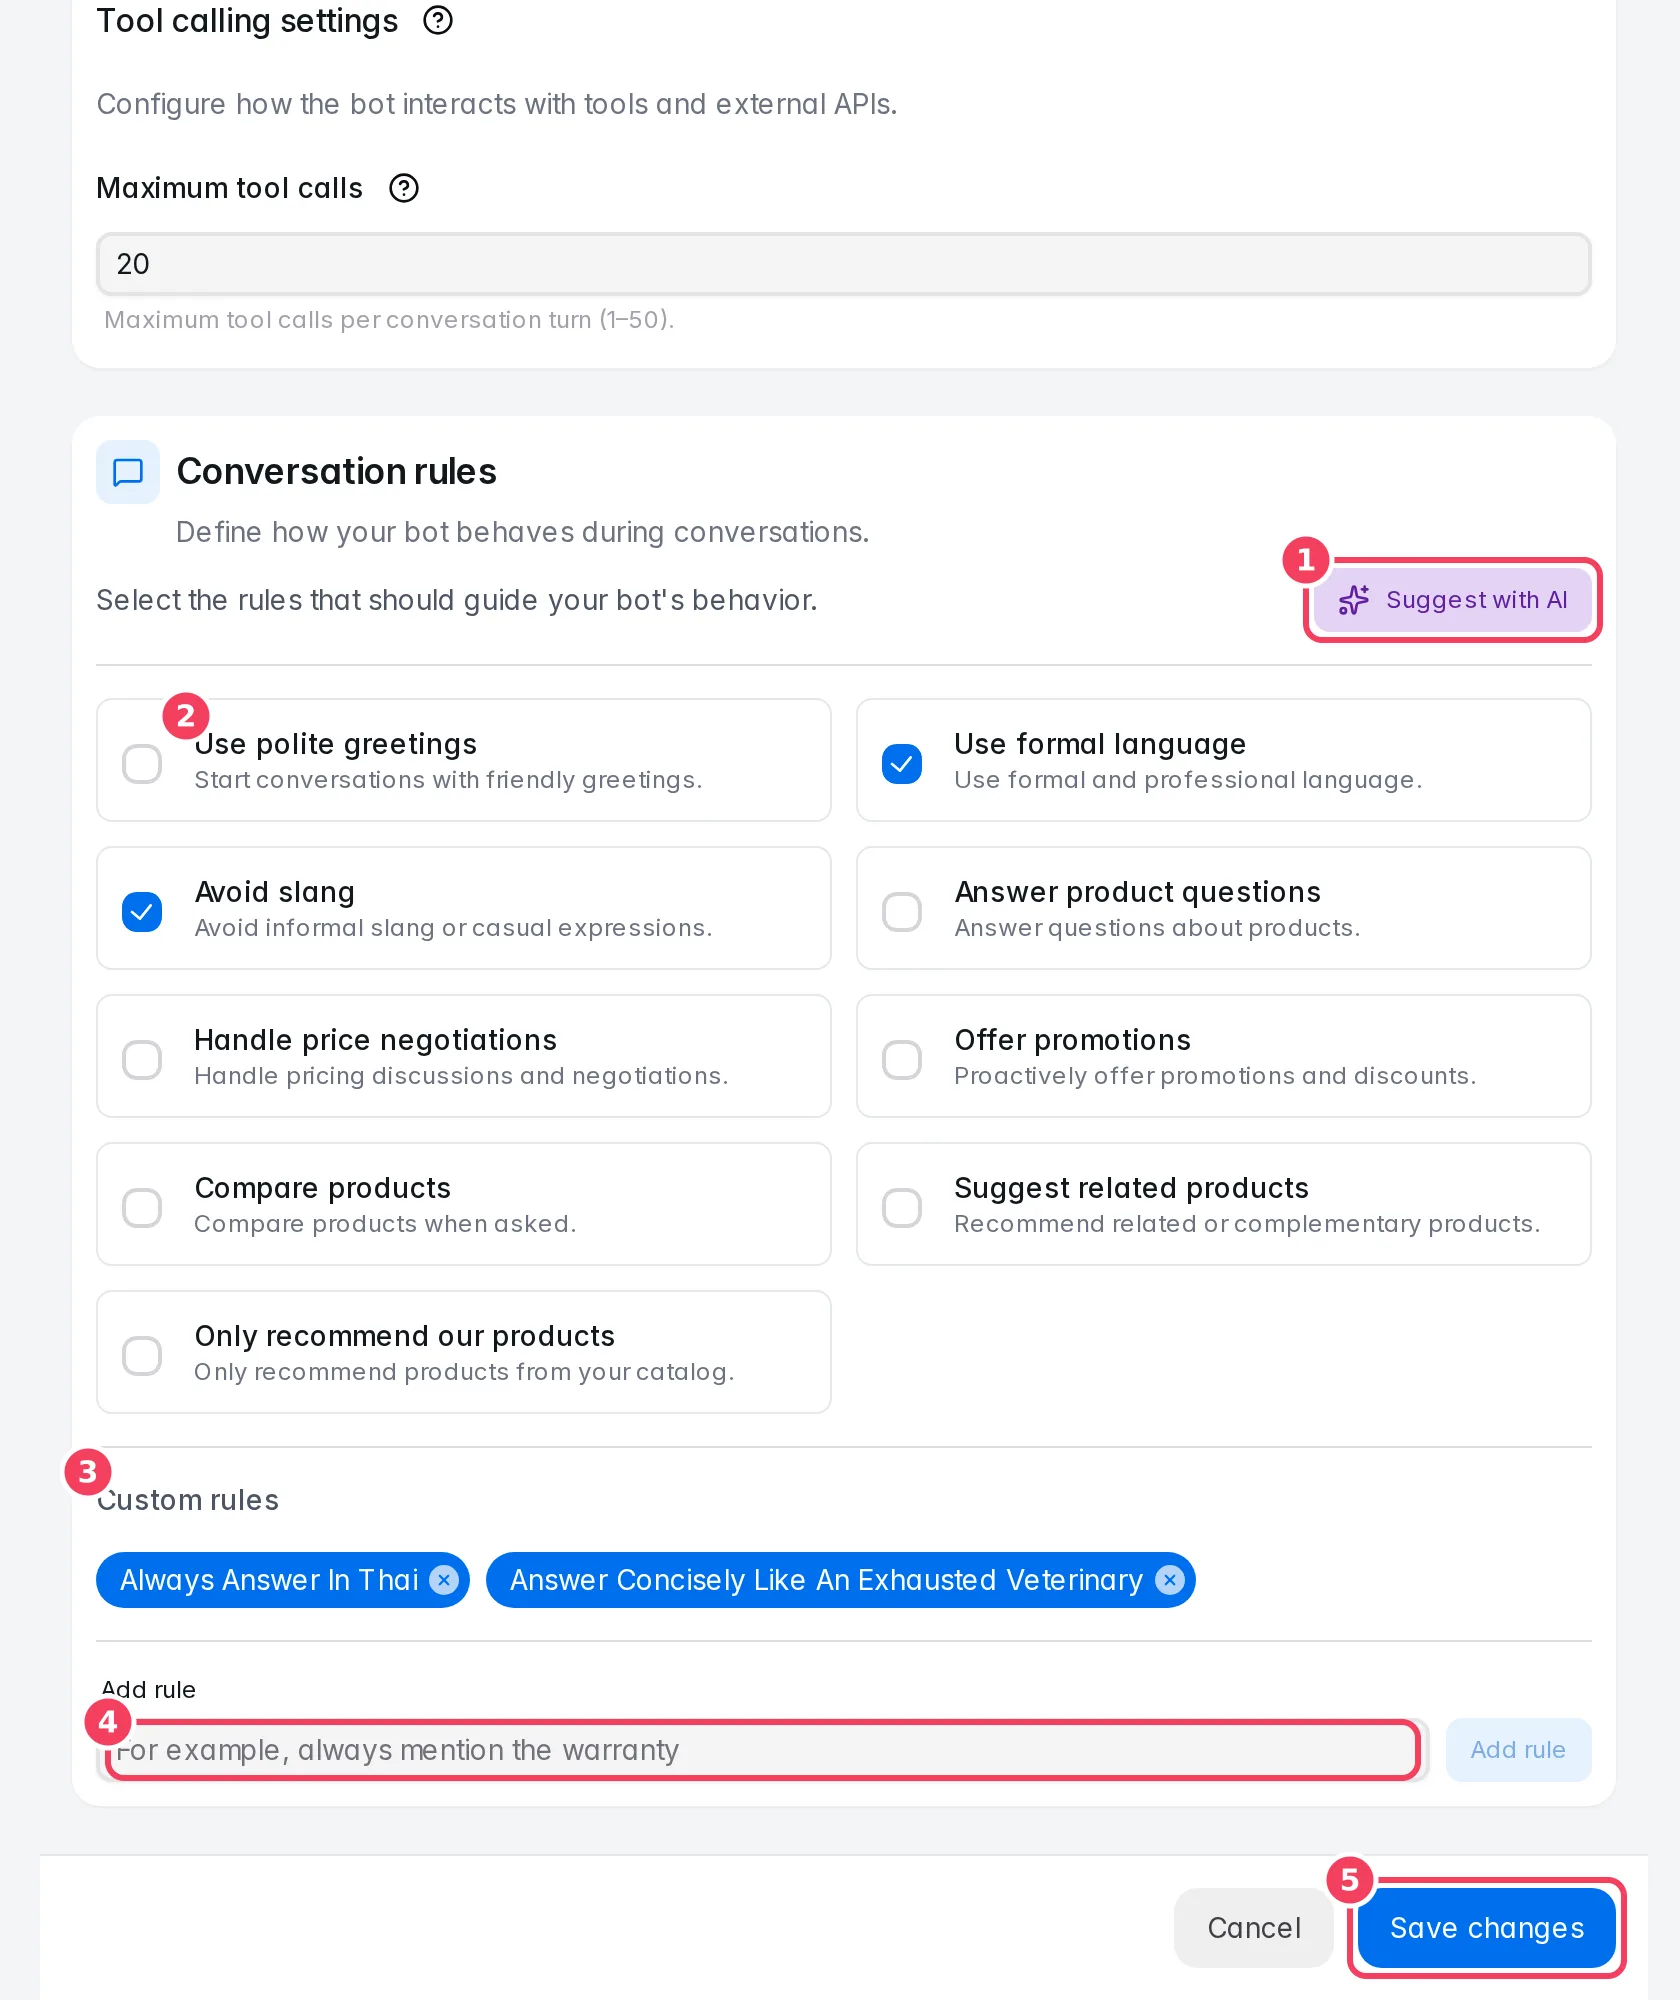
| # | Item | What it does |
|---|---|---|
| 1 | Suggest with AI | Recommends rules from your bot's profile and ticks them for you. |
| 2 | Built-in rules | Tick the behaviours you want. |
| 3 | Custom rules | Your own rules, shown as chips. Click × on a chip to remove it. |
| 4 | Add rule | Type a rule, for example always mention the warranty, and click Add rule. |
| 5 | Save changes | Saves every change on the settings page. |
Built-in rules: Use polite greetings, Use formal language, Avoid slang, Answer product questions, Handle price negotiations, Offer promotions, Compare products, Suggest related products, Only recommend our products.
Generate knowledge and edit drafts
Generate Knowledge Docs on a bot's overview page writes knowledge documents for you:
- Konkui analyses the bot's profile and suggests topics. Tick the ones you want, see Existing Topics you already have, or type your own under Add Custom Topic. Click Continue.
- Choose a mode:
- Auto-generate & Save writes the documents and saves them straight to Files.
- Draft Mode writes drafts for you to review and edit first.
- Click Generate & Save or Generate Drafts. Documents are written one at a time; finished ones are clickable while the rest continue, and Cancel generation stops the rest. Documents already finished are kept.
In Draft Mode you land on Edit Knowledge Drafts when generation finishes. Pick a draft on the left and edit it in the Markdown editor. Each draft shows Draft, Saved or Published:
| Button | What it does |
|---|---|
| Save Draft | Saves this draft as a file in your workspace, still marked as a draft. |
| Publish | Saves (if needed) and finalizes the document as knowledge. |
| Save All / Publish All | Does the same for every remaining draft. |
| Done | Leaves the editor and returns to the bot. |
AI Assist on the Files page is a shortcut to the same generator for your active bot.
Danger zone
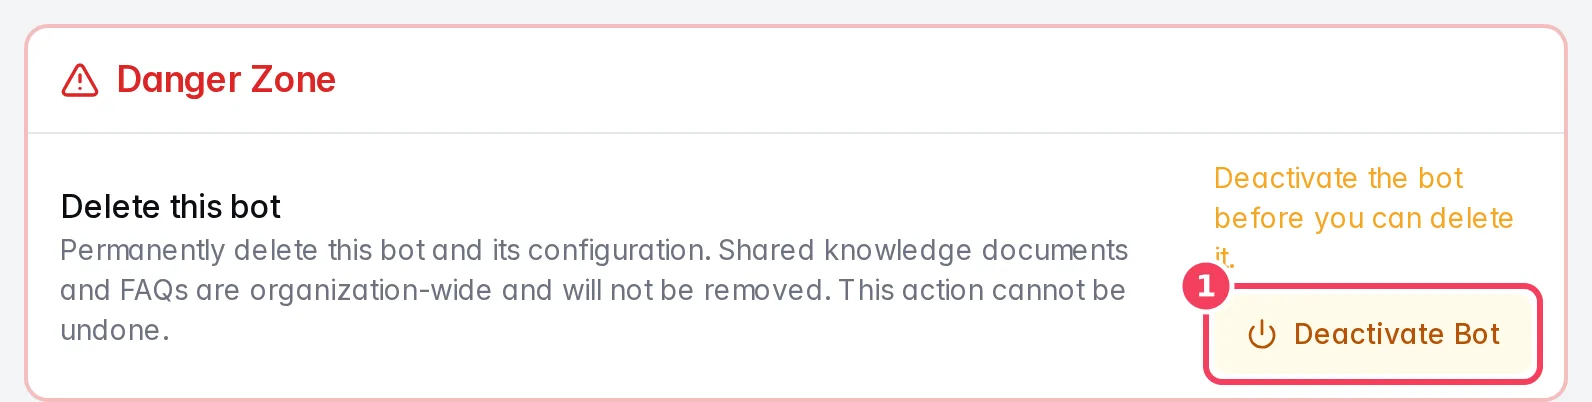
You can't delete the active bot. Click Deactivate Bot first (1); then Delete Bot becomes available and asks you to confirm. Deleting removes the bot and its configuration permanently. Shared knowledge, such as files and FAQs, belongs to the workspace and is not deleted.