
Browse the docs
Guides
Open in dashboardA rich menu is the panel of buttons at the bottom of your LINE chat. A good one answers the most common questions in one tap, and a welcome message tells new friends what your bot can do. In this guide you build both in LINE Features, then add an optional scheduled message.
Before you begin
- Connect your LINE Official Account first. Both the Access Token and Channel Secret must be saved; see Connect your channels. Until then, the LINE Features item does not appear in the sidebar.
- Decide on three to six buttons. Good candidates are the questions customers ask most, such as products, prices, shipping, opening hours or "talk to staff".
- Optional: prepare a menu image of 2500 × 843 px (compact) or 2500 × 1686 px (full), PNG or JPEG, under 1 MB. If you don't have one, Konkui can crop yours or generate a simple one.
Part 1: Build the rich menu
Step 1: Start a new menu
Open LINE Features › Rich Menu and click Create Menu.
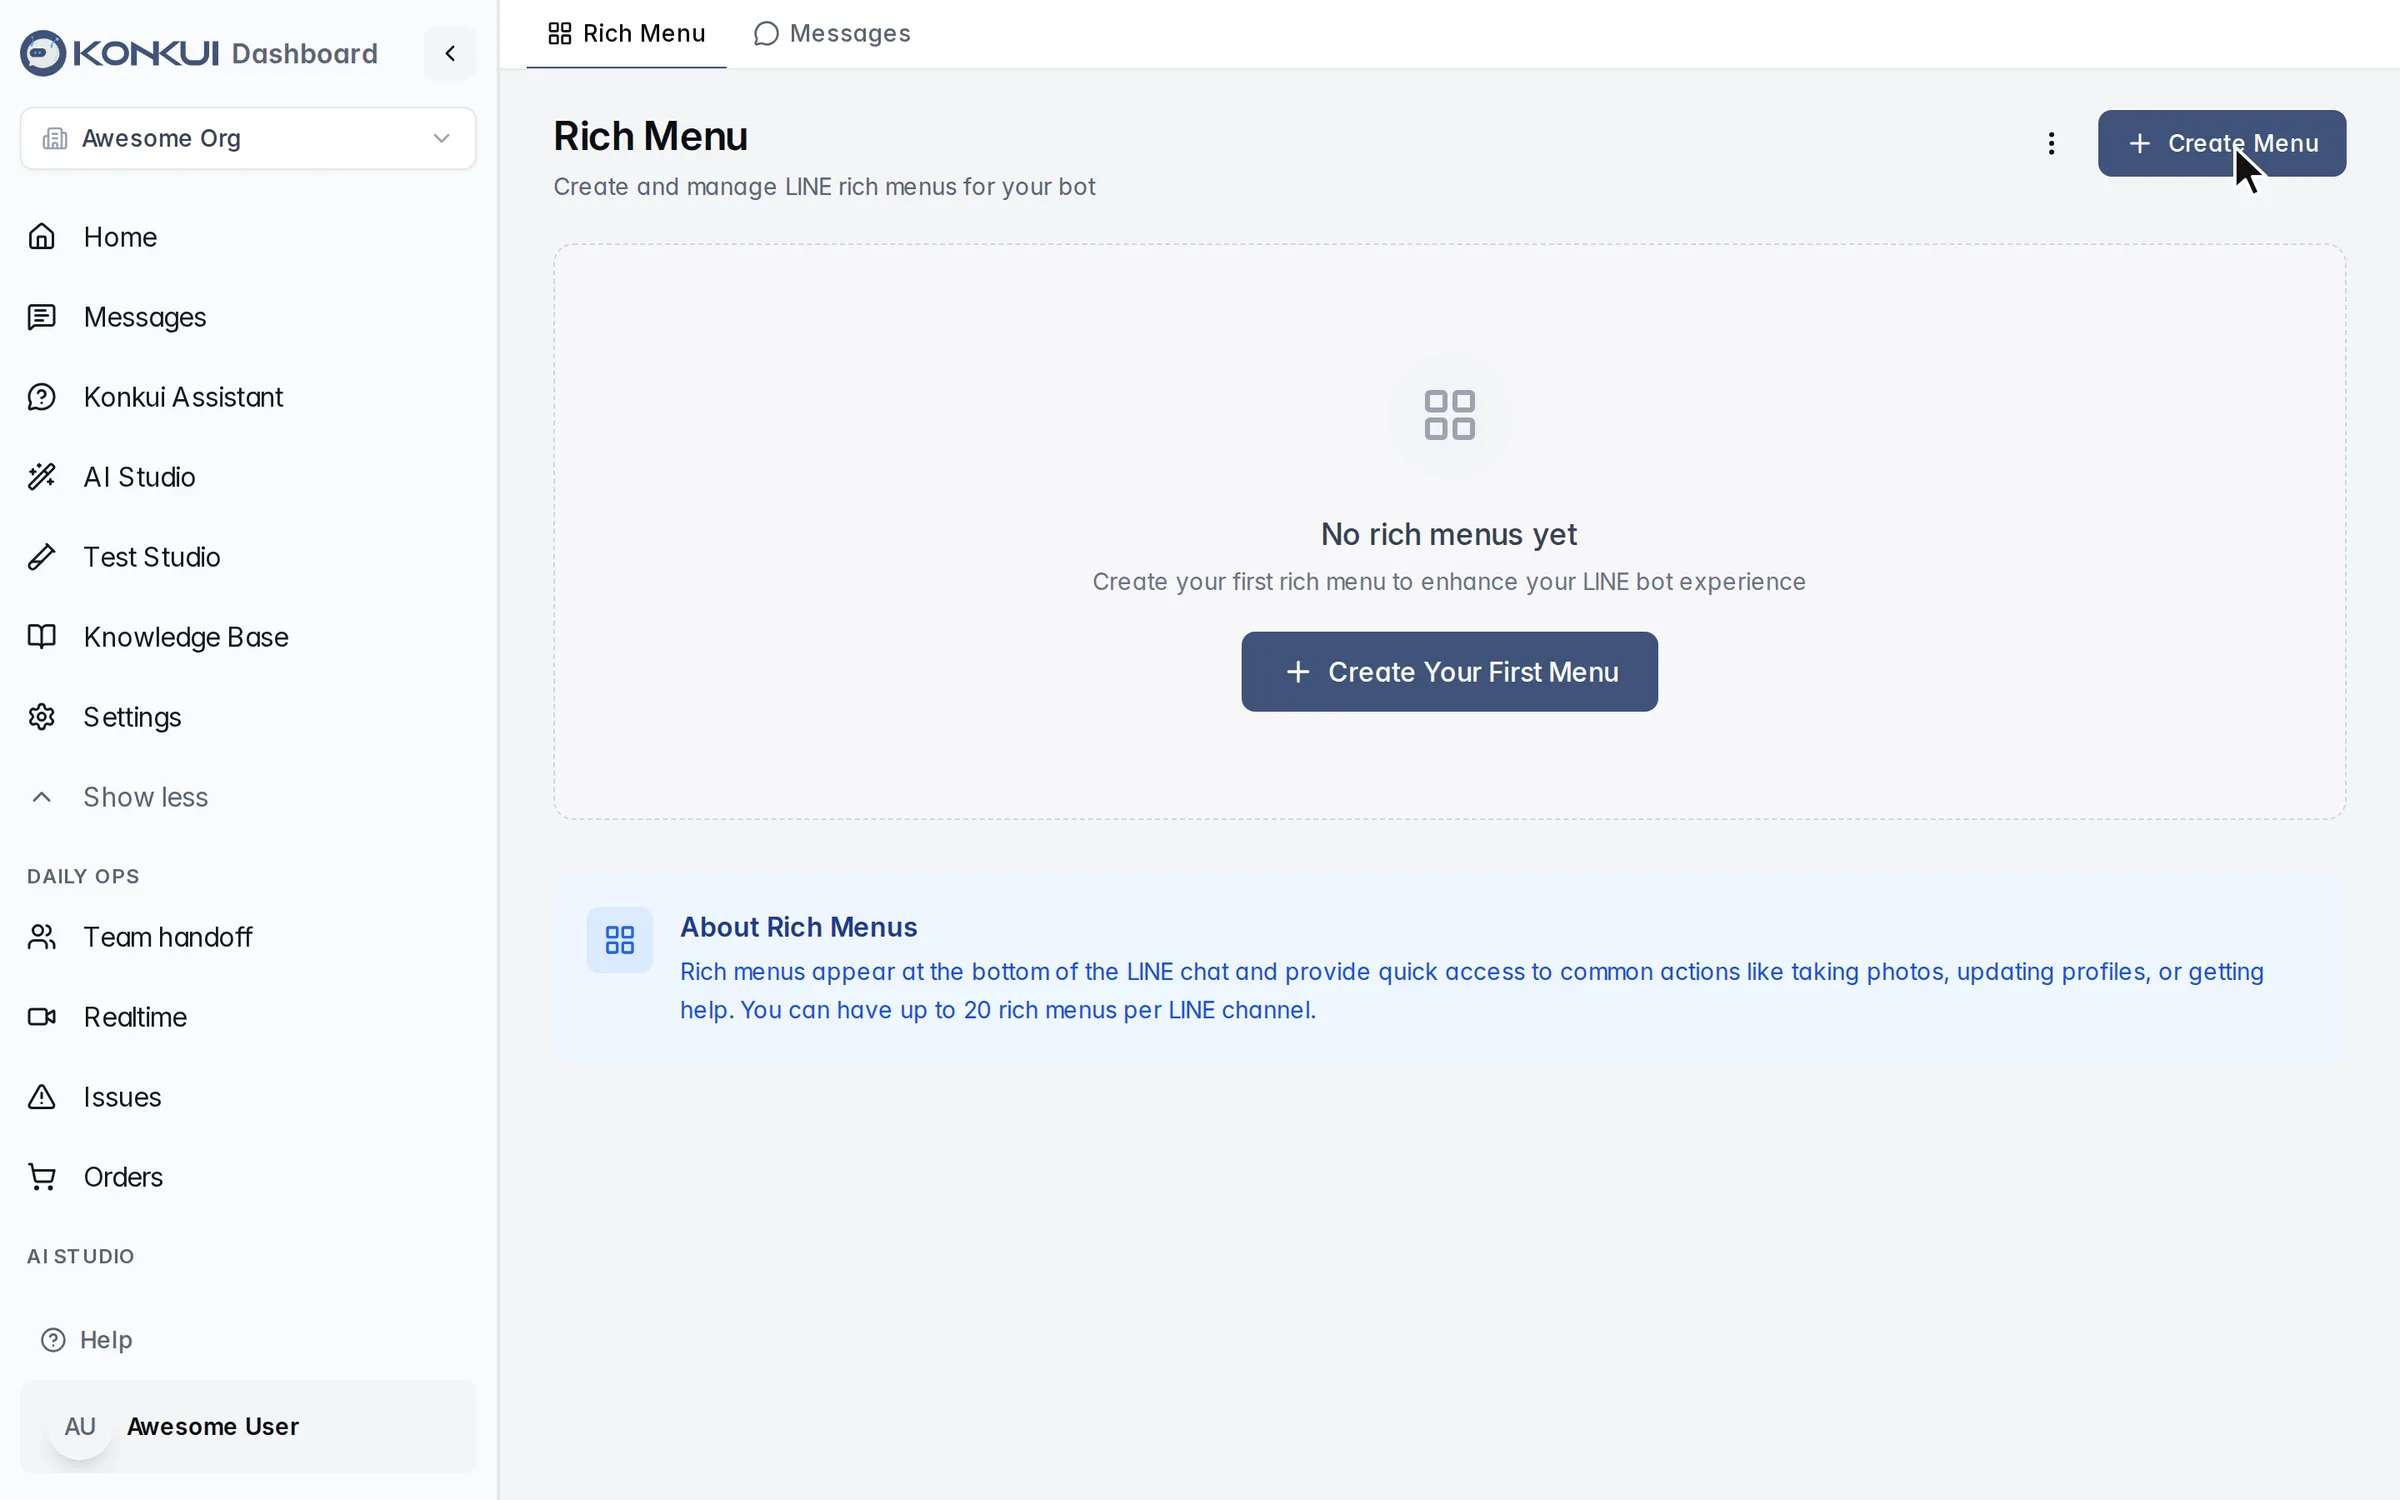
Step 2: Pick a template and name the menu
- Under Templates, pick a layout. 3 buttons (row) is a good start for most shops. The editor creates one button area per cell.
- Under Menu Settings, enter a Menu Name (only you see it) and the Chat Bar Text customers tap to open the menu, up to 14 characters, for example "Menu" or "เมนู".
- Leave Open menu by default on so customers see the buttons as soon as they open the chat.
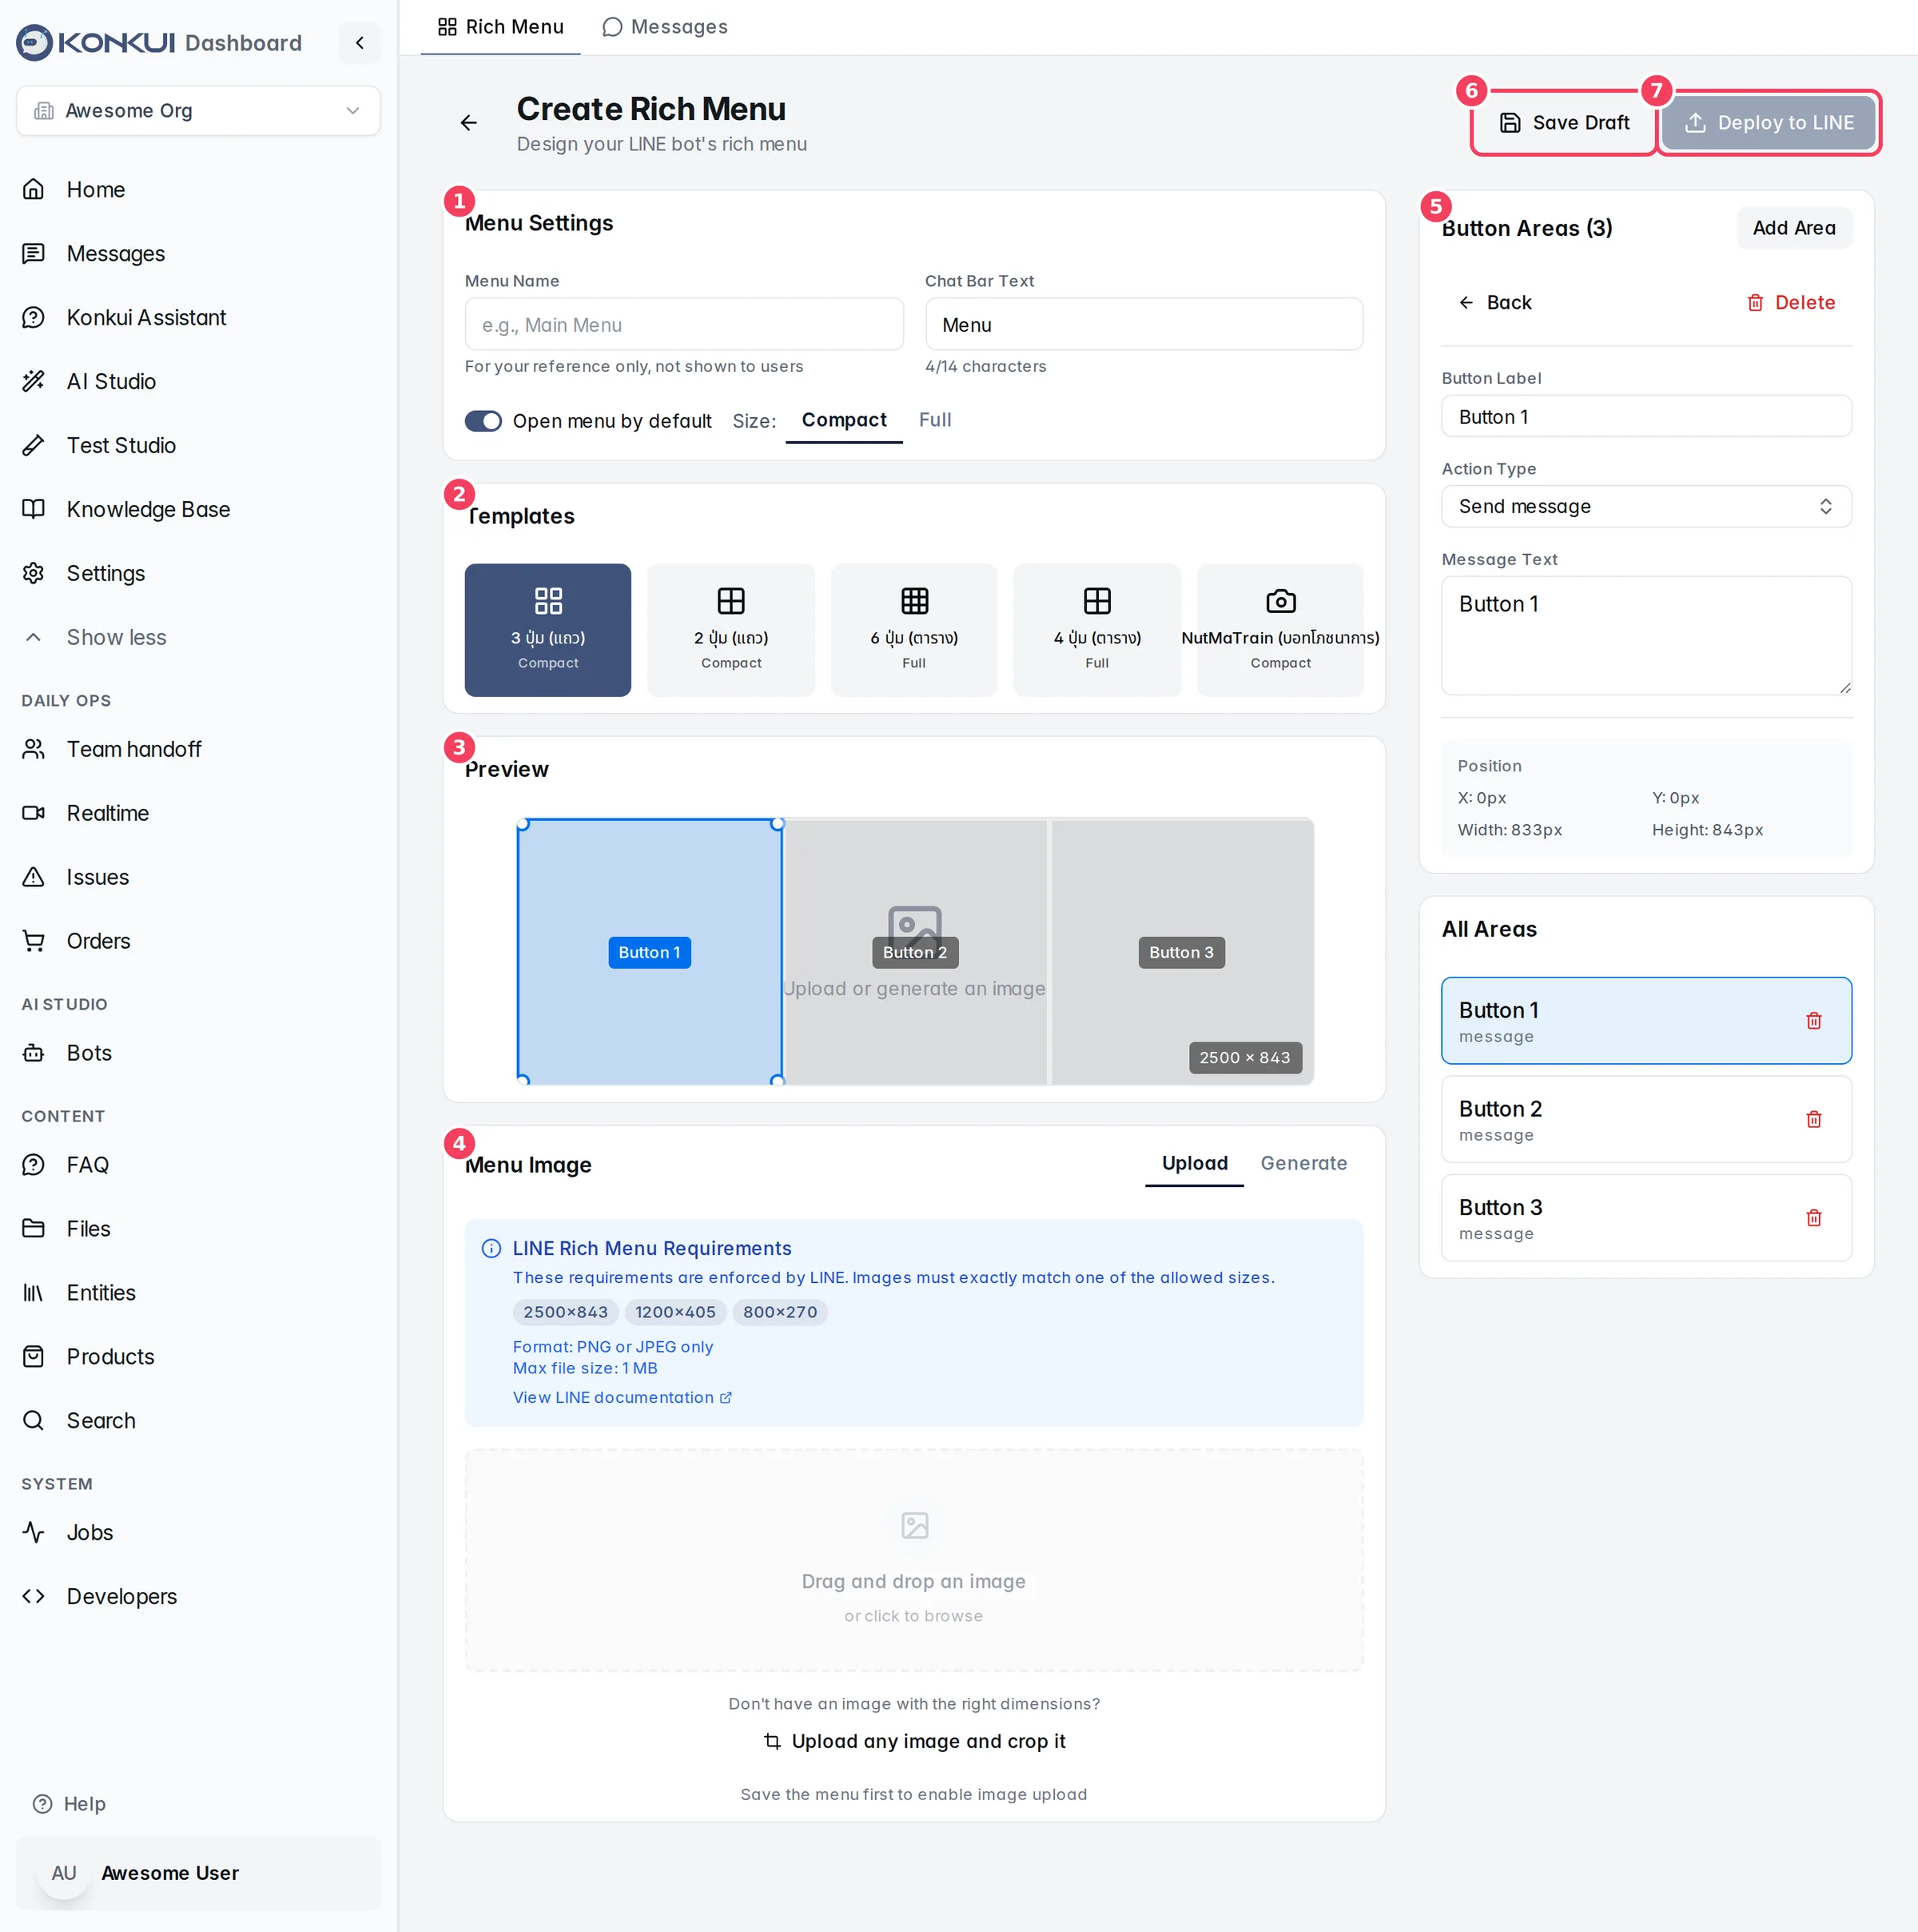
| # | Area | What you do there |
|---|---|---|
| 1 | Menu Settings | Name, chat bar text, open by default, size. |
| 2 | Templates | Choose a layout. |
| 3 | Preview | Click a button area to edit it. |
| 4 | Menu Image | Upload or generate the image. |
| 5 | Button Areas | Configure the selected button. |
| 6 | Save Draft | Save without publishing. |
| 7 | Deploy to LINE | Publish to LINE. |
As soon as the menu has a name and buttons, Konkui saves it as a draft for you.
Step 3: Set up each button
Click a button in the Preview to open its settings on the right.
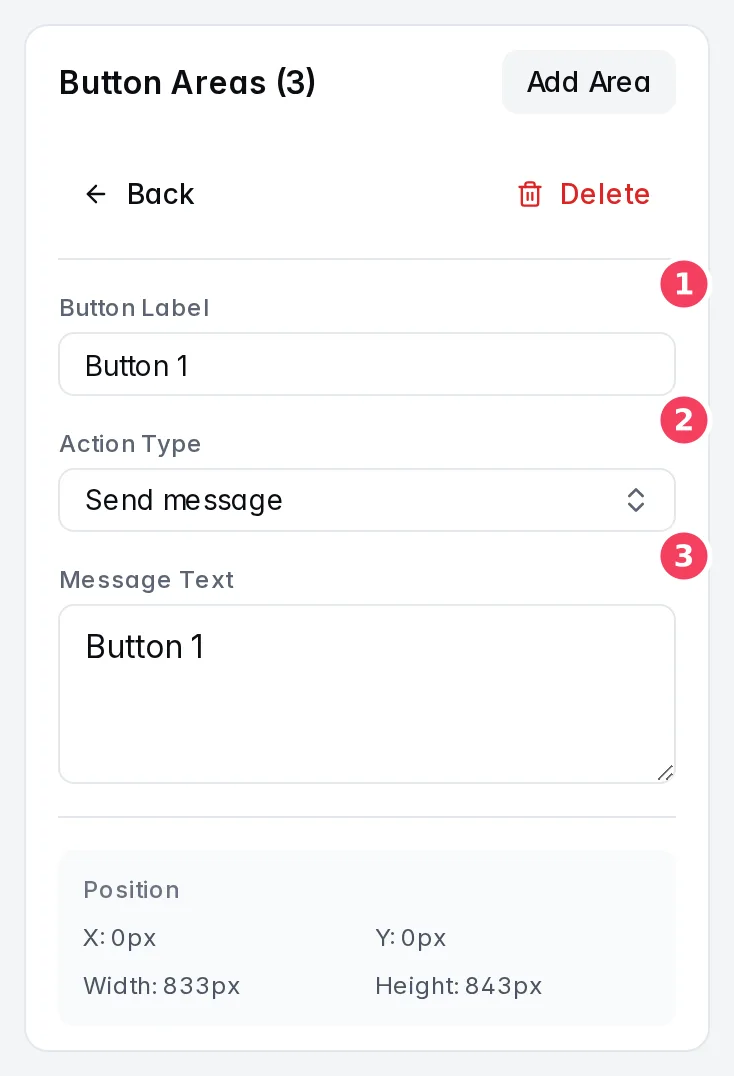
| # | Setting | What to enter |
|---|---|---|
| 1 | Button Label | A short name, such as "Products". |
| 2 | Action Type | What the tap does. |
| 3 | Message Text | For Send message: the text sent when tapped. |
Choose the action type that fits each button:
- Send message: the customer "says" the text and your bot answers it. Use questions your bot already handles well, such as "What products do you have?".
- Open URL: opens your website, storefront or a LIFF page.
- Postback: sends hidden data without posting a message. Mostly useful for custom integrations.
- Open camera / Open photo gallery: handy when customers need to send you a photo, for example a payment slip or a product they are asking about.
Repeat for every button.
Step 4: Add the image
Under Menu Image:
- Upload an image that matches the menu size. If yours is a different size, click Upload any image and crop it to crop, resize and compress it.
- Or switch to Generate, adjust each button's label, emoji and colors, and click Generate & Upload Image.
Make sure the picture lines up with the button areas shown in the Preview: what a customer sees on each part of the image should match what that area does.
Step 5: Deploy and activate
- Click Deploy to LINE. It is available once the menu has an image and at least one button.
- If this is your first menu, Konkui also makes it the default, and every LINE friend sees it right away.
- If you already have a default menu, find the new card on the Rich Menu tab and click Activate to switch everyone to it.
Check it
Open your LINE Official Account chat on your phone. The menu should appear at the bottom with your chat bar text. Tap each button and confirm it does what you expect. If the menu doesn't change, close and reopen the chat; LINE can take a moment to refresh.
Part 2: Greet new friends with a welcome message
Step 1: Create the message
- Open LINE Features › Messages and click Create Message.
- Enter a Name, such as "Welcome".
- Under Trigger Type, keep Welcome selected.
- Under Message Content, choose a Type and write the message. Text is a good start: greet the customer, say what the bot can help with, and point to the rich menu.
- Leave Active on and click Create.
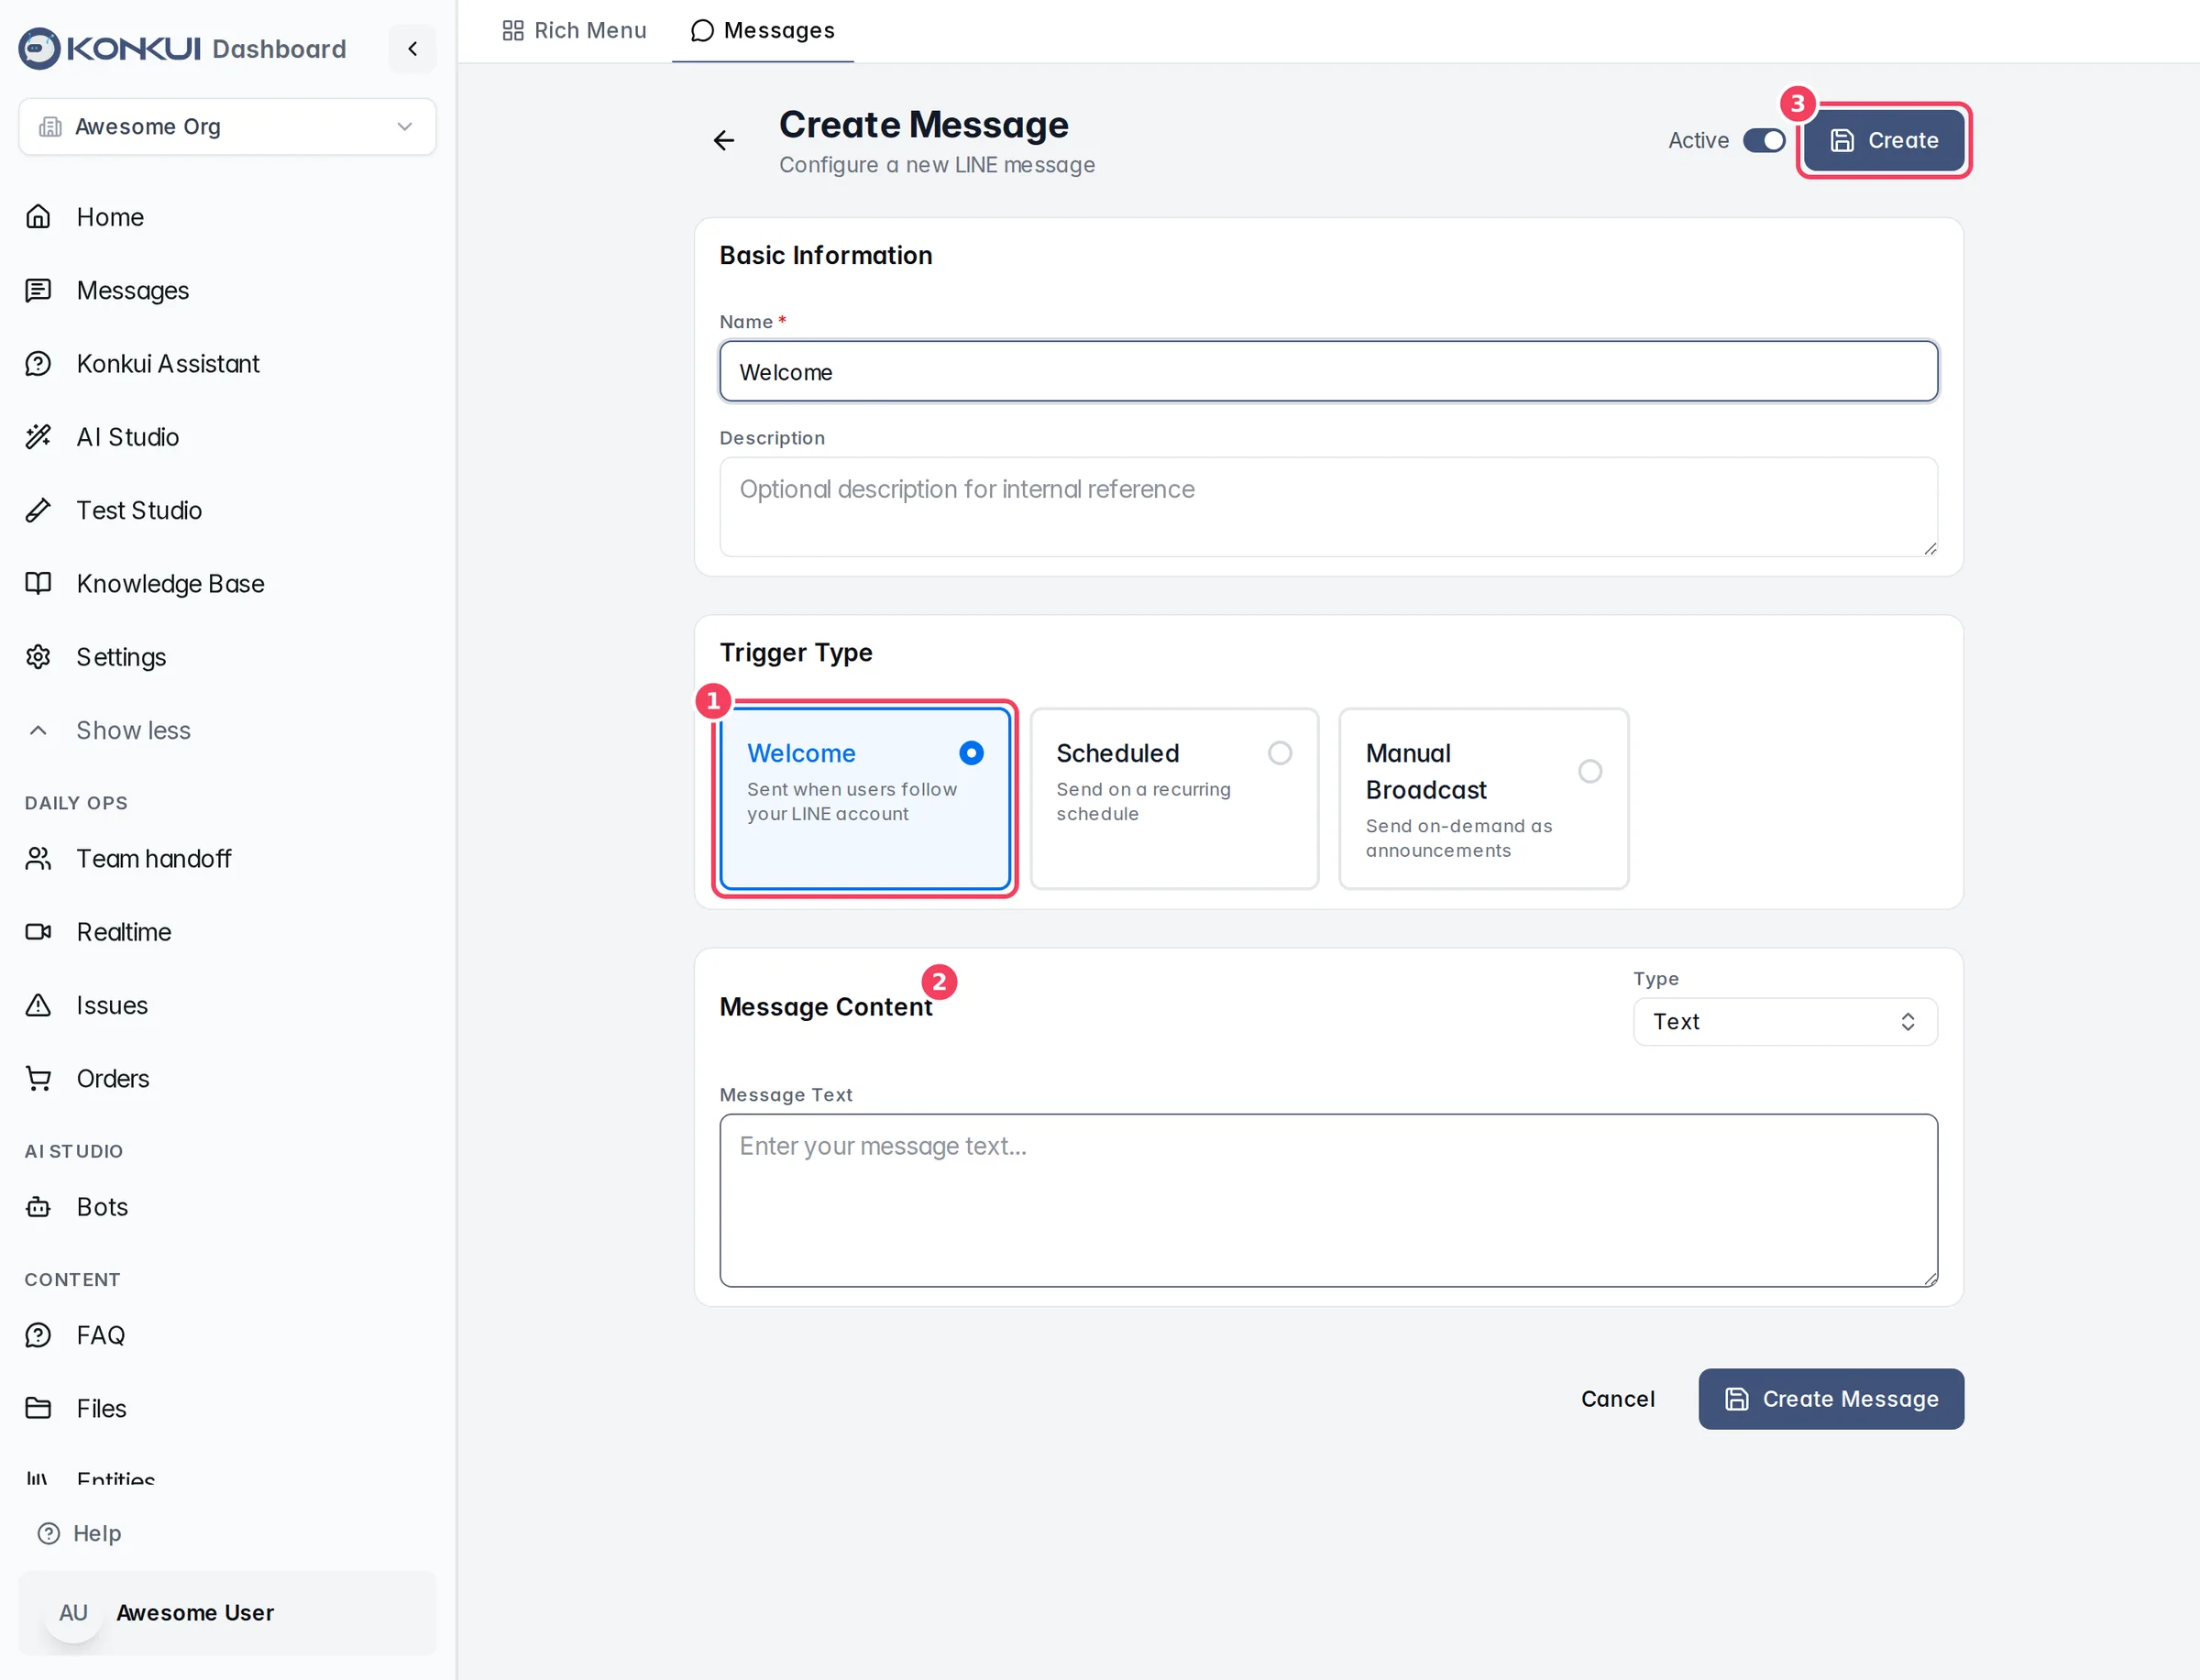
| # | Item | What it does |
|---|---|---|
| 1 | Welcome | Sends the message when someone adds you as a friend. |
| 2 | Message Content | The text or images to send. |
| 3 | Create | Saves the message. |
To send an image or carousel, save the message first, then upload the images. Images can be PNG, JPEG, GIF or WebP, up to 10 MB each.
Step 2: Order several welcome messages (optional)
You can send more than one welcome message, for example a greeting followed by a promotion image. On the Welcome tab, click Reorder, drag the messages into order and click Save Order. LINE delivers at most five message bubbles in one reply, so keep the sequence short.
Check it
Ask a colleague to add your LINE account as a friend, or block and unblock it from a test phone. The welcome message should arrive straight away.
Part 3: Send a scheduled message (optional)
Scheduled messages are useful for regular updates such as a weekly promotion.
- Click Create Message and choose Scheduled as the trigger.
- Under Schedule, pick Preset and a Frequency (daily, weekly or monthly) with the day and time, or One-time for a single date. The Next run preview confirms when it will go out.
- Write the content.
- Under Audience Targeting, keep All Users or narrow it with Include Only or Exclude and the segment filters.
- Click Create.
Each scheduled message card shows its next send time and how many times it has been sent. Use Deactivate on the card to pause it.