
Browse the docs
Dashboard reference
Open in dashboardDevelopers is the portal for connecting your own website, app or backend to your Konkui bot through the Third-party API. Here you create API keys, read the API reference, try the API in the Playground, register webhooks and watch API traffic.
Where to find it
Developers is in the System group of the sidebar (under More when the sidebar is collapsed), or go straight to Developers. An admin can hide it from the sidebar with the Developers toggle under Tab Visibility in Settings › General.
The portal has six tabs: Overview, API Keys, Documentation, Playground, Webhooks and Analytics.
Overview
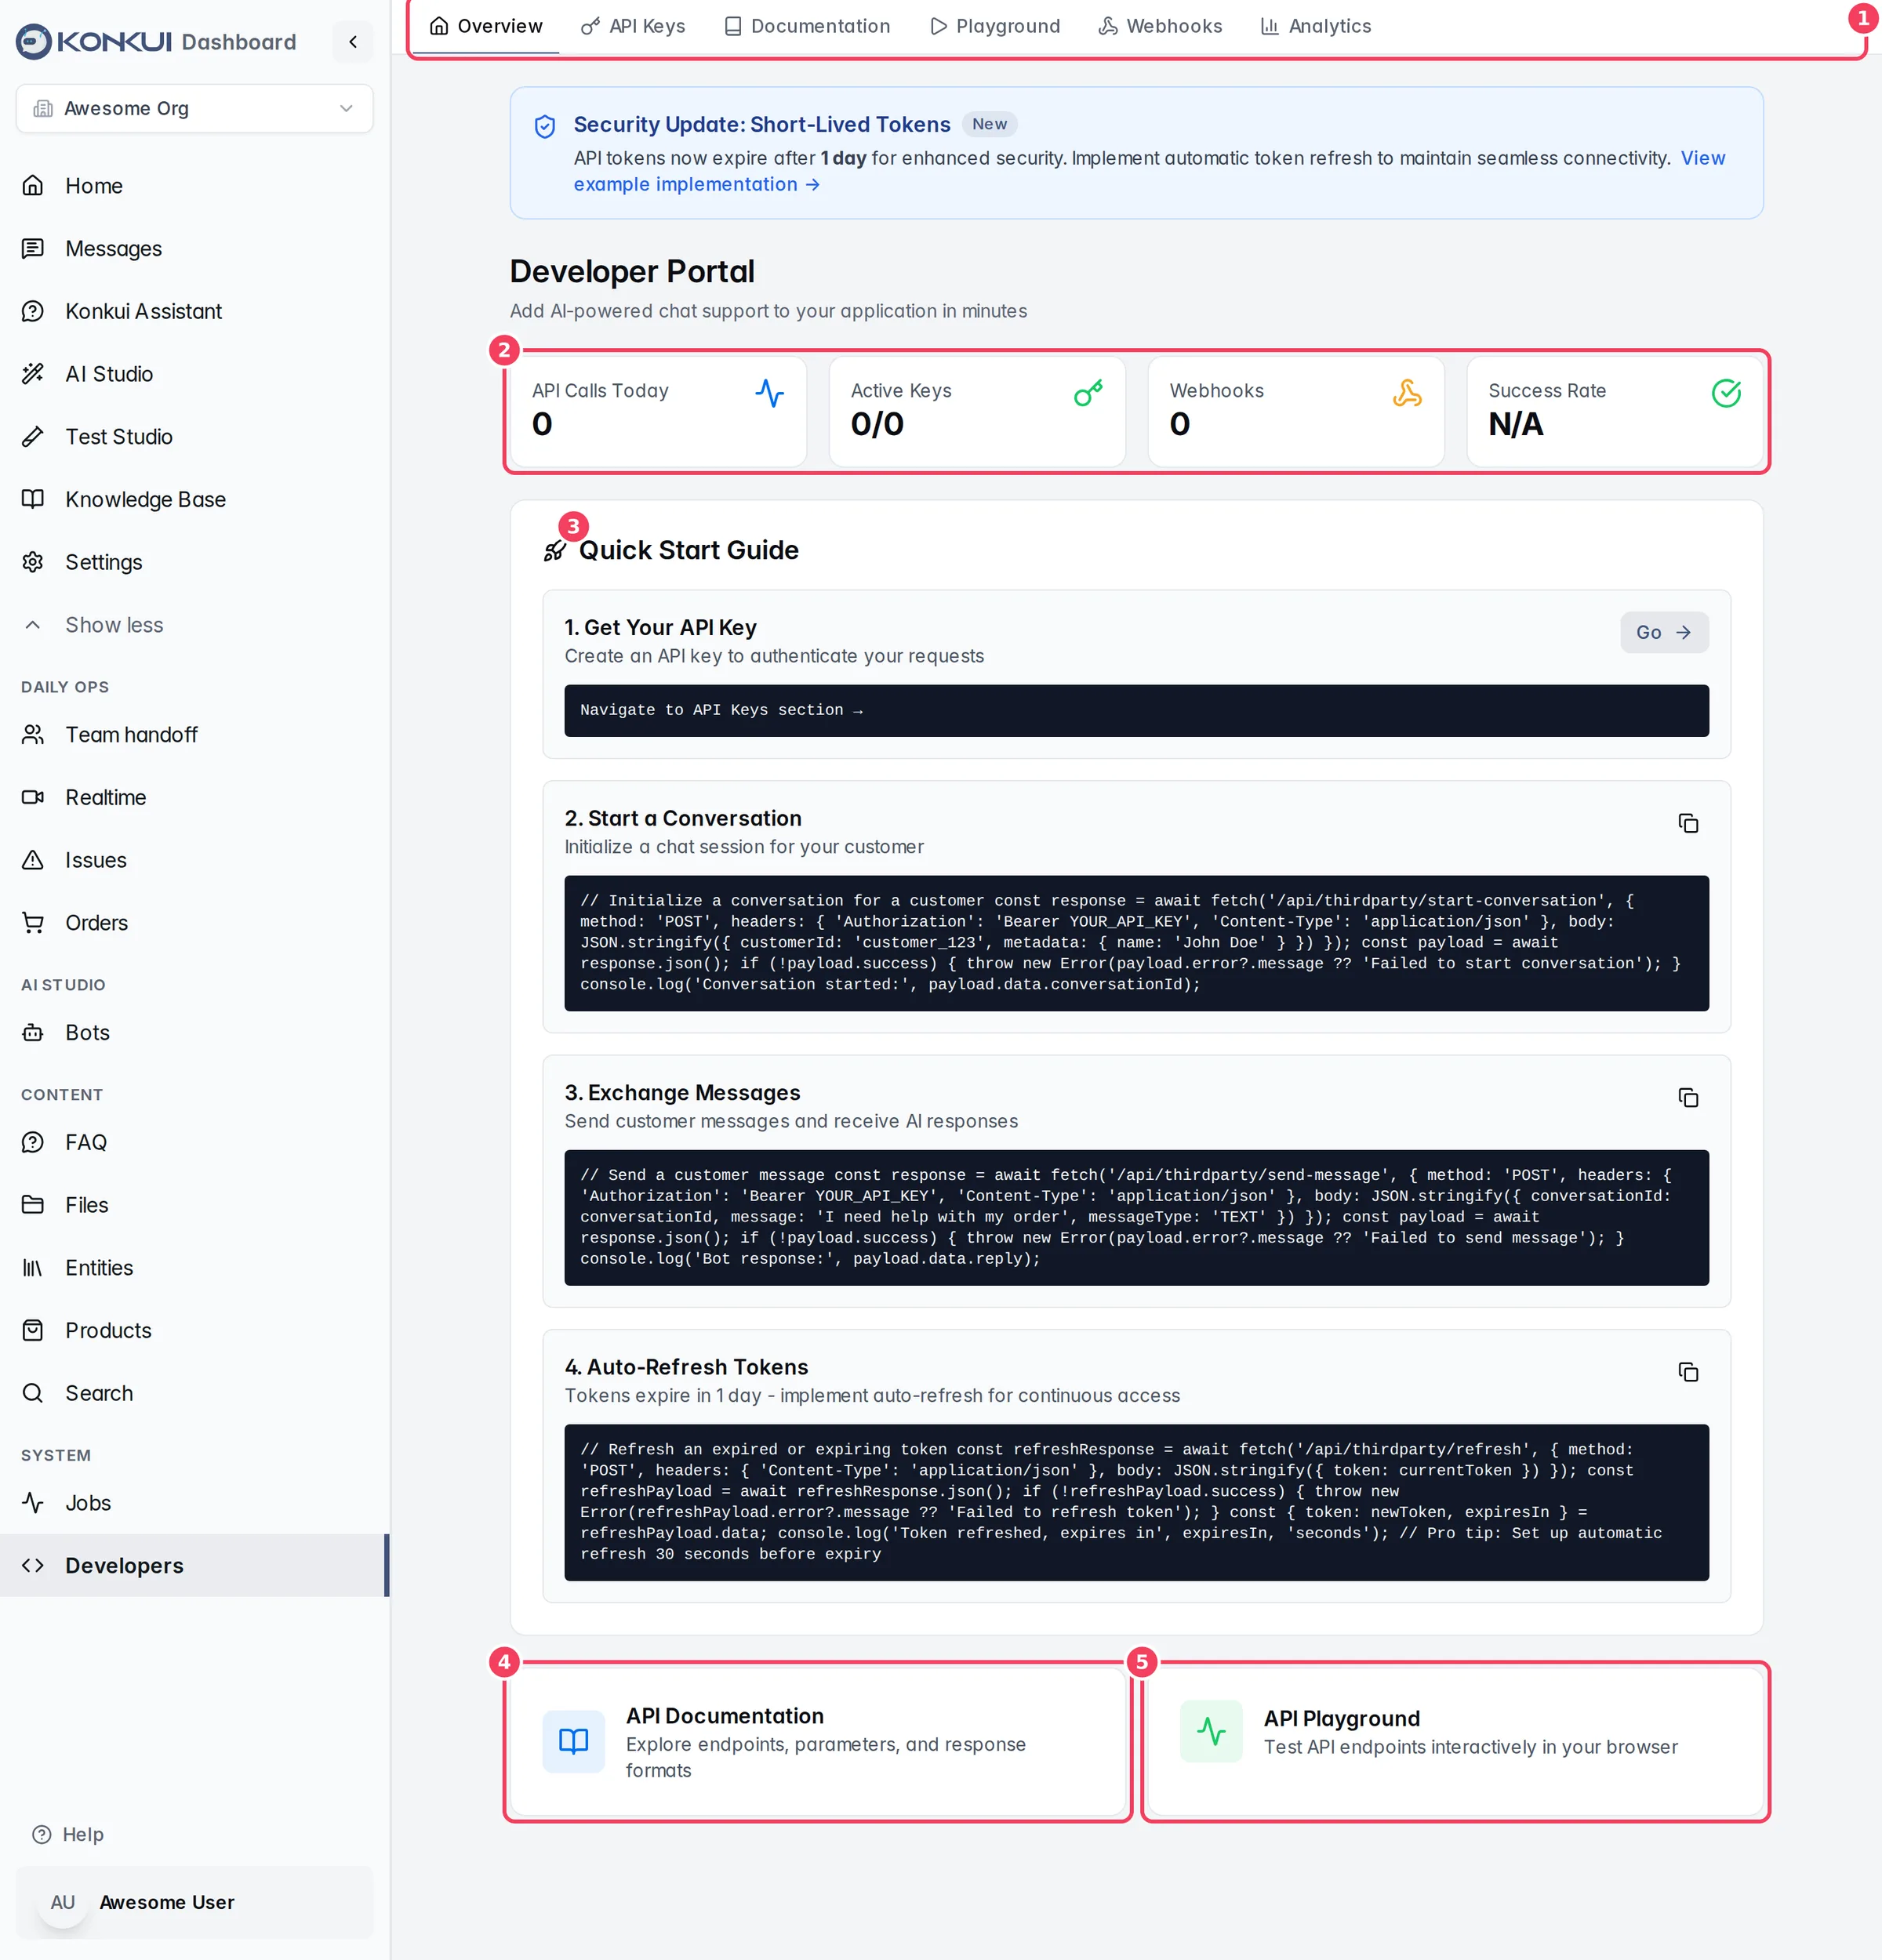
| # | Item | What it does |
|---|---|---|
| 1 | Portal tabs | Switch between the six sections of the portal. |
| 2 | Stats | API Calls Today, Active Keys (keys used at least once / all keys), Webhooks, and Success Rate for the last 7 days. |
| 3 | Quick Start Guide | The four steps of an integration with copyable code: get a key, start a conversation, exchange messages, refresh tokens. Go on step 1 opens API Keys. |
| 4 | API Documentation | Opens the Documentation tab. |
| 5 | API Playground | Opens the Playground tab. |
When your keys have traffic, a Top API Endpoints list at the bottom shows the five most-called endpoints with call counts and average response time. A blue banner at the top reminds you that API tokens expire after 1 day and links to the token refresh guide.
API Keys
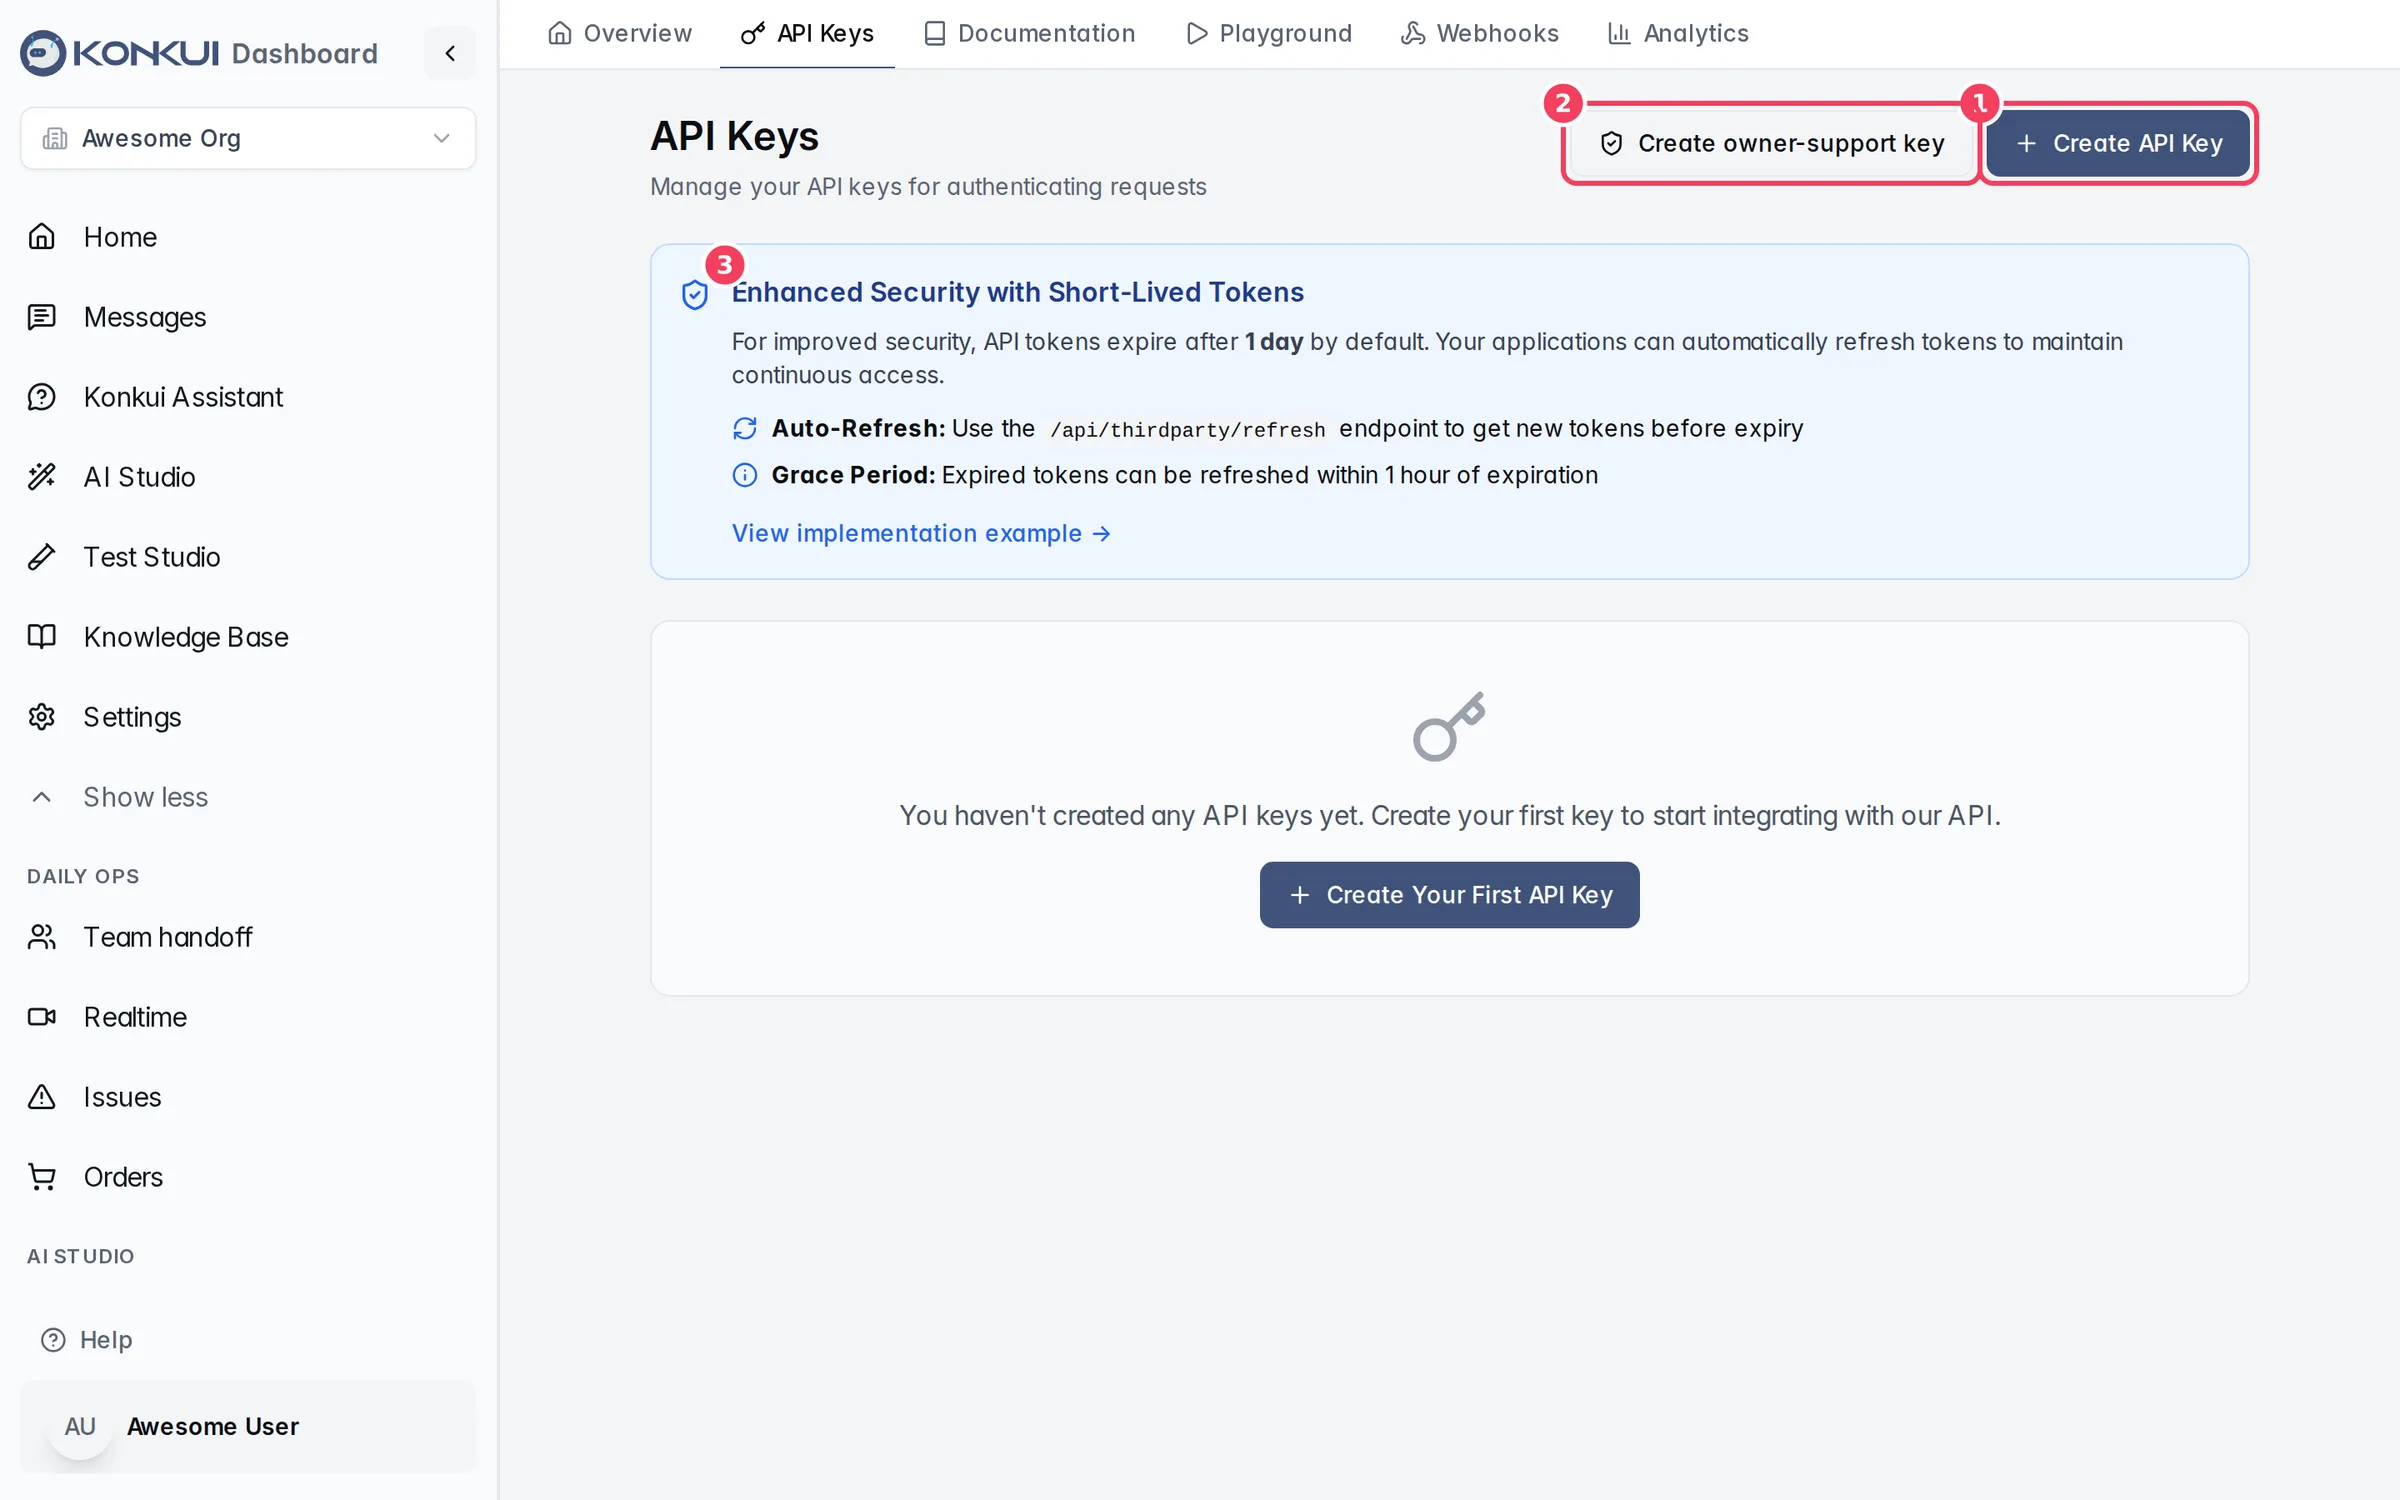
| # | Item | What it does |
|---|---|---|
| 1 | Create API Key | Creates a key for the Third-party chat API. |
| 2 | Create owner-support key | Creates a read-only status key for a delegated support agent (see below). |
| 3 | Enhanced Security with Short-Lived Tokens | Explains token expiry, auto-refresh and the 1-hour grace period. |
Below the notice is your list of keys. Each key shows its name, its scopes (such as read, write), Created, Last used, Expires and the last 8 characters of its Key ID. The full key is never shown again after creation. Use the ⋮ menu and Revoke Key to delete a key; apps using it are rejected on their next request.
Create an API key
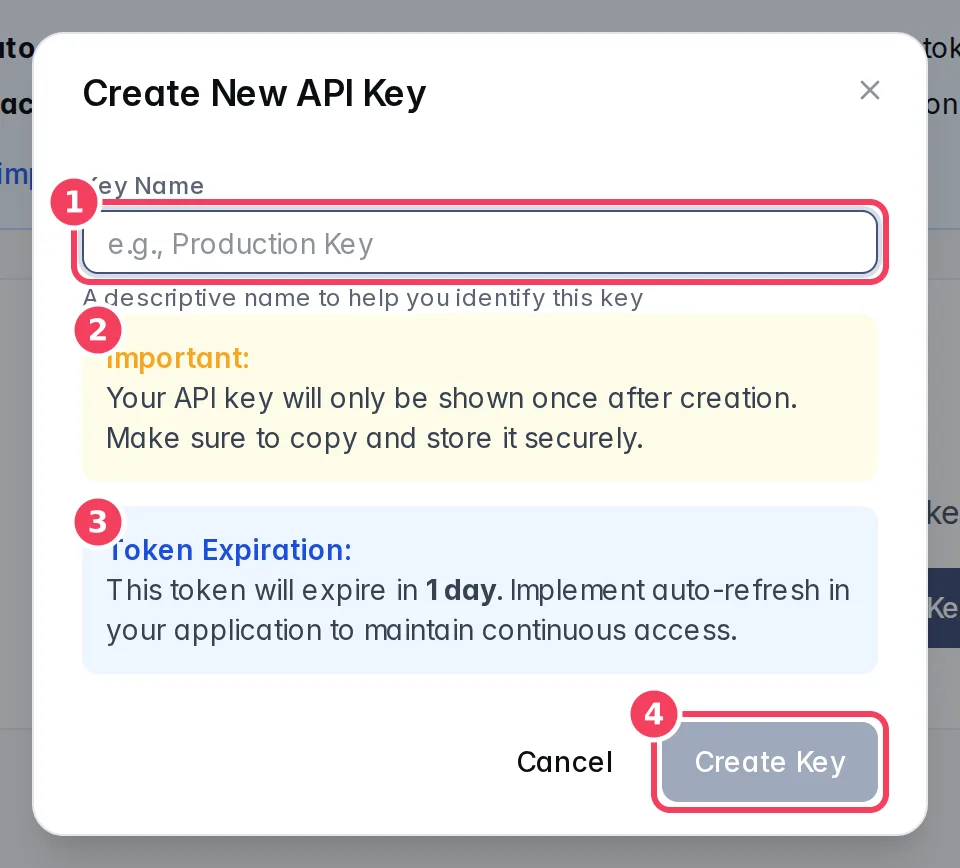
| # | Item | What it does | Notes |
|---|---|---|---|
| 1 | Key Name | A name to recognise the key, for example "Production Key". | Required. Must be unique in the workspace. "Konkui Playground Credential" is reserved. |
| 2 | Important | Reminds you the key is shown only once. | |
| 3 | Token Expiration | Explains that the token expires in 1 day and needs auto-refresh. | |
| 4 | Create Key | Creates the key. |
After you click Create Key, a green API Key Created Successfully! box shows the key with Copy and Dismiss buttons. Copy it into your server's secret store straight away: it won't be shown again.
Owner-support keys
An owner-support key lets a delegated support agent or service read a small bot-health snapshot of your workspace (bot names, whether each is on, and a few settings). It cannot read customer conversations, credentials, billing or settings, and cannot change anything. It has a fixed 1-day lifetime that refresh cannot extend; create a new one only when the agent still needs access, and revoke it when done.
Documentation
The Documentation tab is the detailed API reference, with request and response examples and code in cURL, JavaScript, Python and PHP.
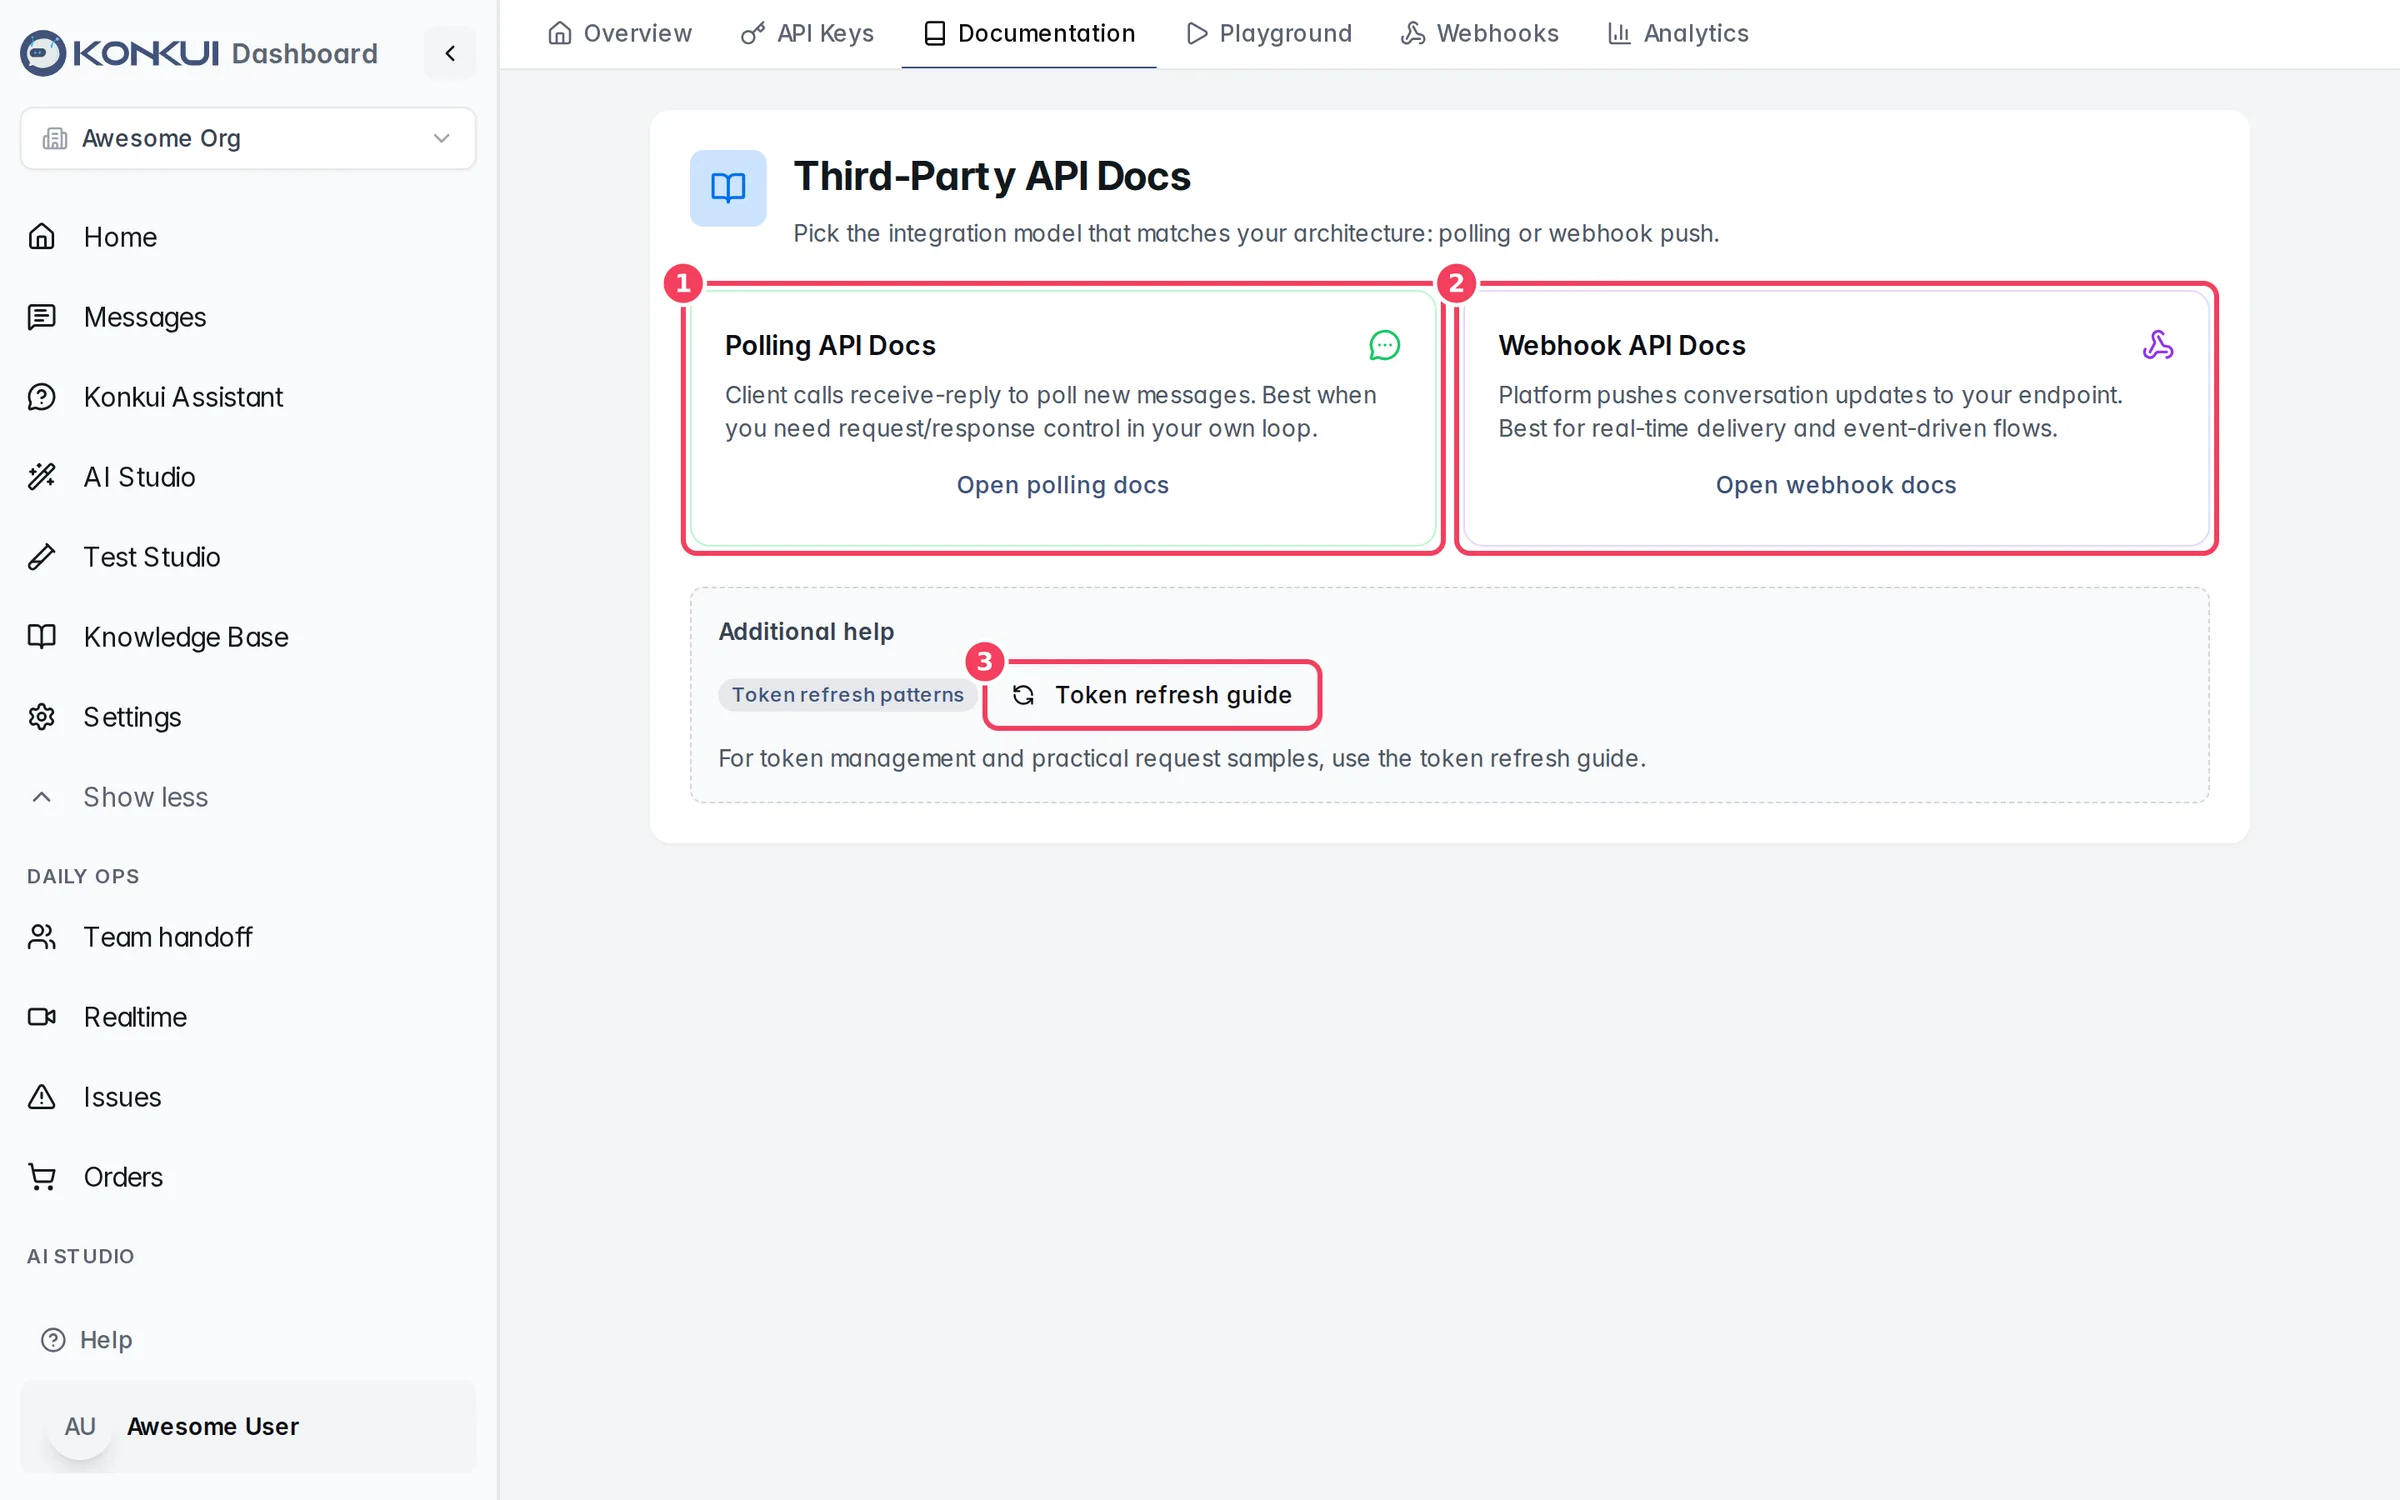
| # | Item | What it does |
|---|---|---|
| 1 | Polling API Docs | For apps that call receive-reply on a timer to fetch new messages. |
| 2 | Webhook API Docs | For apps that receive conversation updates pushed to a webhook. |
| 3 | Token refresh guide | Patterns and samples for refreshing tokens automatically. |
Each API page lists its endpoints on the left. Pick one to see its request headers and body, a sample response and code examples.
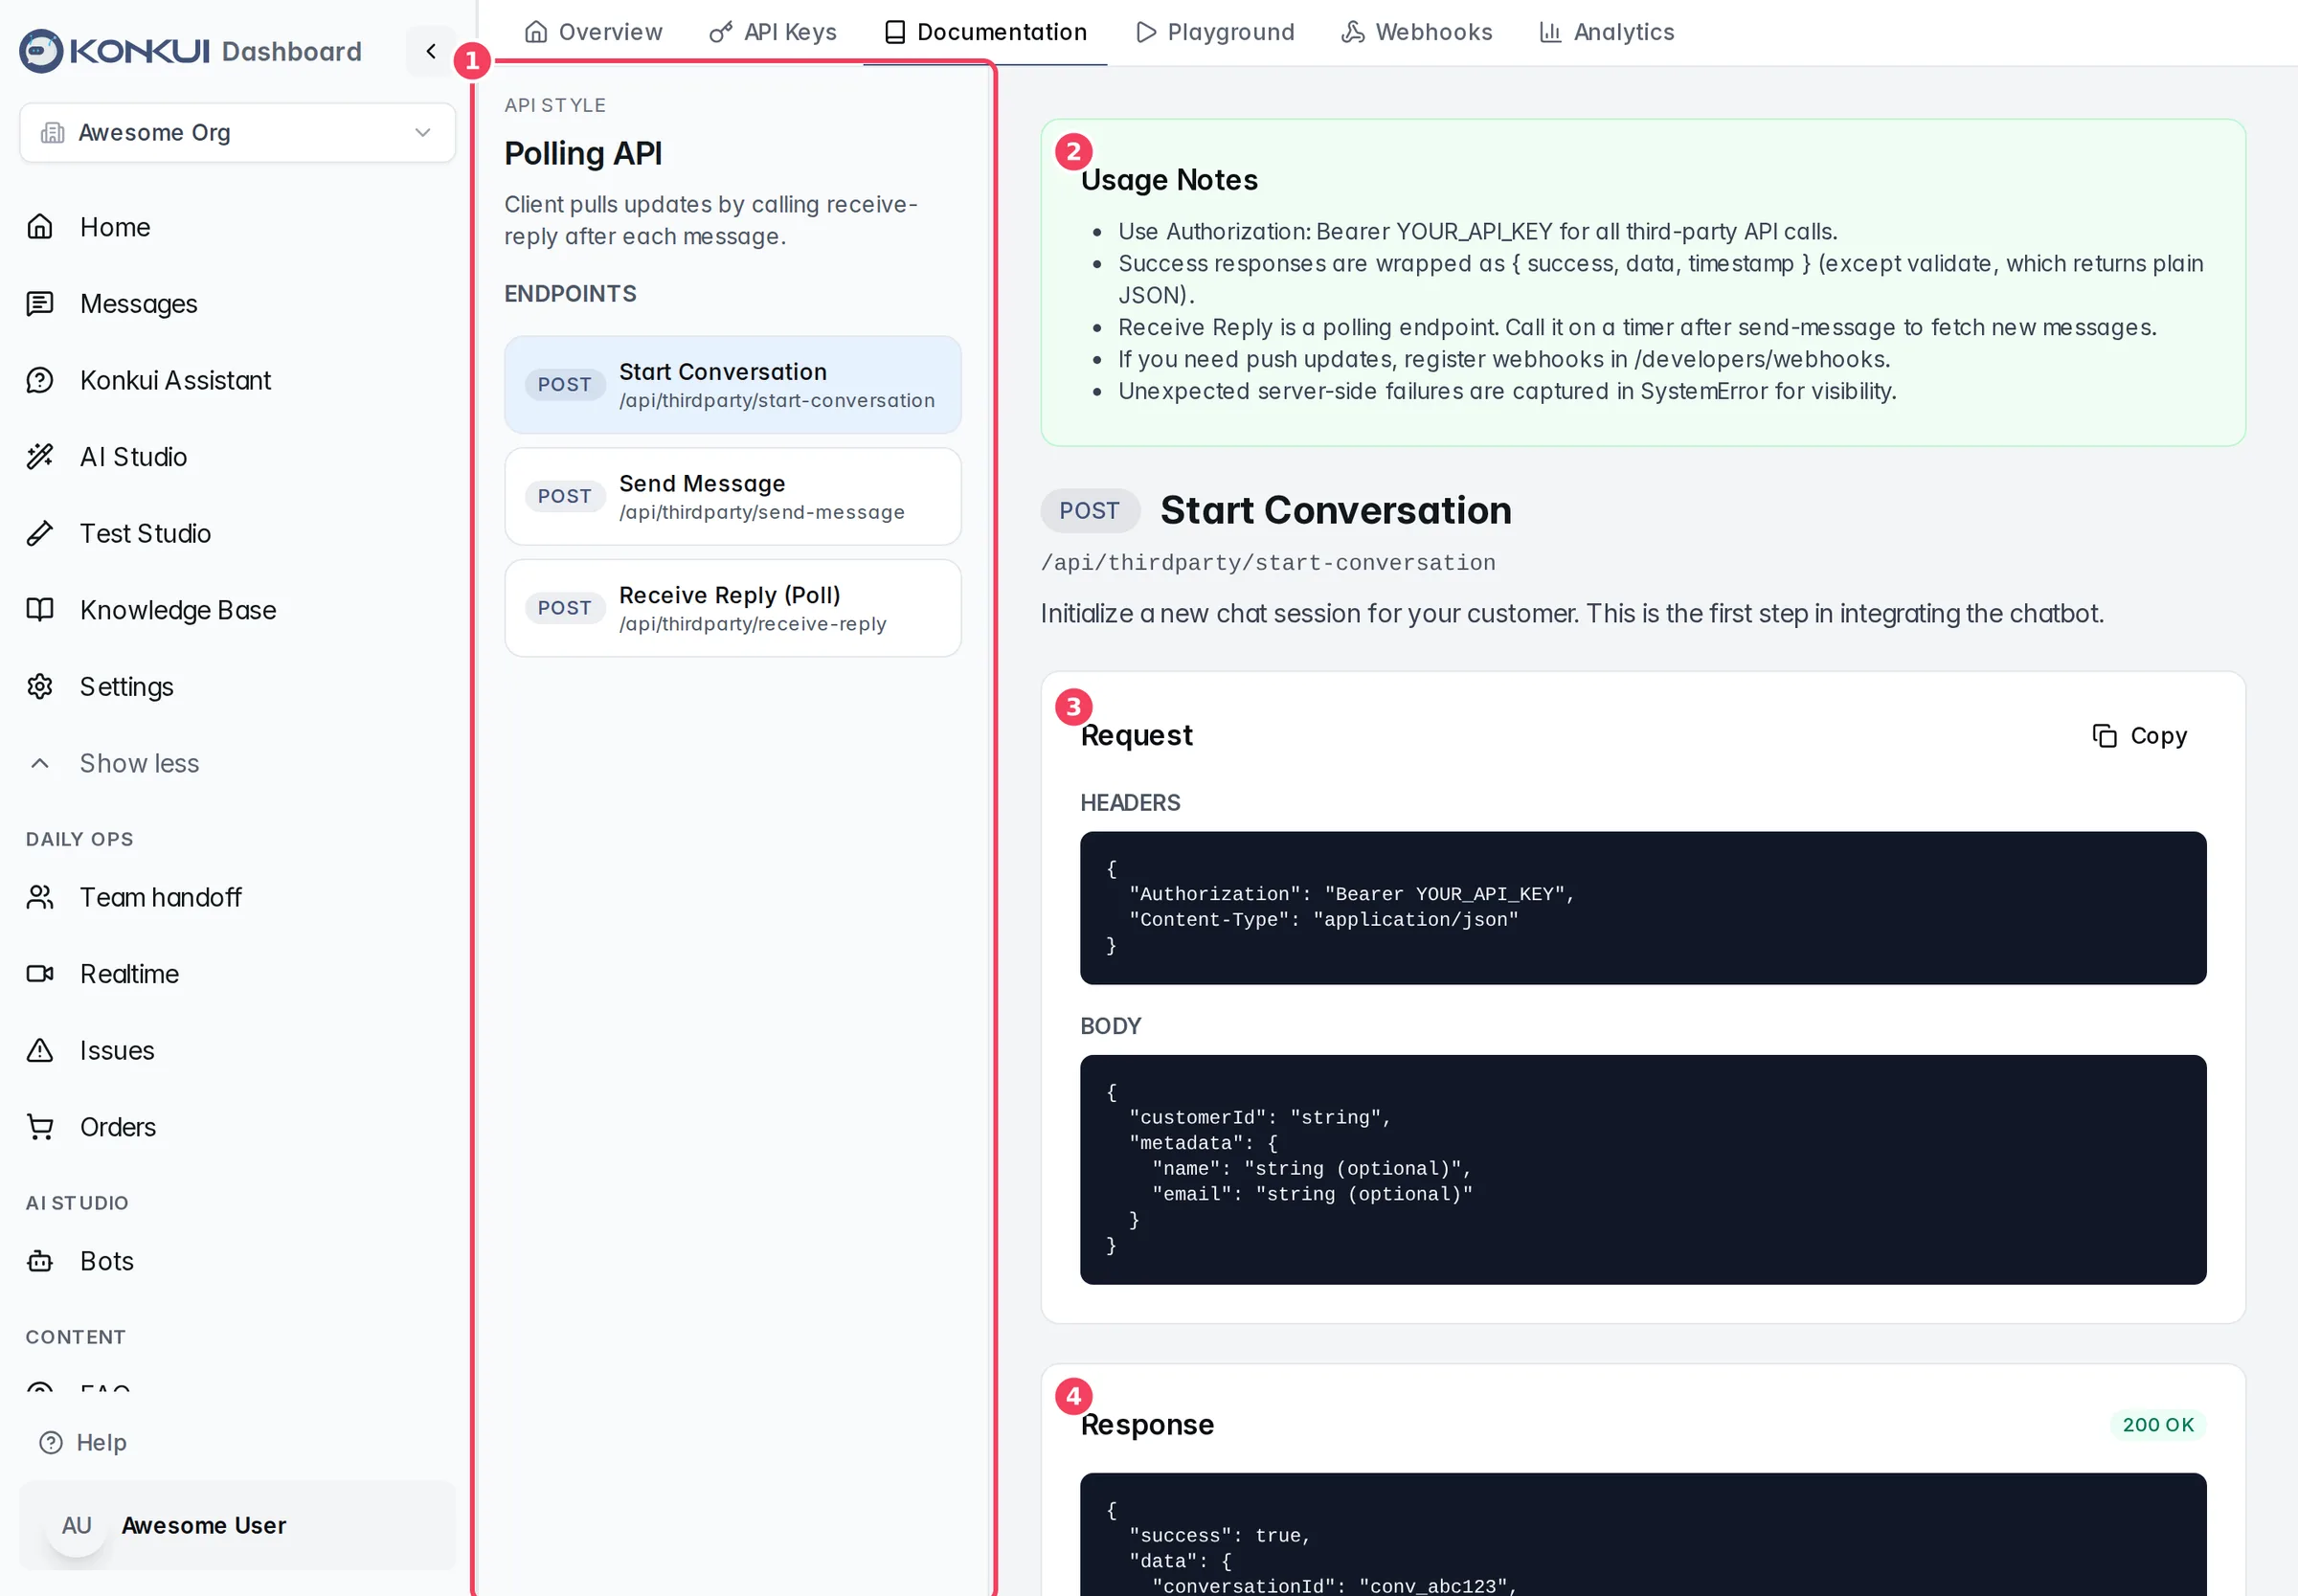
| # | Item | What it does |
|---|---|---|
| 1 | ENDPOINTS | Start Conversation, Send Message and (polling only) Receive Reply (Poll). |
| 2 | Usage Notes | Authentication and response-format rules for this API style. |
| 3 | Request | Headers and body, with Copy. |
| 4 | Response | A sample successful response. |
Playground
The Playground runs a real conversation with your bot through the API, the same way your app would, without writing code.
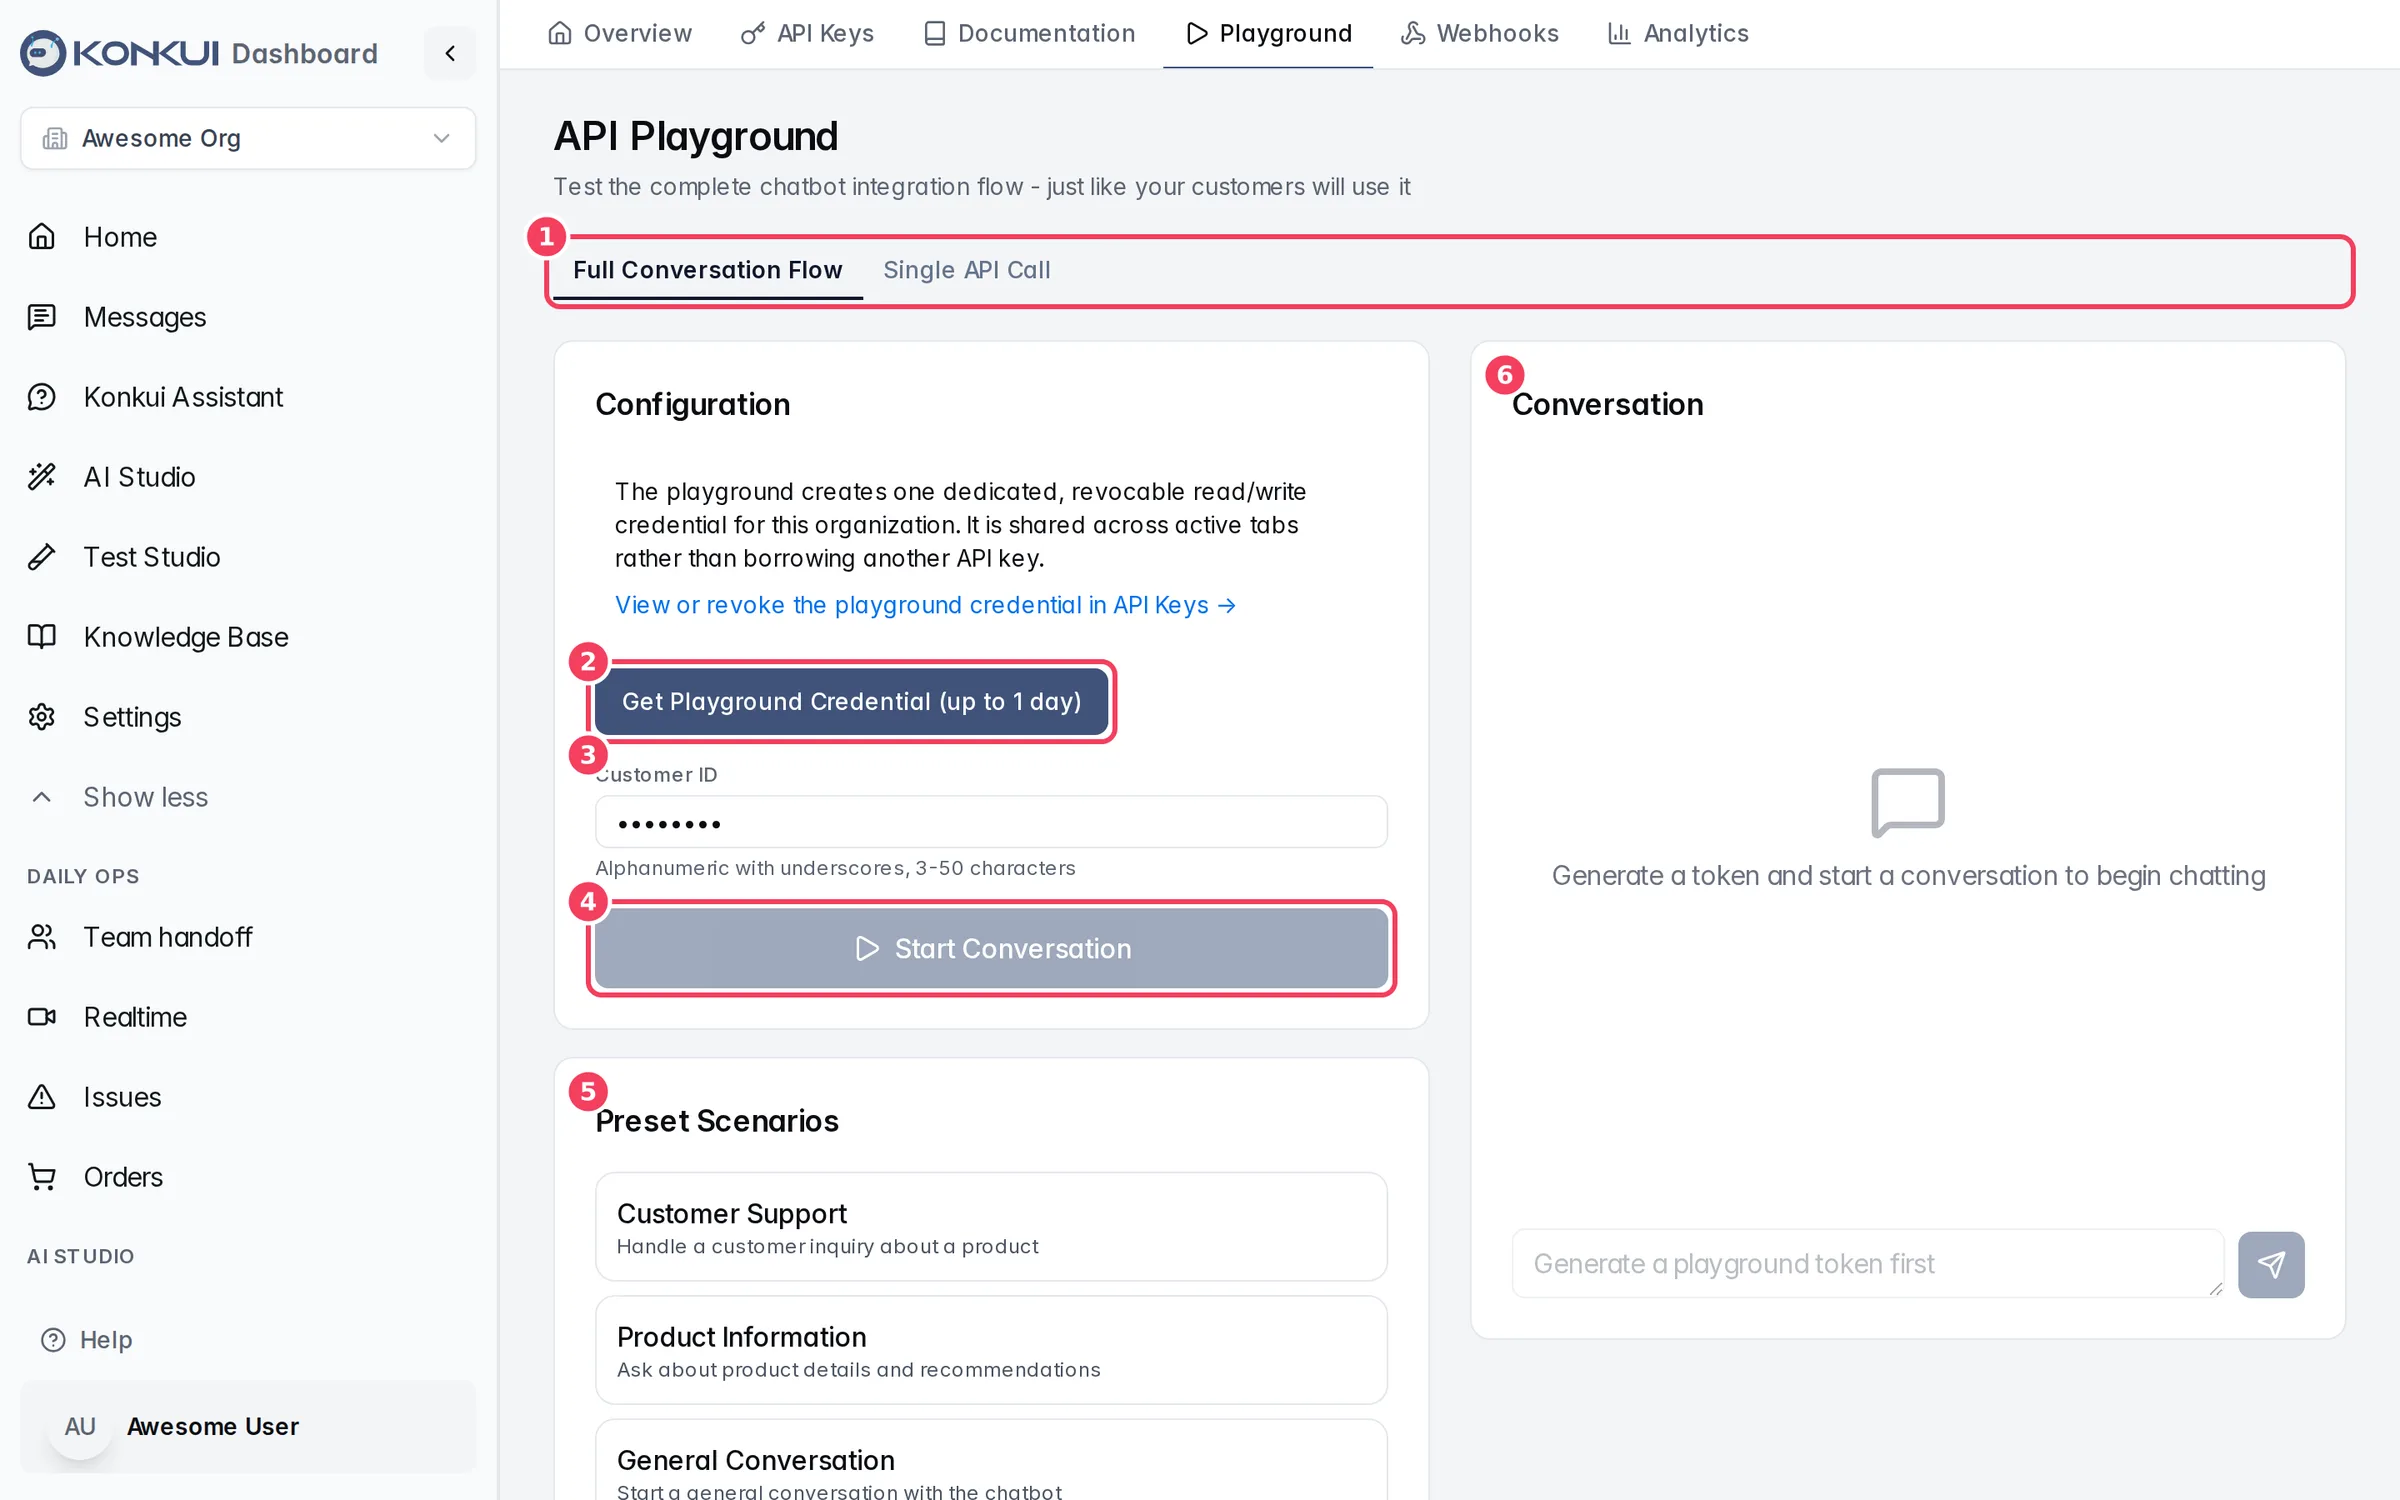
| # | Item | What it does | Notes |
|---|---|---|---|
| 1 | Mode tabs | Full Conversation Flow runs start + send in a chat view. Single API Call is an older, simpler mode. | |
| 2 | Get Playground Credential (up to 1 day) | Creates (or reuses) one dedicated read/write credential for the Playground. | It appears in API Keys, where you can revoke it. A timer shows when it expires. |
| 3 | Customer ID | The customer the test conversation belongs to. | Pre-filled with a test ID. Letters, numbers and underscores, 3–50 characters. |
| 4 | Start Conversation | Starts a conversation and shows its Conversation ID. | Reset Conversation starts over. |
| 5 | Preset Scenarios | Pre-fills a first message (Customer Support, Product Information, General Conversation) and suggests follow-ups. | |
| 6 | Conversation | Type a message and press Enter or the send button; the bot's reply appears below. |
Webhooks
Webhooks push events to your server as they happen, so you don't have to poll.
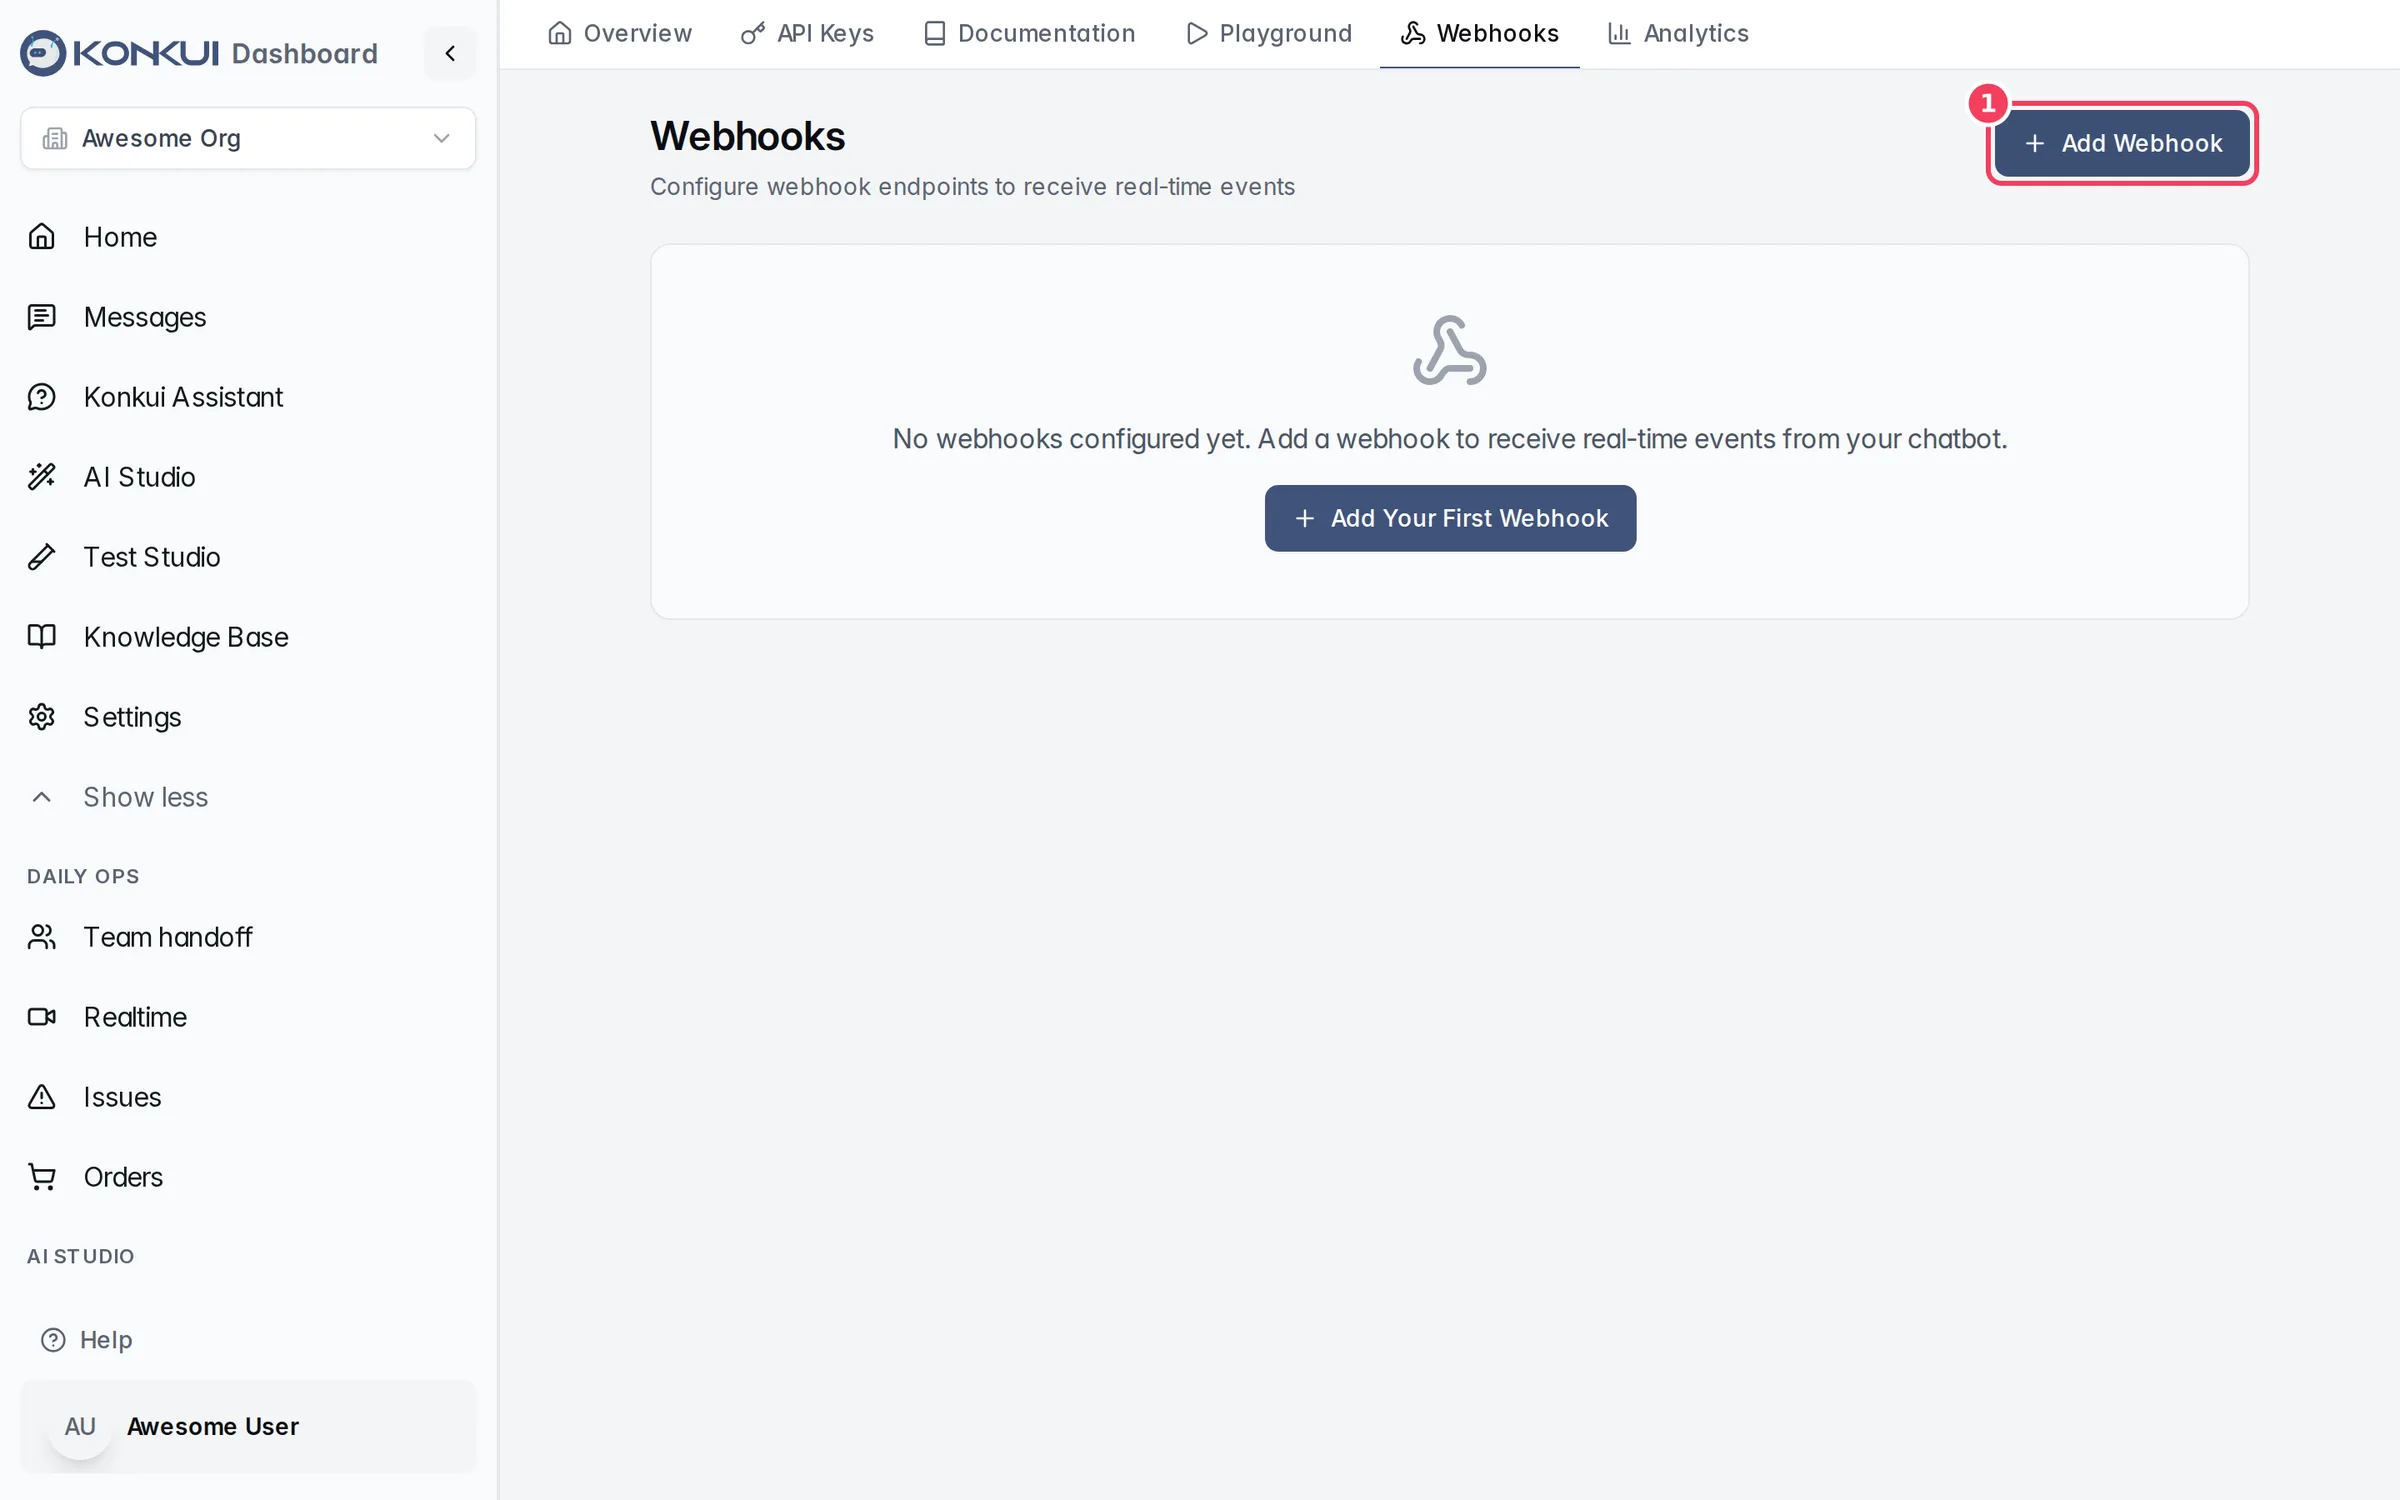
| # | Item | What it does |
|---|---|---|
| 1 | Add Webhook | Registers a new endpoint. |
Each webhook in the list shows its URL, Active/Inactive status and subscribed events, with these controls:
| Control | What it does | Notes |
|---|---|---|
| On/off switch | Pauses or resumes deliveries to this endpoint. | No events are queued while it is off. |
| Test | Sends a signed test event (test) right away and tells you the HTTP result. | |
| Delete (trash icon) | Removes the endpoint after you confirm. | |
| Deliveries | Opens Webhook Deliveries: each delivery's status (PENDING, PROCESSING, SUCCESS, FAILED), event, HTTP status, created and completed times, attempts and last error. | Retry appears on failed deliveries and queues them again. |
Add a webhook
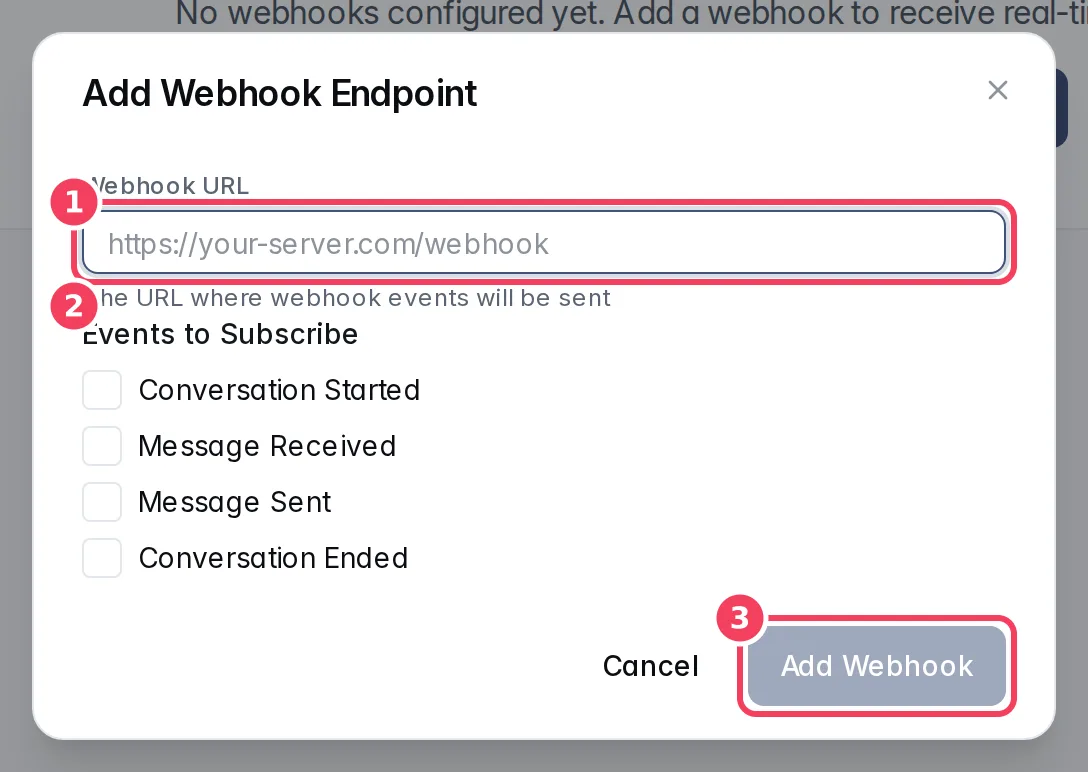
| # | Item | What it does |
|---|---|---|
| 1 | Webhook URL | The public URL on your server that receives events. Use HTTPS. |
| 2 | Events to Subscribe | Conversation Started, Message Received, Message Sent, Conversation Ended. Pick at least one. |
| 3 | Add Webhook | Creates the endpoint. |
After creation, a yellow Copy this webhook secret now box shows the signing secret once. Copy it to your server, then click I saved it. If you lose it, create a new endpoint; the secret is never shown again.
How deliveries work
- Each request is a JSON
POSTwith the headersX-Konkui-Event,X-Konkui-Delivery-IDandX-Konkui-Signature(an HMAC-SHA256 of the raw body using your webhook secret). Verify the signature before trusting a request. - Reply with any 2xx status to acknowledge. Other statuses, timeouts and network errors are retried automatically, up to 3 attempts in total (after about 1 minute, then 5 minutes). After that the delivery is marked FAILED and you can Retry it by hand.
- Delivery is at-least-once, so the same event can arrive twice. Use
X-Konkui-Delivery-IDto ignore duplicates. - Events are sent for conversations created through the Third-party API.
Analytics
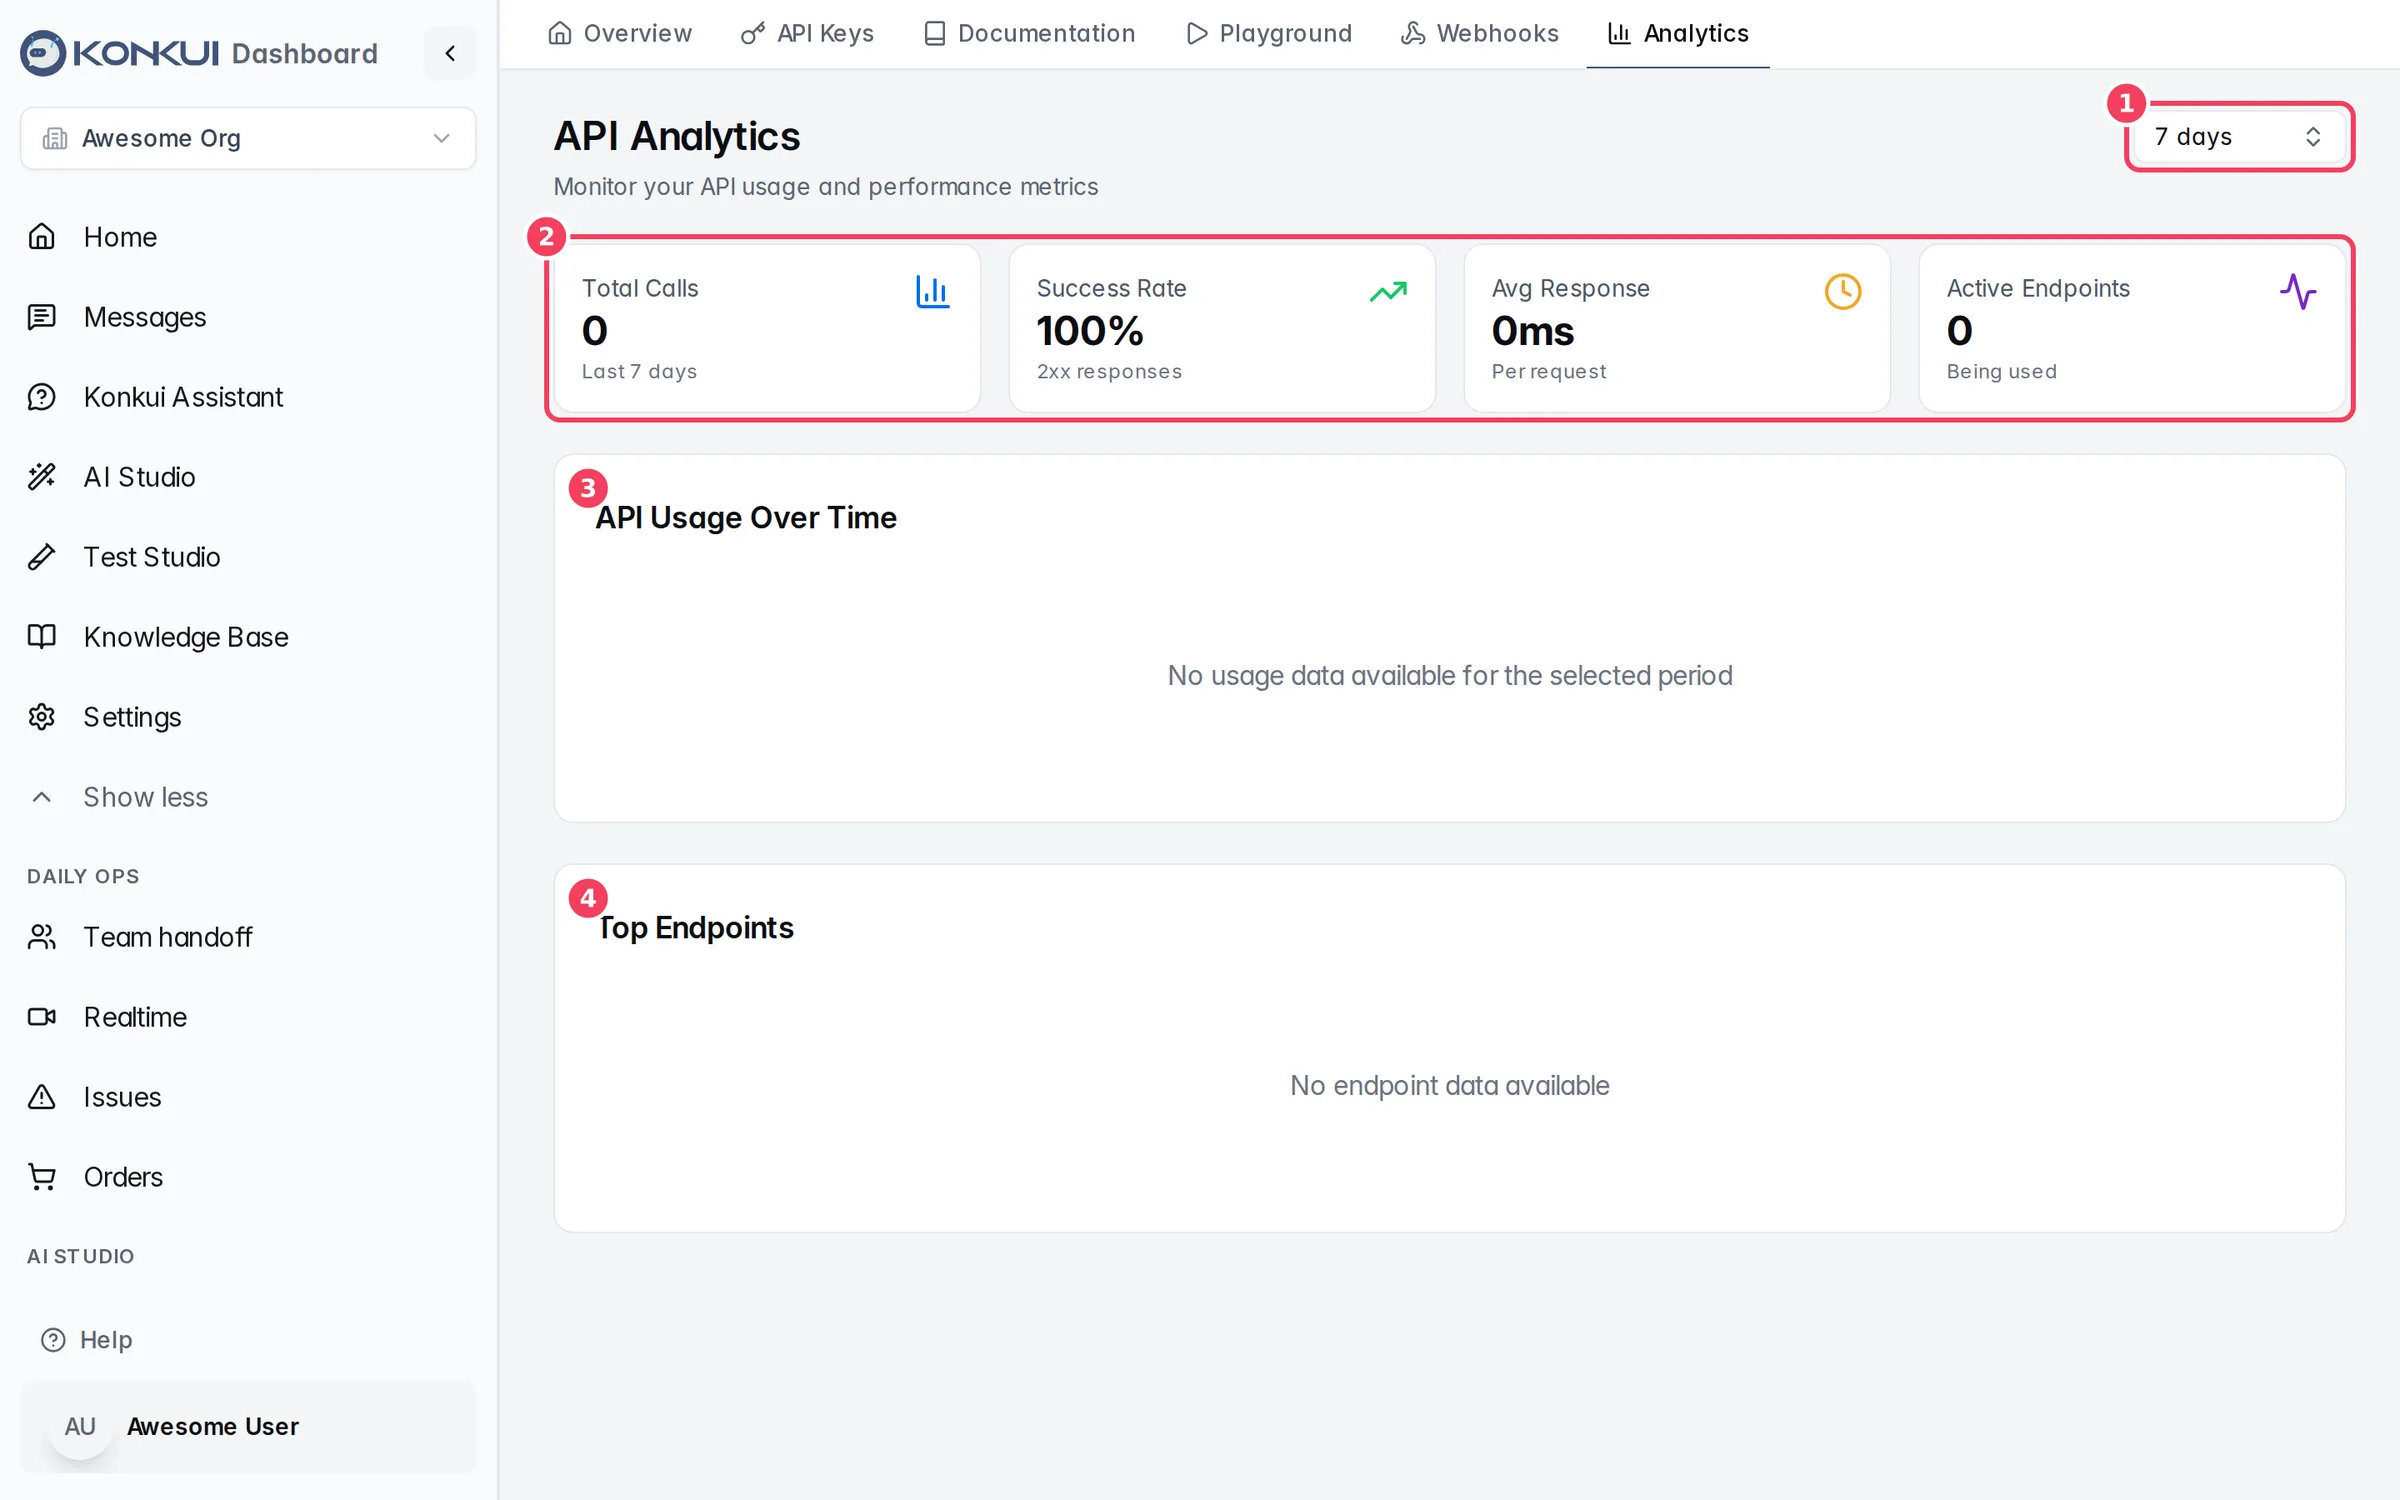
| # | Item | What it does |
|---|---|---|
| 1 | Period | 7 days, 30 days or 90 days. |
| 2 | Metrics | Total Calls, Success Rate (2xx responses), Avg Response and Active Endpoints. |
| 3 | API Usage Over Time | Calls per day for the period. |
| 4 | Top Endpoints | The most-called endpoints with call counts and average response time. |