
Browse the docs
Guides
Open in dashboardUse the Third-party API to put your Konkui bot inside your own website, app or backend. Your server starts a conversation for a customer, sends their messages, and gets the bot's replies, either by asking for them (polling) or by having Konkui push them to you (webhooks).
This guide covers the whole flow. For every field and response, use the API reference in the dashboard: Developers › Documentation.
Before you begin
- You need to be an admin. Only workspace admins can open Developers.
- Your bot should already answer well in Test Studio. See Test and improve your bot.
- Make your API calls from a server. API keys are secrets and must never be shipped in browser code or a mobile app.
1. Try it in the Playground (optional)
Before writing code, open Developers › Playground to run a real conversation through the API.
- Click Get Playground Credential (up to 1 day).
- Keep the suggested Customer ID or enter your own.
- Click Start Conversation, optionally pick a Preset Scenario, then type a message and send it.
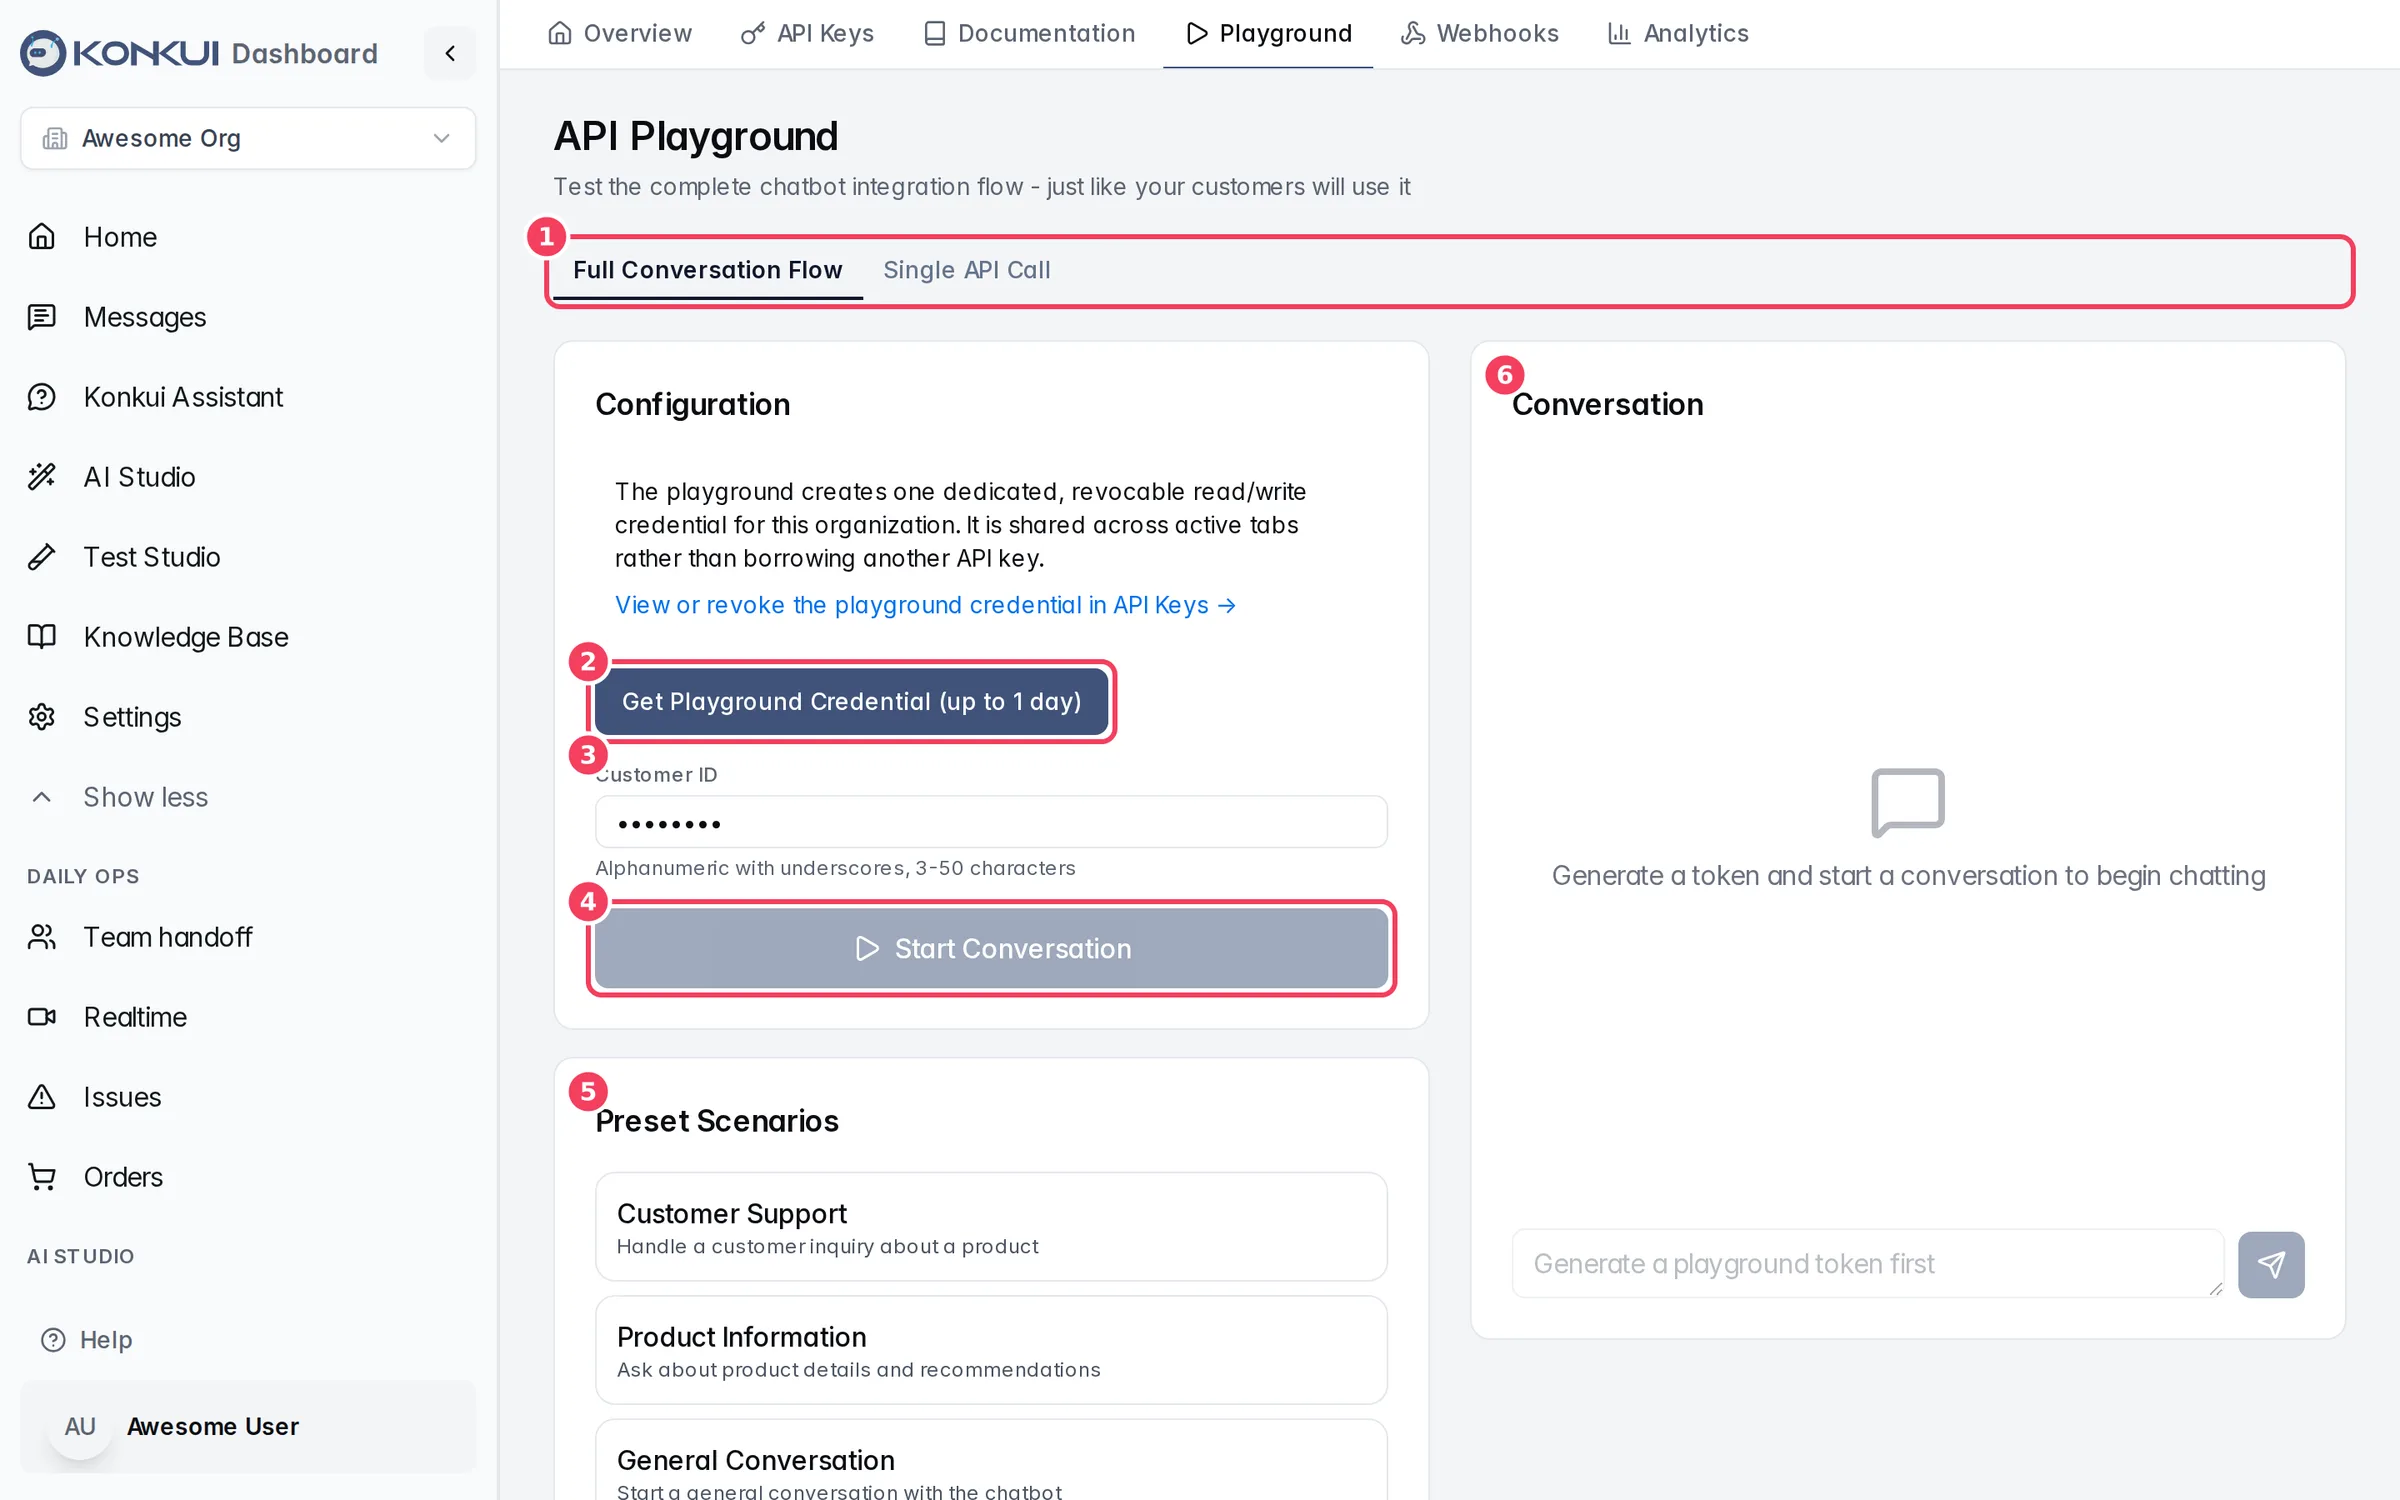
| # | Item |
|---|---|
| 1 | Mode tabs |
| 2 | Get Playground Credential (up to 1 day) |
| 3 | Customer ID |
| 4 | Start Conversation |
| 5 | Preset Scenarios |
| 6 | Conversation |
The Playground credential appears in API Keys; revoke it there when you're done.
2. Create an API key
- Open Developers › API Keys and click Create API Key.
- Enter a Key Name you'll recognise, such as "Production Key", and click Create Key.
- Copy the key from the API Key Created Successfully! box and store it in your server's secret store. It is shown only once.
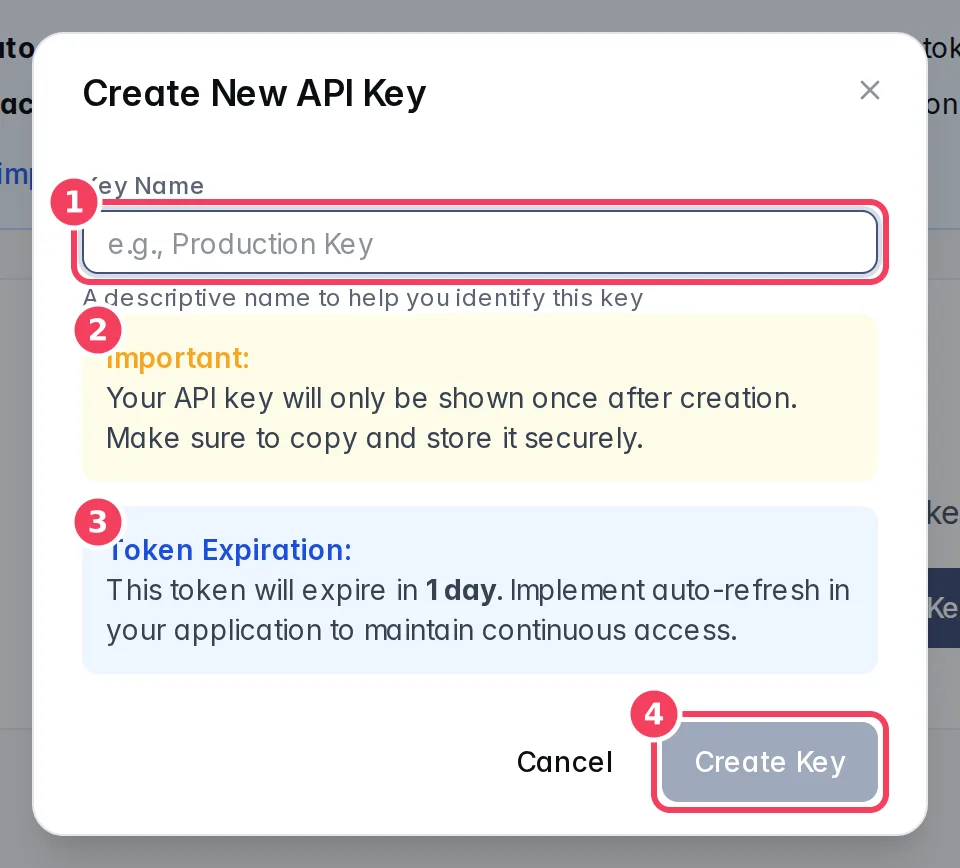
| # | Item |
|---|---|
| 1 | Key Name |
| 2 | Important: the key is shown only once |
| 3 | Token Expiration: 1 day, refresh automatically |
| 4 | Create Key |
Keys created here can read and write conversations. If a key leaks, revoke it from the ⋮ menu with Revoke Key and create a new one.
3. Call the API
Every request goes to https://konkui.com/api/thirdparty/… with your key as a bearer token:
curl -X POST "https://konkui.com/api/thirdparty/validate" \
  -H "Authorization: Bearer $KONKUI_API_KEY"
validate returns { "valid": true, "orgId": "…" }, which makes it a good start-up check.
Start a conversation for a customer. Use your own stable customer ID, and save the conversationId you get back:
curl -X POST "https://konkui.com/api/thirdparty/start-conversation" \
  -H "Authorization: Bearer $KONKUI_API_KEY" \
  -H "Content-Type: application/json" \
  --data '{ "customerId": "customer_123", "metadata": { "source": "mobile-app" } }'
Send the customer's message. The response includes the bot's reply and any recommended products:
curl -X POST "https://konkui.com/api/thirdparty/send-message" \
  -H "Authorization: Bearer $KONKUI_API_KEY" \
  -H "Content-Type: application/json" \
  --data '{ "conversationId": "YOUR_CONVERSATION_ID", "message": "I need help with my order", "messageType": "TEXT" }'
Successful responses are wrapped as { "success": true, "data": …, "timestamp": … }. Errors return success: false with an error.message.
| Status | Meaning | What to do |
|---|---|---|
400 | The request data is invalid. | Fix the request. |
401 | The key is missing, invalid, expired or revoked. | Refresh the token, or create a new key. |
403 | The key lacks permission for this endpoint, or the workspace is unavailable. | Check the key and your workspace. |
404 | The conversation isn't in this workspace. | Check the conversation ID. |
500 | Server error. | Retry with backoff. |
4. Get replies: polling or webhooks
Pick the model that fits your app. The Documentation tab has a full reference for each.
Polling
Call receive-reply after sending a message, or on a timer, to fetch new messages in order. Pass afterTimestamp to get only messages newer than the last one you saw, and limit to control batch size:
curl -X POST "https://konkui.com/api/thirdparty/receive-reply" \
  -H "Authorization: Bearer $KONKUI_API_KEY" \
  -H "Content-Type: application/json" \
  --data '{ "conversationId": "YOUR_CONVERSATION_ID", "limit": 20, "afterTimestamp": "2026-10-06T10:00:00.000Z" }'
Polling is simplest when your app already waits for the reply to each message.
Webhooks
With webhooks, Konkui pushes events to your server as they happen.
- Open Developers › Webhooks and click Add Webhook.
- Enter your Webhook URL (use HTTPS) and tick the Events to Subscribe: Conversation Started, Message Received, Message Sent.
- Click Add Webhook, then copy the secret from Copy this webhook secret now into your server and click I saved it. The secret is shown only once.
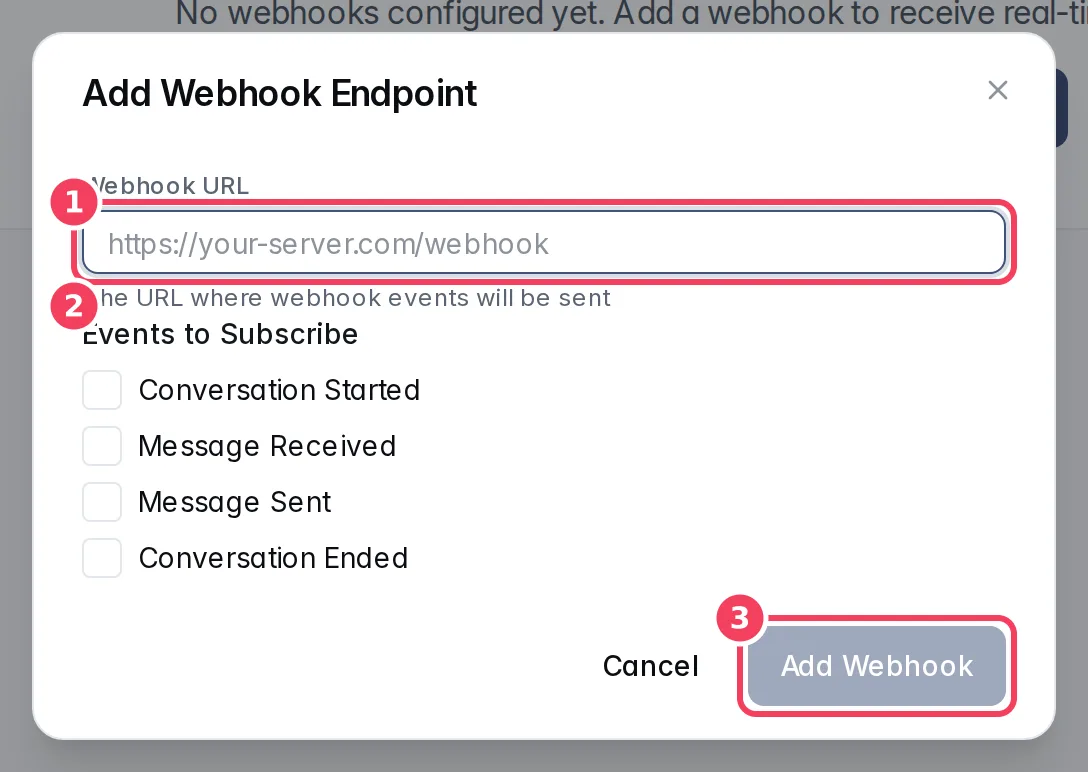
| # | Item |
|---|---|
| 1 | Webhook URL |
| 2 | Events to Subscribe |
| 3 | Add Webhook |
Each delivery is a JSON POST with event, timestamp, organizationId and data, plus these headers:
| Header | Use it to |
|---|---|
X-Konkui-Signature | Verify the request: it is the HMAC-SHA256 of the raw body, using your webhook secret, in hex. |
X-Konkui-Event | Route the event. |
X-Konkui-Delivery-ID | Ignore duplicates. Deliveries are at-least-once, so the same event can arrive twice. |
Return a 2xx status quickly. Anything else is retried automatically (up to 3 attempts: after about 1 minute, then 5 minutes).
Test and troubleshoot a webhook
- Click Test on the webhook to send a signed
testevent immediately. A message tells you the HTTP status your server returned. - Click Deliveries to see recent deliveries with their status, HTTP code, attempts and last error. Click Retry on a FAILED delivery once your server is fixed.
- Use the switch on the webhook to pause deliveries while you work on your server.
5. Keep tokens fresh
API tokens expire 1 day after they are issued. Before that, exchange the current token for a new one:
curl -X POST "https://konkui.com/api/thirdparty/refresh" \
  -H "Content-Type: application/json" \
  --data "{\"token\":\"$KONKUI_API_KEY\"}"
The response contains a new token, expiresIn and expiresAt. Save the new token, then stop using the old one: it stops working once the refresh succeeds.
- Refresh a little before expiry (for example 30 seconds early) and make sure only one refresh runs at a time.
- An expired token can still be refreshed within 1 hour of expiring. After that, create a new key.
- The Token refresh guide in Developers › Documentation has ready-made code for automatic refresh.
6. Check it worked
- Developers › Overview shows API Calls Today and Success Rate.
- Developers › Analytics charts calls per day and lists your top endpoints.
- Conversations started through the API count toward your plan's conversations and AI usage like any other. Track them in Settings › Usage.