
Browse the docs
Guides
Open in dashboardThis guide walks you through paying for Konkui: picking a plan, paying by card or PromptPay, putting your company details on tax invoices, downloading invoices and receipts, keeping pay-per-use charges under control, and cancelling.
Before you begin
- You need to be an admin. Everyone in the workspace can view Billing, but only admins can upgrade, cancel, change the spend cap or save billing details. See Team and roles.
- Compare plans and current prices on the pricing page. The same plans are listed in the dashboard.
1. Add your billing details first
Do this before you pay, so your first invoice already carries your company details.
- Open Settings › Billing and scroll to Billing details.
- Click Add billing details.
- Fill in Company name (Thai) and Address (Thai) (both required), and your Tax ID (13 digits). English name and address, phone and email are optional.
- Click Save.
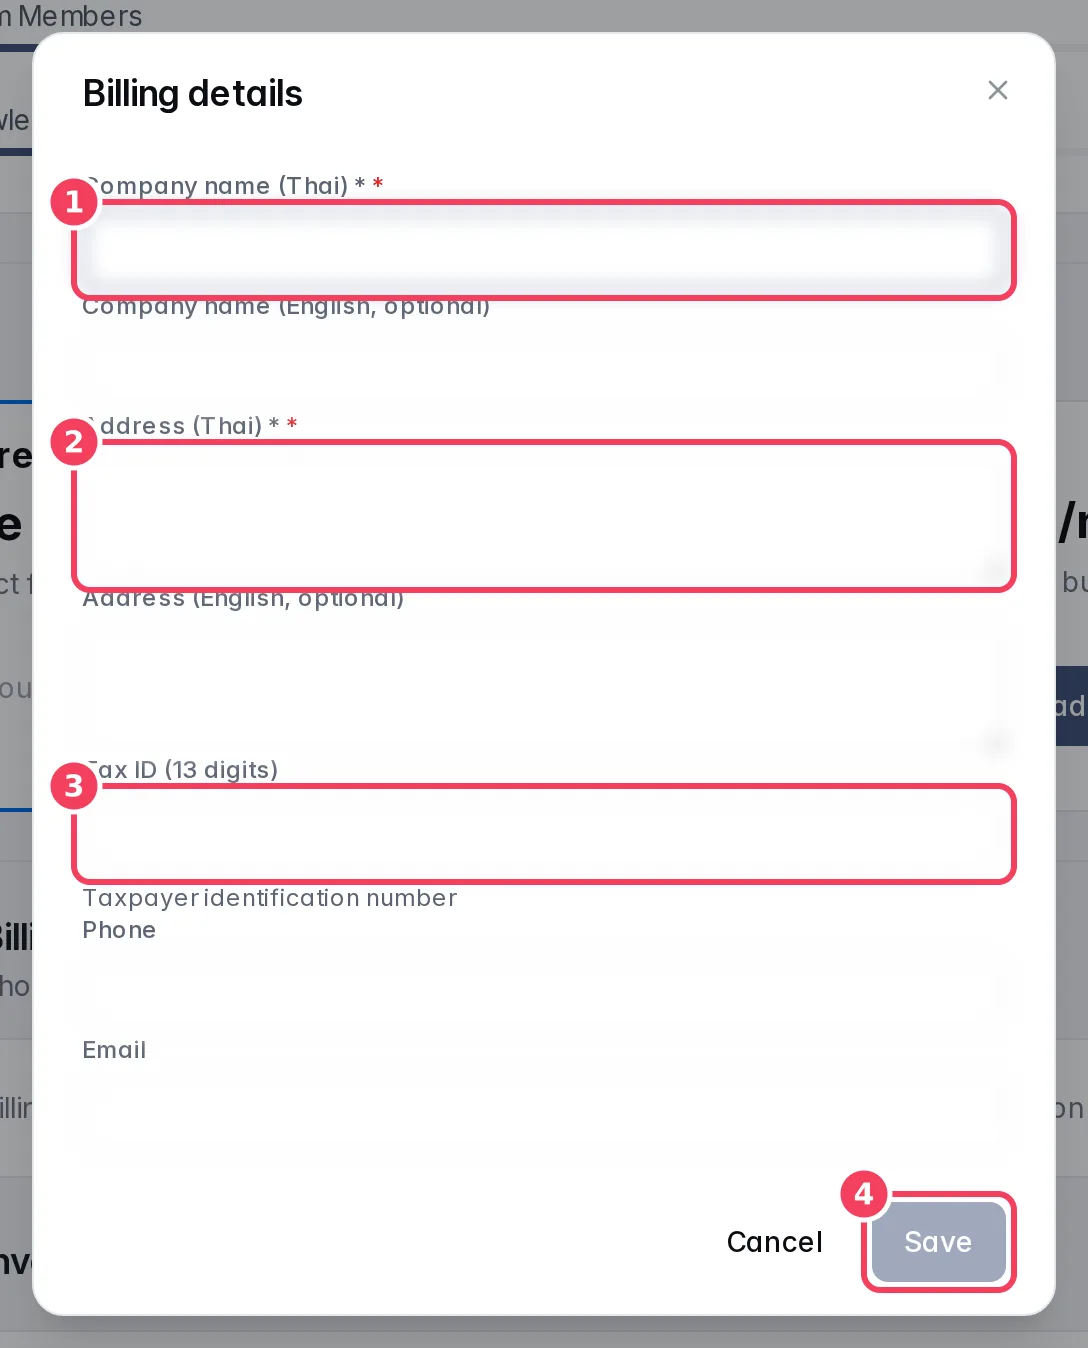
| # | Field |
|---|---|
| 1 | Company name (Thai) |
| 2 | Address (Thai) |
| 3 | Tax ID (13 digits) |
| 4 | Save |
These details appear as the payer on every invoice and receipt PDF you download. Click Edit to change them later.
2. Choose a plan
- On the same page, find Plans. Each card shows the monthly price, the rate for extra conversations (if the plan has one), and what's included. Your current plan is marked Current.
- Click Upgrade to … on the plan you want.
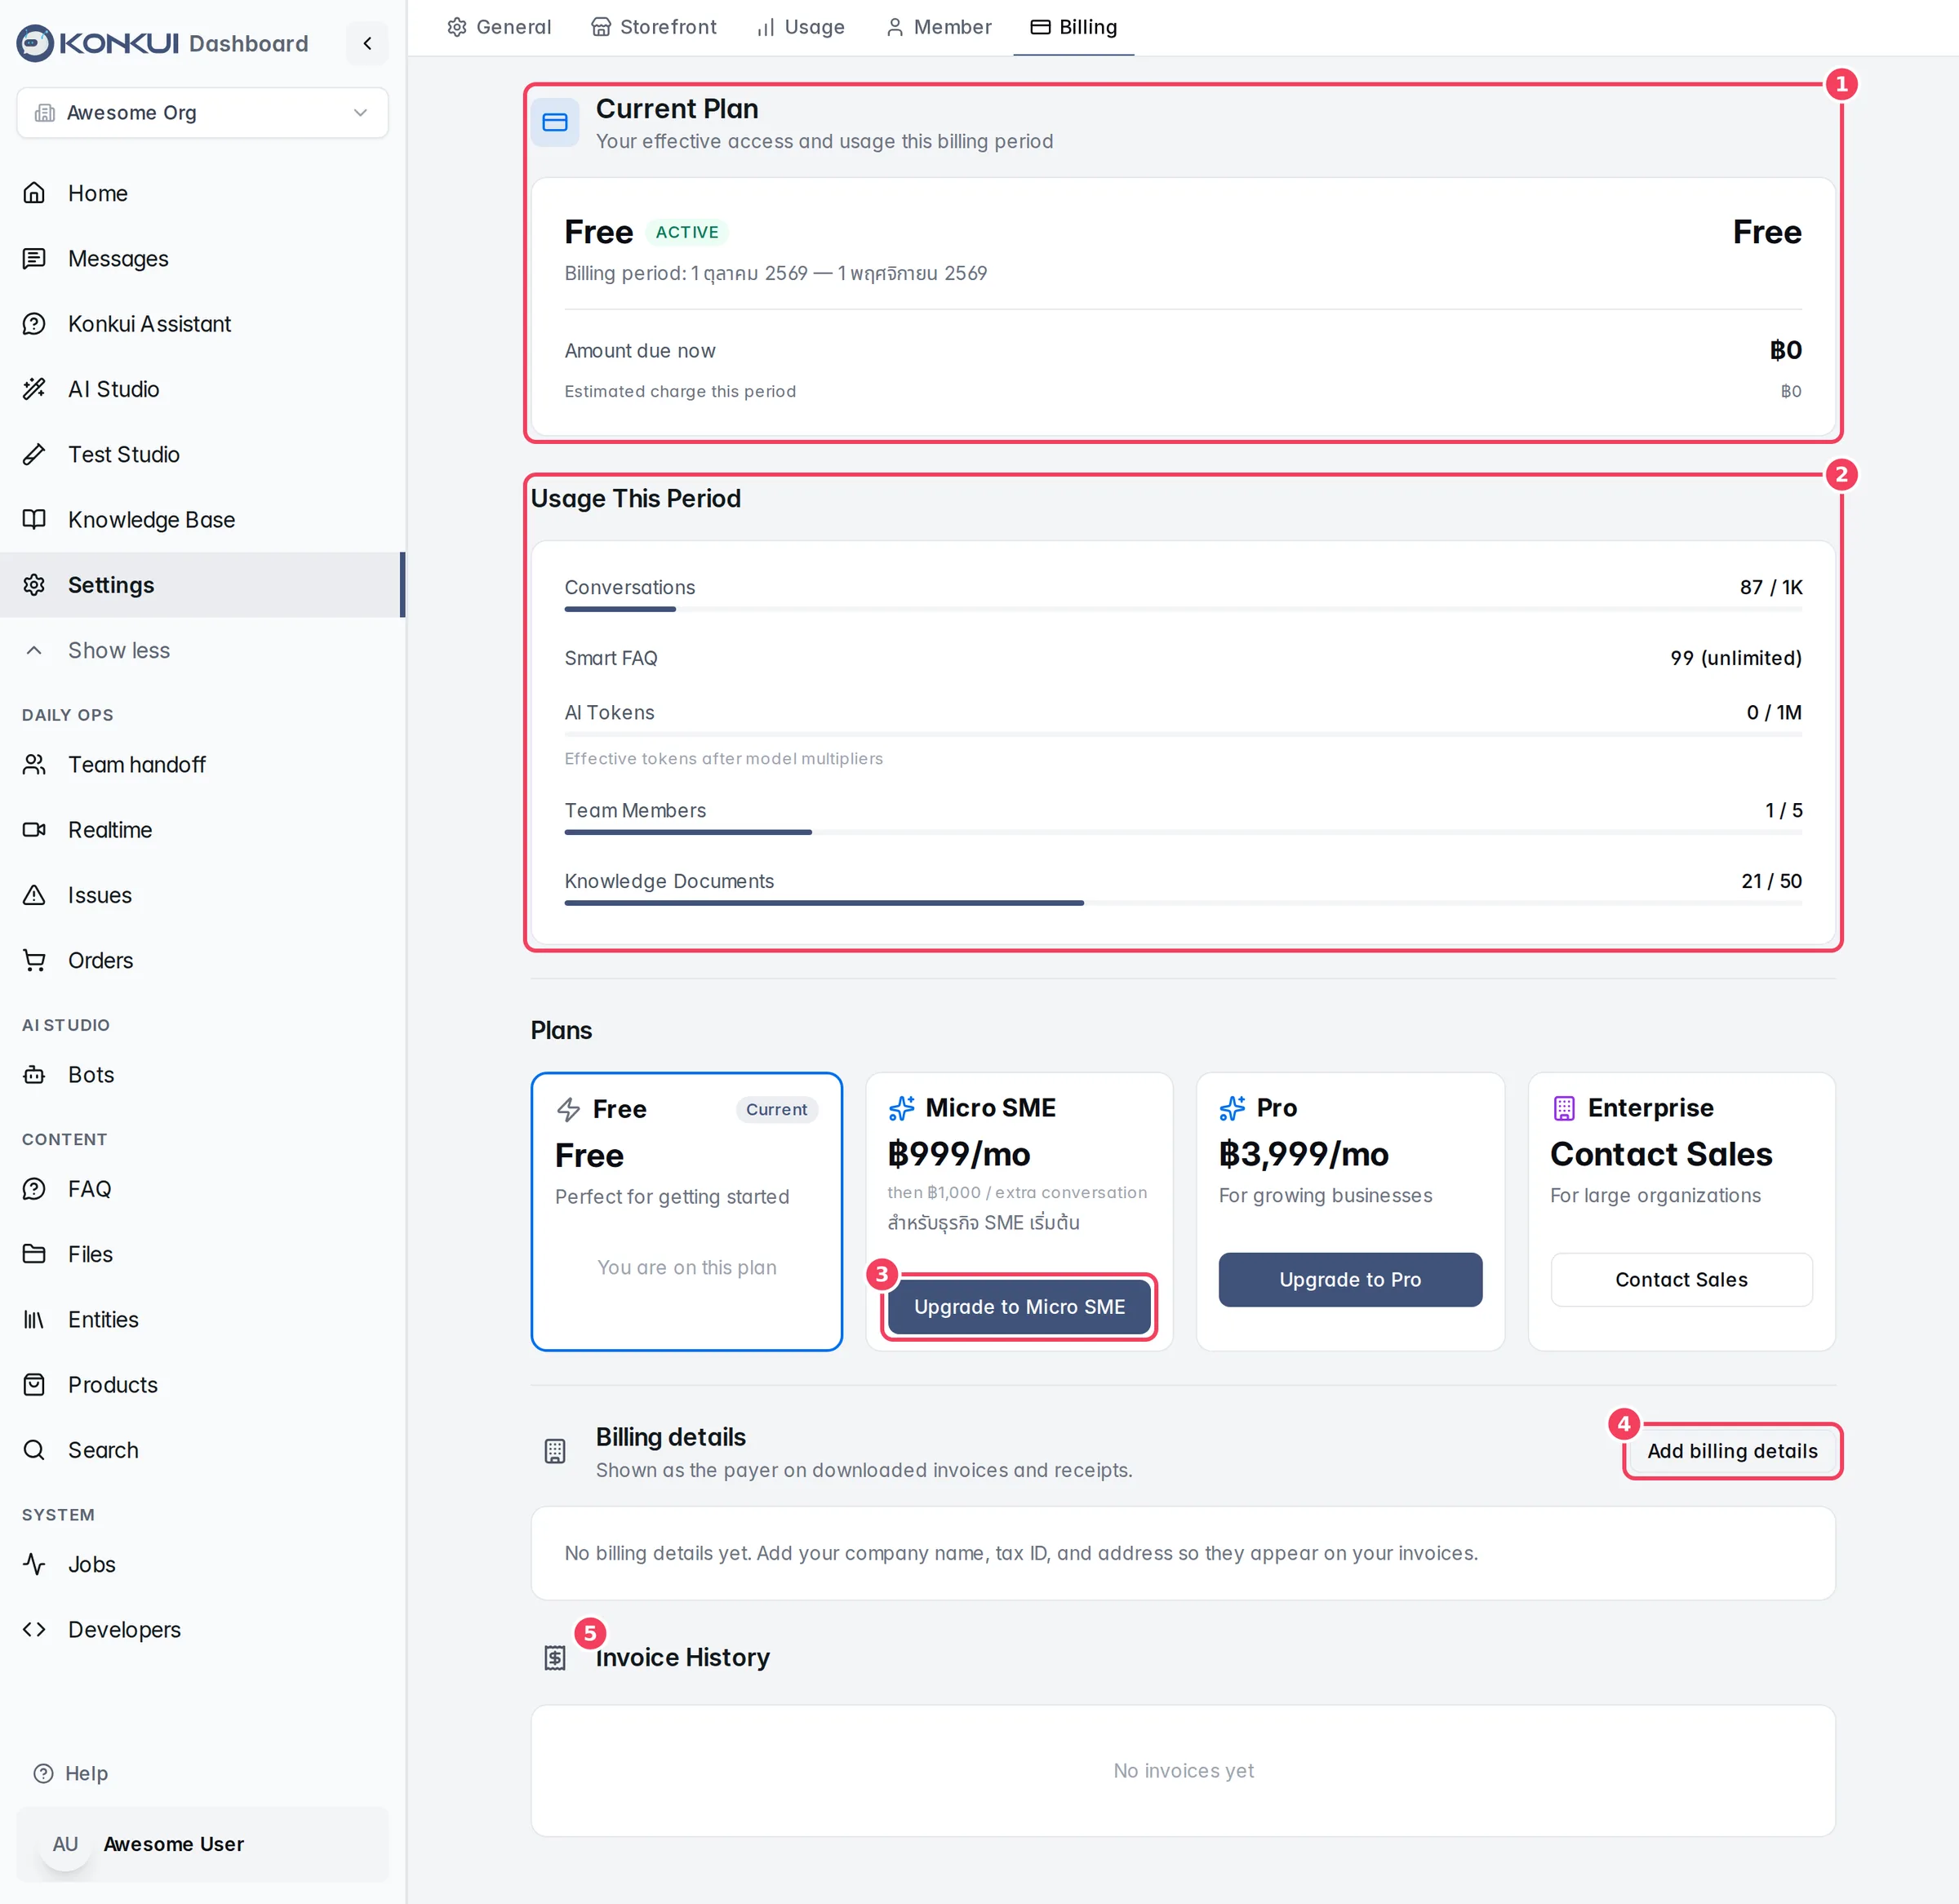
| # | Item | What it does |
|---|---|---|
| 1 | Current Plan | Your plan, billing period and amount due. |
| 2 | Usage This Period | How close you are to each plan limit. |
| 3 | Upgrade to … | Starts the upgrade for that plan. |
| 4 | Add billing details | Your company details for invoices (step 1). |
| 5 | Invoice History | Your invoices and receipts (step 5). |
For a plan marked Contact Sales, click the button to email the sales team. To move to a smaller plan, cancel your current plan (step 6); the card shows Downgrade via cancellation.
3. Pay by card or PromptPay
The Choose how to pay dialog opens.
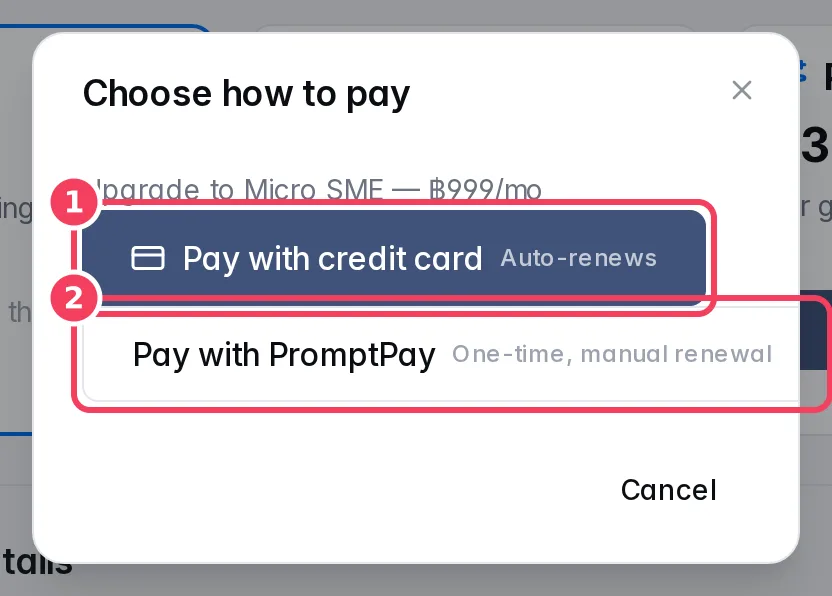
| # | Option | Best for |
|---|---|---|
| 1 | Pay with credit card | Hands-off billing. You pay on a secure card checkout page and come back to Billing. The plan auto-renews every period. |
| 2 | Pay with PromptPay | Paying from a Thai bank app. A QR code appears with the amount and a countdown; scan it before it expires. PromptPay is one-time, so you renew manually each period. |
With PromptPay, keep the dialog open after paying. It checks every few seconds and shows Payment Successful! once the payment is confirmed; your plan is active straight away.
4. Check it worked
- Current Plan shows the new plan with status ACTIVE and the new billing period.
- Invoice History lists the invoice with status PAID.
- Usage This Period shows your new limits.
5. Download invoices and receipts
In Invoice History, each row has:
- Invoice — the invoice PDF (opens in a new tab).
- Receipt — the receipt PDF. It appears once the invoice is paid.
Amount due now under Current Plan adds up any invoices that are still unpaid.
Keep pay-per-use charges under control
Some plans include a set number of conversations and AI tokens, then charge for usage beyond that. The extra charge is added to your next invoice. Estimated charge this period under Current Plan shows the plan fee plus pay-per-use so far.
To put a ceiling on it:
- Under Pay-per-use overage, find Monthly overage spend cap.
- Enter an amount in Cap (THB) and click Save cap.
| You enter | What happens |
|---|---|
| Nothing (blank) | No cap: overage is charged in full. This is the default. |
| An amount | Overage is charged up to that amount. When it's reached, new conversations and AI responses pause until the next period or until you raise the cap. |
0 | You never pay overage. AI work stops when you reach your included quota. |
Click Remove cap to go back to no cap. Workspace admins are emailed when usage is stopped by a cap. To see where your usage goes, read Read your reports and usage.
6. Cancel
- Under Current Plan, click Cancel subscription (below the price).
- Read the dialog and click Cancel Subscription to confirm, or Keep Plan to back out.
Your plan stays active until the end of the current billing period; Current Plan shows Cancelled — active until …. A card subscription stops renewing. A PromptPay subscription moves to the Free plan at the end of the period.